統合フェーズ 6: NavData 生成 API を使用する
ほとんどのプロジェクトでは、生成した NavData を直接ユーザ独自のレベルのデザイン ツールやゲーム エディタに統合したくなると思います。この統合を行うことにより、アーティストまたはデザイナが特定のレベルに変更を加えるたびに最新の NavData が常に自動生成され、ビルドに取り込まれることが確実に行われるようになります。
このトピックでは、プログラムで NavData を生成するための主要な手順について説明します。
プロジェクトをセットアップする
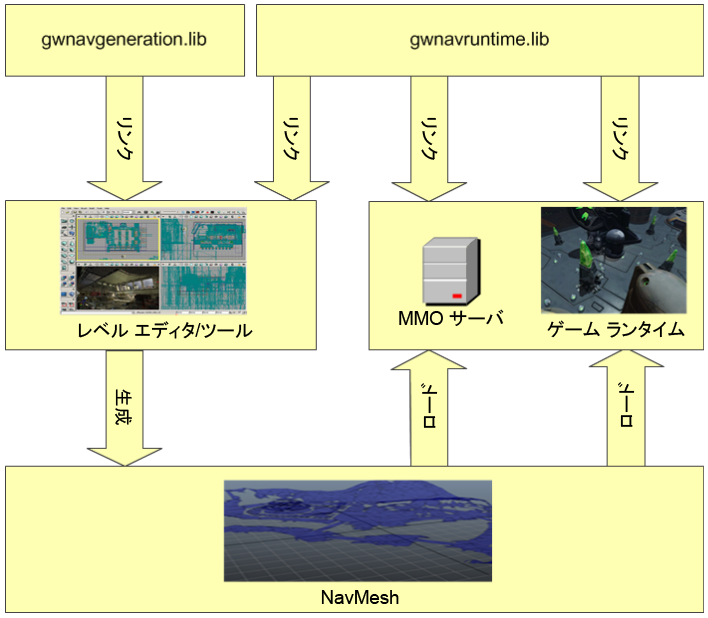
「統合フェーズ 1a: インクルード、ライブラリ、プリプロセッサ定義」のランタイム ゲームに対する手順を実行します。また、gwnavruntime と同じディレクトリ内に保存されている gwnavgeneration ライブラリにリンクする必要があります。
次の図に示すように、これらのライブラリをレベル エディタとゲームのランタイムにリンクする必要があります。
このチュートリアルでは、生成システムに対して並列処理サービスを提供するために、DefaultGeneratorGlue クラスが使用されます。このクラスでは、複数のプロセッサ間に計算を分散させるために、Intel が提供する Threaded Building Blocks (TBB)ライブラリに依存します。Gameware Navigation のコア ライブラリ内にサードパーティの依存関係を含めないようにするために、このクラスと関連するクラスのヘッダとソースは、integration ディレクトリに保存されています。DefaultGeneratorGlue を使用するには:
- integration/gwnavgenerationglue ディレクトリの下にあるすべての .h および .cpp ファイルをプロジェクトに追加します(別の方法として、solutions ディレクトリで提供されるソリューションを使用して、これらのファイルを gwnavgenerationglue と呼ばれる小さなライブラリにコンパイルし、そのライブラリにリンクすることもできます)。
- integration ディレクトリでインクルード ファイルを検索するように、コンパイラを設定します。
- 3rd/tbb_version_date/lib サブディレクトリの下にある適切な種類のTBB ライブラリにリンクするように、リンカを設定します。
- エディタを起動したときにアクセスできるようにするために、3rd/tbb_version_date/bin サブディレクトリに保存されている TBB の .dll ファイルをデプロイする必要があります。
- Windows プラットフォームの場合、このサブフォルダのすべての .dll ファイルを使用するアプリケーションが置かれたフォルダにコピーします。
- Linux の場合、このサブフォルダを LD_LIBRARY_PATH 環境変数に追加します。
- Mac OS X の場合、このサブフォルダを DYLD_LIBRARY_PATH 環境変数に追加します。
GeneratorInputProducer を作成する
GeneratorInputProducer クラスの実装を作成する必要があります。このクラスの目的は、地形を構成するトライアングルを NavData 生成システムに提供することです。
これには、GeneratorInputProducer::Produce() という重要な仮想メソッドが含まれていて、ユーザが実装する必要があります。生成システムが地形のセクタに対して NavData を生成するたびに、このメソッドが呼び出され、処理対象のセクタの記述と、三角形を入力する ClientInputConsumer オブジェクトを渡します。GeneratorInputProducer::Produce() の実装は、入力する三角形を決定するために GeneratorSector パラメータで保持されている任意のデータを使用することができます。これには作成時にセクタに割り当てる名前や GUID も含まれます。
NavData を複数のセクタに分割する方法については、「地形のセクタ化」を参照してください。ゲームの地形全体を反映する 1 セクタの NavData を作成する場合には(初期統合などがこれに該当します)、GeneratorInputProducer::Produce() の実装で、ClientInputConsumer オブジェクトに地形メッシュのすべての三角形を入力するだけです。
#include "gwnavgeneration.h"

class MyProducer : public Kaim::GeneratorInputProducer
{

public:
    virtual KyResult Produce(
            const Kaim::GeneratorSector& sector,
            Kaim::ClientInputConsumer& inputConsumer);
};

KyResult MyProducer::Produce(
            const Kaim::GeneratorSector& /* sector */,
            Kaim::ClientInputConsumer& inputConsumer )

{
    // A sector can contain your whole level, or a part of a level that you plan
    // to stream in and out at runtime. You can set up as many sectors as you need.
    // See the section on running a generation below.

    // A NavTag is an array of blind data that you can add on each triangle.
    // You can use this data to distinguish different materials that you want to
    // take into account during your runtime path finding and path following.
    Kaim::DynamicNavTag aNavTag;
    aNavTag.m_blindDataArray.PushBack(42);


    // Set up a CoordSystem object to match the system used in your editor.
    KyFloat32 oneMeterInClientUnits = 1.0f;
    Kaim::CoordSystem::ClientAxis clientRightAxis = Kaim::CLIENT_X;
    Kaim::CoordSystem::ClientAxis clienFrontAxis = Kaim::CLIENT_Y;
    Kaim::CoordSystem::ClientAxis clientUpAxis = Kaim::CLIENT_Z;

    Kaim::CoordSystem myCoordSystem;
    myCoordSystem.Setup(
        oneMeterInClientUnits,
        clientRightAxis,
        clienFrontAxis,
        clientUpAxis );

    // For each triangle in the sector, feed it to the input consumer.
    // How you retrieve the triangles is specific to your system.
    // If you have set up a CoordSystem as shown above, you can send your
    // triangles in your own coordinate system. The conversion is done internally
    // by the generation system.
    for(KyUInt32 index=0; index < myTriangleCount; index++)
    {
        inputConsumer.ConsumeTriangle(
                        myTriangle.Vertex[0],
                        myTriangle.Vertex[1],
                        myTriangle.Vertex[2],
                        aNavTag,
                        myCoordSystem);
    }
    return KY_SUCCESS;
}
ClientInputConsumer オブジェクトには、さまざまなセクタ間で共有されるシード ポイントのリストと TagVolume のリストも含まれています。シード ポイントを生成システムに提供したり、3D ボリューム内の NavMesh にタグを付ける必要がある場合、お使いになるシード ポイントとボリュームをこれらのリストに追加することをお勧めします。詳細は、「移動可能な領域を識別する」を参照してください。
BaseSystem を設定する
ランタイム ゲームの場合と同じように、アプリケーションでも BaseSystem の初期化と終了を行う必要があります。詳細は、「統合フェーズ 1b: BaseSystem を設定する」を参照してください。
NavData を生成するために、BaseSystem を正しく初期化するための GeneratorBaseSystem クラスを使用することができます。Kaim::BaseSystem::Init(config) を呼び出す代わりに、Kaim::GeneratorBaseSystem::Init(config) を呼び出すだけです。生成処理中に Gameware Navigation は、NavData の生成にのみ役に立つデータ構造を使用します。したがって、生成のみのクラスを正しく登録するには、GeneratorBaseSystem を使用することをお勧めします。
生成を実行する
生成実行の起動に関連する主要コンポーネントは、Generator クラスと、その GeneratorInputOutput 設定クラスです。
GeneratorInputOutput オブジェクトを作成して設定パラメータを使用して設定し、NavData を生成する地形の各セクタまたはブロック向けに定義を追加します。続いて、このオブジェクトを Generator::Generate() への呼び出しで渡します。これにより、生成処理が起動します。
#include "gwnavgenerationglue/defaultgeneratorglue.h"

bool Generate()
{
    // Create an instance of your GeneratorInputProducer class.
    Kaim::Ptr<MyProducer> producer = *KY_NEW MyProducer;

    // Create an instance of the DefaultGeneratorGlue.
    KyGlue::DefaultGeneratorGlue glue;

    // Set up a Generator to use your producer.
    Kaim::Generator generator(producer, &glue);

    // Set the output directory within which the .NavData and other output files
    // are created. You must use the same absolute root directory every time
    // you create a Generator, but you might set up a different relative directory for
    // each different level. This keeps all of your NavData easily accessible during
    // visual debugging.
    generator.SetOutputDirectory("c:/MyGame/NavData", "MyTestLevel");

    // Create a GeneratorInputOutput
    Kaim::GeneratorInputOutput generatorInputOutput;

    // Alternatively, you can create a GeneratorInputOutput by loading it from a
    // .GenIO file created during a previous generation run. This retains all
    // settings from the last run. You can also explicitly save your GeneratorInputOutput
    // object at any time by calling Kaim::GeneratorInputOutput::Save().


    // Use the Kaim::GeneratorParameters and Kaim::GeneratorAdvancedParameters
    // classes that are accessible through generatorInputOutput.m_params and
    // generatorInputOutput.m_params.m_advancedParameters to configure settings
    // such as, the dimensions and movemement capabilities of your characters.
    generatorInputOutput.m_params.m_entityRadius = 0.8f;
    generatorInputOutput.m_params.m_advancedParameters.m_navTagMinPixelArea = 4;

    // Use the Kaim::GeneratorRunOptions class that is accessible through
    // generatorInputOutput.m_runOptions to configure the operation of the
    // generation process itself.
    generatorInputOutput.m_runOptions. m_doMultiCore = true;

    // Add a sector.
    // It is recommended to create a unique GUID for each sector and
    // even to save it along with your own level definition. This ensures that you
    // always generate with the same GUID for a given level or block of terrain.
    // If you want to generate a random GUID, you can use the
    // KyGlue::DefaultGuidGeneratorInterface class.
    Kaim::Ptr<Kaim::GeneratorSector> sector = *KY_NEW Kaim::GeneratorSector(
            Kaim::KyGuid("AAAAAAAA-AAAA-AAAA-AAAA-AAAAAAAAAAAA"),
            "MyGameLevel");

    generatorInputOutput.AddSector(sector);


    // Run a generation using the configuration we have set up.
    if (Kaim::Result::Fail(generator.Generate(generatorInputOutput)))
    {
        return false;
    }
    return true;
}
生成システムはセクタごとに、Navigation Lab と同じ出力ファイル セットを提供します。これらのファイルは、Generator 用に設定したルート ディレクトリの下のサブディレクトリに格納されます。サブディレクトリには、GeneratorSectorConfig のセクタ用に設定した名前に従って名前が付けられています。ゲームに含めるために、ここから .NavData ファイルを取得できます。
出力ファイルを使用する代わりに、Raw データ バッファとして NavData を取得することもできます。Raw データ バッファを対象レベル用の他のデータと一緒にパッケージ化して、ランタイム ゲーム内のメモリにデータを入れ込んだり、取り出したりするストリーミング処理を簡略にすることができます。詳細は、「統合フェーズ 6a: NavData をアセット パイプラインに統合する」を参照してください。
このセクションの内容
 特に明記されている場合以外は、この作業は、Creative Commons 表示 - 非営利 - 継承 3.0 非移植ライセンス のもと認可を受けています。 Autodesk Creative Commons FAQ (英語版) を参照してください。