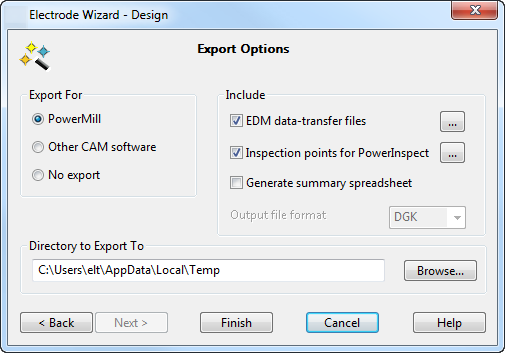
Use this page to set the options to export the electrode.
Winstat Export Enabled — If this is displayed, it indicates that the Winstat interface is enabled.
- Select what you want to
Export for:
- PowerMill — Select this option to export a
.trode
file. In addition, the electrode and fill-in surface, if created, are exported in
.dgkfiles.
If you export an electrode that includes an emboss feature, a .dmtfile is generated for the emboss feature in the electrode.
Other details from the electrode (for example, the material and holders) are exported in an XML file.
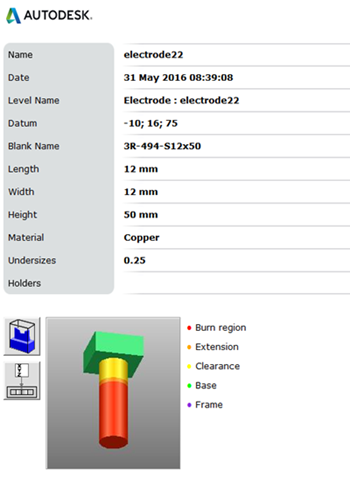
Details of the electrode are also stored in .htmland .csv files. An image of the electrode is stored in a .jpg file and displayed in the .html file that is automatically displayed in the side panel. This shows the electrode in burn-area shading complete with a colour key to the right of the image. All files are named using the name of the electrode.
- Other CAM software — Select this option to export to CAM software other than PowerMill.
- No export — No data is exported.
- PowerMill — Select this option to export a
.trode
file. In addition, the electrode and fill-in surface, if created, are exported in
.dgkfiles.
- Use the options in the
Include
section to specify the export information:
- Select EDM data-transfer files to export the EDM setup files required for machining the electrode. This option is selected by default.
- Click the Ellipsis
 button to display the EDM Export Selection dialog.
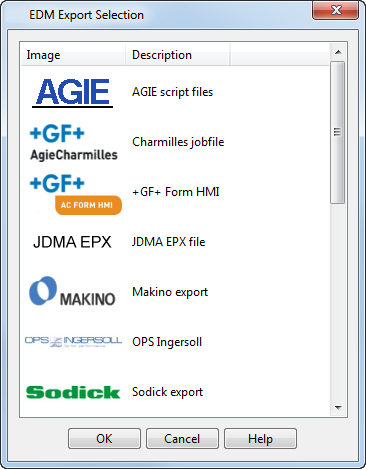
You can export:
AGIE script files
Charmilles jobfile
+GF+_Form_HMI
JDMA EPX file
Makino export
OPS Ingersoll
Sodick export
Zimmer & Kreim
Mitsubishi EPX format
Mitsubishi NC (ESPER) format
Exeron
ONA
CERTA QMeasure inspection format
Note: The CERTA QMeasure inspection format can also be used to produce CERTA preset scripts. - Select the required option. As well as the options shown above, the dialog may include:
- Custom script — User-defined scripts are included using this option.
Tip: ONA EDM scripts can be produced in two styles, automation and classical. PowerShape uses Automation style by default, but you can produce the classical style script format by editing the config file ona_export.con in the electrode tree.
- OPS + MultiProg — This is the same as OPS-Ingersoll export but starts MultiProg (if installed) after exporting the data.
- Custom script — User-defined scripts are included using this option.
- Select
Inspection points for PowerInspect to select inspection points. The option is selected by default.
- Click the
Ellipsis
button to display the
Inspection Points dialog.
Select the inspection points and enter the Probe diameter.
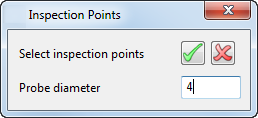
These inspection points are exported as PowerInspect compatible .pts files that are included in the .trode file archive.
Tip: You can edit inspection points on an existing electrode by clicking Inspection Points on the Edit Electrode dialog to display the Inspection Points dialog. - Select Generate Summary Spreadsheet to export a spreadsheet file containing the details of all the electrodes in the model. When creating the last electrode or electrode copy, select this option.
- Select the
Output file format.
- Click the
Ellipsis
- Enter a path for the Directory to Export to, or click the
Browse button to navigate to the required folder. The export data is sent to this directory.
Note: You can export to directories only on the local and mounted drives.
- Click
Finish to complete the
Export Options page. The electrode base is automatically trimmed back to avoid collisions and the electrode is created as a symbol and put it on the required level. When the electrode is created, you are asked if you want to create another electrode using the wizard.
In addition:
- A new workplane is also created with the same name as the electrode. This workplane is for machining purposes.
- If
Generate Summary Spreadsheet is selected, clicking
Finish generates two files:
electrode_summary.csv
electrode_summary.html
- If the electrode is exported, the html file containing details about the electrode is displayed in the browser window.
- If the electrode is not what you expected, read Tips for creating electrodes and try creating it again.