Use this procedure to change the following settings for posts in a railing style:
- type of posts (first fixed, last fixed, fixed, dynamic, and balusters)
- distance the posts extend above railings
- maximum spacing between posts and balusters
- number of balusters for each tread for railings that are attached to stairs
First fixed posts and last fixed posts are attached at the beginning and end of each railing, respectively. Additional fixed posts and dynamic posts are added to the railing between the first and last fixed posts. Balusters are closely spaced supports for a railing. You can specify the spacing between dynamic posts and between balusters.
- Select a railing.
- Click
 .
. 
- Select the style you want to edit.
- Click the Post Locations tab.
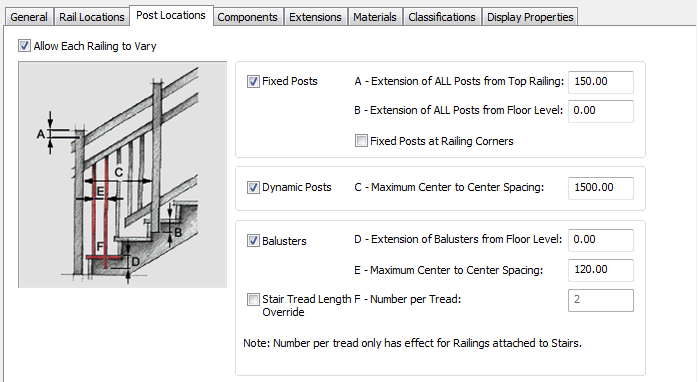
- Specify whether the post properties of this railing style can be overridden for individual railing objects:
If you want to… Then… specify post properties, such as fixed posts, dynamic posts, and balusters, when you add or modify railings select Allow Each Railing to Vary. require all railings of this style to use the post settings of the style clear Allow Each Railing to Vary. Note: Changes to posts do not affect existing railings of this style unless Allow Each Railing to Vary is cleared. - Specify the post locations:
If you want to… Then… include fixed posts at the beginning and end of the railing select Fixed Posts. specify the distance above or below the top rail for all posts enter a value for Extension of ALL Posts from Top Railing. specify the height of all posts from the floor enter a value for Extension of ALL Posts from Floor Level. include fixed posts at the corners of the railing select Fixed Posts at Railing Corners. include dynamic posts with the railing select Dynamic Posts. You can then enter a value for Maximum Center to Center Spacing. include balusters with the railing select Balusters. You can then enter a value for Maximum Center to Center Spacing. override the number of balusters on each stair tread select Stair Tread Length Override. You can then enter a value for Number per Tread. This applies only to railings that are attached to stairs. - Click OK.