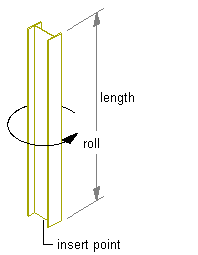
Use this procedure to add a new freestanding column that has the property settings specified in the structural column tool that you select. The style specified in the tool provides the column shape. When you specify an insert point for the column, the shape is extruded in a positive direction along the current UCS Z-axis to a height determined by the Start offset, End offset, and Logical length properties of the tool.

Creating a column
- Open the tool palette that contains the structural column tool you want to use, and select the tool. Tip: You may have to scroll to display the desired tool. After selecting it, you can move or hide the Properties palette to expose more of the drawing area.Note: Alternatively, you can click


 .
. 
- Specify the insert point for the column.
- If the Properties palette value for Specify roll on screen is Yes, move the cursor to roll the column around its extruded axis as desired, and then click; or enter a value for the roll angle, and press Enter.
A positive value rolls the column counterclockwise around its extruded axis when viewed from its end (top) to its start (bottom).
- Specify an insert point for another column, or press Enter to end the command.