Use this procedure to create a freestanding railing in the drawing.
Creating a freestanding railing
- Open the tool palette that you want to use, and select a railing tool. Note: Alternatively, you can click
 .
. 
- On the Properties palette, expand Basic, and expand General.
- Select a style.
- Expand Dimensions.
- Click the setting for Rail Locations. Note: If the settings in the Rail Locations worksheet are read-only, the rail locations have been set in the style, and cannot be overridden here.
- Specify the parameters for the guardrail or the handrail:
If you want to… Then… specify the height of the guardrail or the handrail enter a value for Horizontal Height. specify the height of the guardrail or the handrail while it is on a stair flight enter a value for Sloping Height. specify the distance that the guardrail or the handrail is offset from the posts enter a value for Offset from Post. specify the side of the post for the offset, based on the direction the stair (or railing) was drawn select Center, Left, Right, or Auto for Side for Offset. (Side for Offset is available only when there is an offset value.) Auto is useful only for railings attached to the edges of stairs. A positive value is toward the center of the stair, while a negative value is toward the outside edge. Side for Offset for handrails also has a selection of Both, so you can specify a handrail on both sides of the railing.
If you select Auto, and the railing is not attached to a stair, or, if the railing is along the center of a stair, the offset is to the right.
- Specify the settings for bottom rails:
If you want to… Then… specify the height of the lowest rail when it is horizontal enter a value for Horizontal. specify the height of the lowest rail when it is on a stair flight enter a value for Sloping. specify the distance that the bottomrail is offset from the posts enter a value for Offset from Post. specify the side of the post for the offset, based on the direction the stair (or railing) was drawn select Center, Left, Right, or Auto for Side for Offset. (Side for Offset is available only when there is an offset value.) designate more than one bottom rail enter a value for Number of Rails. When you designate multiple bottom rails, you can enter a value for Spacing of Rails. - If you want to revert to the rail settings defined in the style, click Reset To Style Values.
- Click OK to return to the Properties palette.
- Click the setting for Post locations. Note: If the settings in the Post Locations worksheet are read-only, the post locations have been set in the style, and cannot be overridden here.
- Specify the post locations:
If you want to… Then… include fixed posts at the beginning and end of the railing select Fixed Posts. specify the distance above or below the top rail for all posts enter a value for Extension of ALL Posts from Top Railing. specify the height of all posts from the floor enter a value for Extension of ALL Posts from Floor Level. include fixed posts at the corners of the railing select Fixed Posts at Railing Corners. include dynamic posts with the railing select Dynamic Posts. You can then enter a value for Maximum Center to Center Spacing. include balusters with the railing select Balusters. specify the height of all balusters from the floor enter a value for Extension of Balusters from Floor Level. specify the maximum distance between the balusters enter the appropriate value for Maximum Center to Center Spacing. override the number of balusters on each stair tread select Stair Tread Length Override. You can then enter a value for Number per Tread. (This applies only to railings that are attached to stairs.) - If you want to revert to the post settings defined in the style, click Reset To Style Values.
- Click OK to return to the Properties palette.
- Expand Location.
- For Attached to, select NONE.
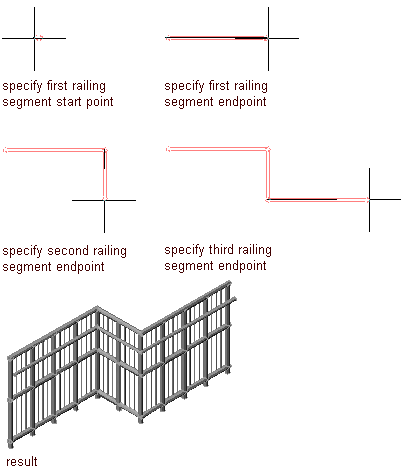
- Specify the start point of the railing.
- Specify further points for the railing.
- Press Enter.