Silhouette curves represent the widest part of a solid and serve as useful parting curves for molds. You can also use these curves to split the faces of a solid.
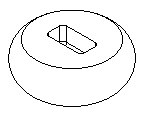
 Silhouette curve
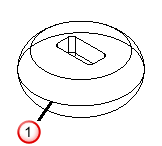
One of the tasks in creating a mold for a solid model is determining the parting lines and splitting the part into at least two parts. Silhouette curves represent the widest extent of a part when viewed from the +Z direction. These curves often are helpful for determining parting lines.
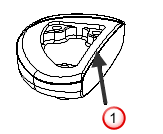
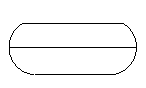
The first image shows a solid model. Initially, the side of the part is a single surface. As a first step in creating two mold halves, we would like to split the side face at its widest part. The second image shows the silhouette curve for the solid.
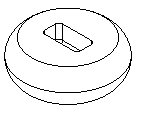
Silhouette curve
In the Silhouette Curves dialog, you can also use the calculated silhouette curves to split the faces of the solid. The figures below show that the side face is now split into two separate pieces along the silhouette curve.
See Select core/cavity for more information on splitting solids into two halves.
This curve can then be used to create parting surfaces.
To create a silhouette curve:
- Select Construct tab > Solids panel > Manufacturing > Silhouette Curves to display the Silhouette Curves dialog.
- Optionally enter a Curve name, or leave the default name.
- Select the name of a solid from the
Solid list or click the
Pick solid
 button and
select the solid in the graphics window.
button and
select the solid in the graphics window.
- If you want to extract hidden silhouettes, select Include hidden silhouettes.
- The silhouette curves are determined from the +Z direction of the UCS. Select the UCS from the UCS list.
- If you want to split the faces of the solid at silhouette curves, select Split Faces at Silhouettes.
- Silhouette curves can often be made up of many small pieces. To reduce the number of these pieces, check Smooth/Reduce. The number after the Smooth/Reduce label is the tolerance for data smoothing. The smaller the number, the tighter the curve approximates the original silhouette. This option can smooth out sharp corners in your curve, so use it with caution.
- If you want to join the resulting curves that touch into a single piece, select Join Resulting Curves.
- The Tolerance affects how tightly the silhouette curve approximates the actual silhouette. Reduce this number if the silhouette misses regions of your part.
- Click OK.