The Surface tab is available at all times, and is divided into a number of sections.
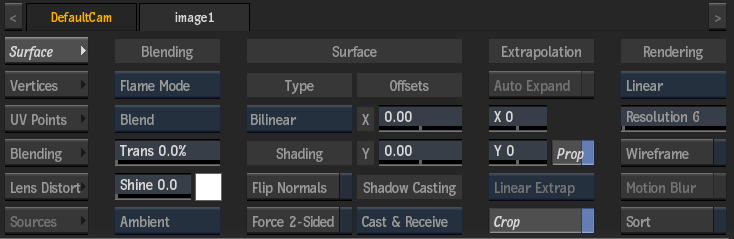
Blending Section
- Blend Type box
- Select whether to use Flame or Photoshop blend modes.
- Blend Mode box
- Select how the front and matte clips or the front and back clips are combined.
- Blend Premultiplication box
- Select whether the blend operation is premultiplied or not. You can set this as a default preference in the Action Setup menu. Disabled if a Diffuse map is attached: use the Diffuse to set the premultiplied state.
- Transparency field
- Displays the transparency of the image. Enter 0 for a completely opaque image, or 100 for a completely transparent image.
- Shine field
- Displays the level of shine for the specular highlights (there are no specular highlights when Shine is set to 0). Editable.
- Specular Highlights colour pot
- Displays the colour of the surface highlights. The specular highlight is visible only if Shading is enabled in the Setup menu and if shine is greater than 0. Editable.
See Specular Highlights.
- Lighting box
- Select Ambient or Diffuse lighting so that the surface can reflect incidental light.
Surface Section
- Shape box
- Select a shape for the selected surface. For Stereo Objects, you are limited to using a Flat surface. For shapes other than flat, you have access to the Vertices and UV Points settings.
Shape Description Flat This is the simplest surface. It is added to the scene by default the first time you enter Action with a Front, Back, and Matte. When working with a Stereo Object, Flat is the only shape available. You cannot change its shape because a flat image does not have vertices. You can, however, scale and shear a flat image using its axis. Bilinear A bilinear surface has four vertices: one for each corner. The vertices are joined using linear interpolation (straight lines). You can animate the shape of a bilinear surface by changing the position of the corners. Perspective A perspective surface has four vertices similar to a bilinear surface. The vertices form a perspective plane of the surface. You can animate the shape of a perspective surface by changing the position of the corners. Extended Bicubic An extended bicubic surface has vertices in sections that can be subdivided up to eight times to increase the number of vertices. The vertices are joined using bicubic interpolation (curved lines). You can animate the shape of a bicubic surface by changing the position of the corners and moving the tangent handles to adjust the curve between corners.
- Flip Normals button
- Enable to flip the selected surface normals to light the back side of a surface.
- Force 2-Sided button
- Enable to have lights in the scene light both sides of the surface (when shading is turned on).
- Surface Offset X field
- Displays the level of offset for a surface along the X axis. Editable.
- Surface Offset Y field
- Displays the level of offset for a surface along the Y axis. Editable.
See Offsetting a Surface.
- Shadow Casting box
- Select how the selected image object will be affected by a Shadow Cast object in the scene.
Extrapolation Section
Linear extrapolation
Smooth extrapolation
- Auto Expand button
- Enable to automatically resize the surface when an attached diffuse map's Axis settings are changed. Only available for Flat surfaces, and when a diffuse map is a child of the surface. Always available for stereo objects.
- Vertical Size Offset field
- Displays the vertical size offset (expansion or restriction) of the surface while respecting the surface shape. Editable.
- Horizontal Size Offset field
- Displays the horizontal size offset (expansion or restriction) of the surface while respecting the surface shape. Editable.
- Proportional button
- Enable to change the size offset fields proportionally.
- Extrapolation box
- Available for extended bicubic surfaces only, and when the size offset fields are not at 0. Select Linear to extrapolate the surface in a straight direction. Select Smooth to extrapolate smoothly based on the position of the vertices of the surfaces.
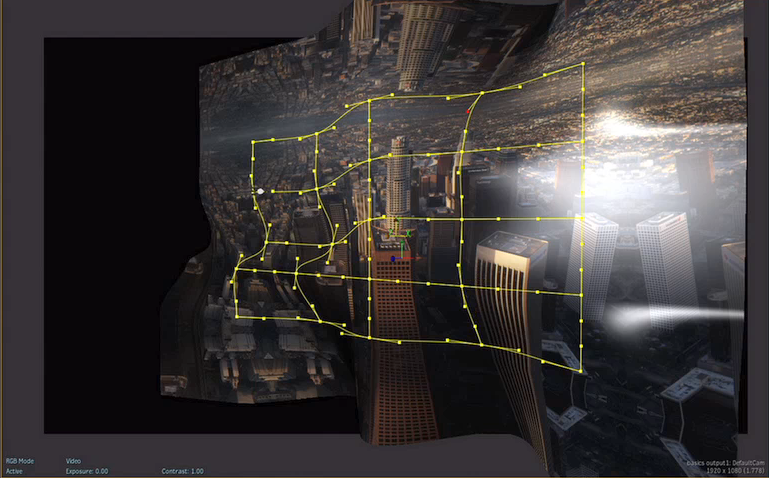
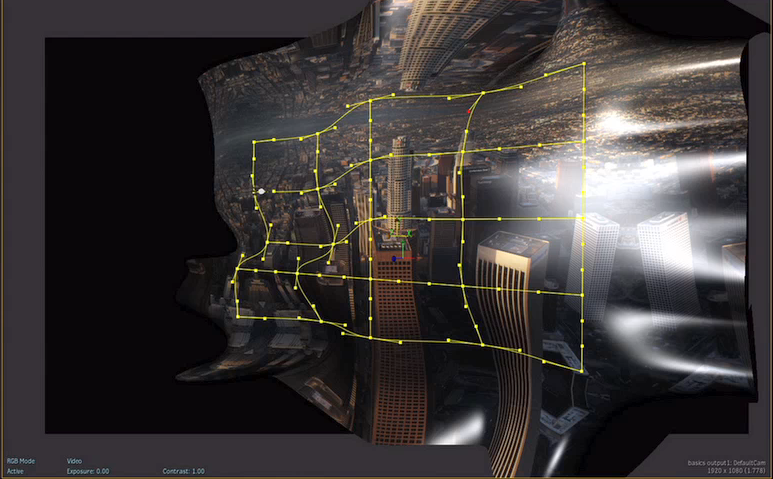
- Crop button
- Enable to restrict a bilinear or perspective surface to the dimensions of the UV points.
You can crop the parts of the image that are outside of the geometry, or let the texture go beyond the surface wireframe, by enabling the Crop button.
Rendering Section
- Filter box
- Select the type of filtering to apply to the surface. For example, to be able to mix various ratios in an Action setup, such as a PAL image in a 1080 HD setup, requires filtering.
Select: To apply: Nearest No filtering — the pixel of the texture closest to the screen pixel is displayed. Linear Basic bilinear filtering. Anisotropic Non-proportional filtering between X and Y (faster to process than EWA, but with a lesser quality). Aniso+Linear A combination of Anisotropic and Linear filtering. EWA A high-quality elliptical weighted average filter that determines the proportions of an elliptical area around every pixel to perform a weighted sampling of the colours (slower to process than other filters). EWA is always calculated in screen space, so you should always view the result with a 100% zoom factor. EWA+Linear A combination of EWA and Linear filtering (offers the most advanced filter processing). EWA and Anisotropic filtering are especially useful to deal with rotations and perspective effects.
The majority of the filters do not alter the image in any way if you have not moved it, or if you move it in actual pixel increments. The only exception is the EWA+Linear filter which always filters the image, even if you have not moved it (inherent to this type of filtering).
- Surface Resolution field
- Displays the geometry resolution of the selected surface. By default, the value is equal to the default Action Resolution setting (in the Rendering section of the Setup menu).
The lower the value, the better the resolution and the greater the processing time required to interact with the image. For example, a value of 1 on an NTSC image creates a mesh with 720 horizontal and 486 vertical subdivisions on the selected surface, affording accurate displacement, normals, and lighting.
- Wireframe button
- Enable to convert the selected surface to a wireframe representation (lighting and transparency properties are kept).
- Motion Blur button
- Enable to use motion blur for the selected surface (can only be used if the global Motion Blur is enabled in the Action Setup menu).
- Sort button
- Enable to sort non-flat surfaces where overlapping transparent regions are causing artefacts.