Collections serve two purposes: you can populate layers with collections; or, you can group nodes into a collection and override an attribute on all of these nodes in one step. You can populate your collection by providing an expression, by selecting nodes from the viewport or Outliner, or by a combination of both.
Collections allow you to easily manage data changes in complex scenes.
Create collections to group nodes based on the attributes you want to override in your scene. Create collections also to group nodes so that you can control their visibility simultaneously.
Collection membership is name based. When you add nodes to a collection using an expression, all nodes with names that match the expression are automatically included. This expression can be reapplied to dynamically adapt to changes in the scene. See Update your render setup when your scene updates and Create overrides for a collection in your render layer.
To control the visibility of collections, you can enable/disable them so that only enabled collections contribute to the scene and are visible. You can also isolate select collections so that only those collections are visible in the viewport. This feature enables you to control the visibility of multiple objects with a minimal number of steps. See Control visibility of collections and Show an isolated subset of collections in the viewport.
Collections are interpreted top-down. Lower collections have precedence over higher ones, both in terms of visibility and application of overrides. See Order of application of overrides. Collections can be re-ordered in the Render Setup editor by middle-mouse dragging and dropping.
Types of collections
By default, your collection includes only transform nodes, which determine the objects you see in the viewport when a layer is visible. This is reflected by the transform type
 indicator on your collection.
Subcollections that include other node types, for example: shapes, shaders, or shading groups, are created automatically when you create an override. Maya automatically recognizes the node type that is being overridden, and creates a subcollection with only that node type. A node type indicator such as
 or
or
 appears on your collection to denote its member type. For more information regarding node types, see
Node types.
appears on your collection to denote its member type. For more information regarding node types, see
Node types.
For additional control, however, you can also create collections and subcollections of any node type. Select the desired node type from the Collection Filters drop-down list in the Property Editor. See Add collection members by node type.
One or more collections may exist in a render layer, and one or more subcollections may exist within one collection. See Create a render layer.
Create a collection
To create a collection, right-click your render layer and select Create Collection.
Add members to your collection
Select a collection and its attributes appear in the Property Editor. You can add nodes to your collection by doing any of the following:
- entering an expression in the Include field,
- explicitly selecting nodes and adding them
- a combination of both.
You can add the same node to more than one collection.

Add members via an expression
Use a wildcard in your expression to include nodes in your collection; for example, building* to include all nodes with names starting with building. All wildcard characters supported by the ls command can also be used in this expression.
By default, only transform nodes that match your expression are included in the collection. For advanced users, you can use the Collection Filters drop-down menu to adjust the collection filter to include other types of nodes in your collection; for example: shaders, shapes, shading engines, sets and so forth. You can even include all nodes, regardless of type, by selecting the All collection filter.
Expressions are case sensitive; for example, *cushion* is not the same as *Cushion*.
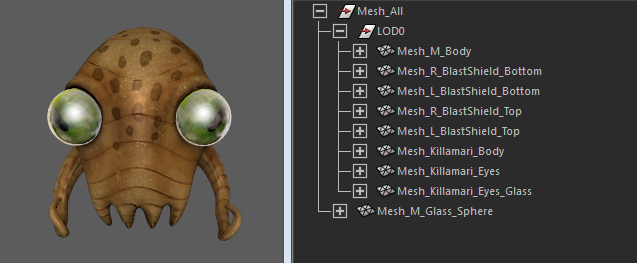
In this example, the expression Mesh_K* includes all of Killamari's body, eyes and eyes glass in the collection.
Use an expression to include members with namespaces in their names
You can use expressions and wildcards to include nodes with namespaces in their names. Use a wildcard for each namespace.
For example:
This expression selects all nodes in the namespace called livingRoom_substances. An example would be: livingRoom_substances:greenapple4.
livingRoom_substances:*
This one also selects nodes in that namespace, but only those whose names begin with a c. An example would be: livingRoom_substances:couchB.
livingRoom_substances:c*
However, it would not match an object such as livingRoom_substances:chairB_v08:chairB. In this case, you can use:
livingRoom_substances::c*
This third expression recursively matches nested namespaces.
Use the syntax :: to denote a recursive namespace search.
This livingRoom_substances::c* expression denotes that the first namespace must be livingRoom_substances, and the node name must begin with a c, but there can be any number of namespaces between the two, or there can be no namespaces at all.
For example, these nodes are all included by the expression:
- livingRoom_substances:couchB
- livingRoom_substances:chairB_v08:chairB
- livingRoom_substances:tables:coffeeTable_v08:coffeeTable
If you do not want to include all nested namespaces; for example, you only want to include two nested namespaces to add nodes such as this one:
livingRoom_substances:chairB_v08:chairB
but not livingRoom_substances:couchB and not livingRoom_substances:tables:coffeeTable_v08:coffeeTable.
You can use : instead of :: in your expression to explicitly specify your namespaces instead of recursively searching:
livingRoom_substances:*:c*
This expression matches nodes where the first namespace is livingRoom_substances, the second namespace can be anything, and the node name begins with a c.
The :: syntax can be used anywhere in your expression, even at the beginning.
For example, ::c* includes all nodes that begin with a c in any number of nested namespaces. It would include, for example, the following nodes:
- couchC
- livingRoom_substances:couchB
- livingRoom_substances:chairB_v08:chairB
- livingRoom_substances:tables:coffeeTable_v08:coffeeTable
- diningRoom_lights:chandelier
- diningRoom_furniture:chairA_v07:chairA
You can include an expression with both a recursive match and a non-recursive match.
Consider a scene with the following nodes:
- pSphere1
- aaa:pSphere1
- aaa:bbb:pSphere1
- aaa:bbb:ccc:pSphere1
- aaa:ccc:pSphere1
::p* would match all nodes with names beginning with a p within any number of nested namespaces, including no namespaces:
- pSphere1
- aaa:pSphere1
- aaa:bbb:pSphere1
- aaa:bbb:ccc:pSphere1
- aaa:ccc:pSphere1
aaa::p* would match all nodes with names beginning with a p in namespaces starting with aaa:
- aaa:pSphere1
- aaa:bbb:pSphere1
- aaa:bbb:ccc:pSphere1
- aaa:ccc:pSphere1
::ccc:p* would match all nodes with names beginning with a p in namespaces ending with ccc; in this case:
- aaa:bbb:ccc:pSphere1
- aaa:ccc:pSphere1
Note the single : to denote a non-recursive match.
aaa:ccc::p* would match all nodes with names beginning with a p in namespaces starting with aaa:ccc, where there are no namespaces in between aaa and ccc:
- aaa:ccc:pSphere1
Note the single : to denote a non-recursive match. In other words, it would not match aaa:bbb:ccc:pSphere1.
::bbb::p* would match all nodes with names beginning with a p that exists in any namespace that contains the bbb namespace:
- aaa:bbb:pSphere1
- aaa:bbb:ccc:pSphere1
::aaa::ccc::p* would match all nodes with names beginning with a p that exists in any namespace that contain the aaa and ccc namespaces:
- aaa:bbb:ccc:pSphere1
- aaa:ccc:pSphere1
Represent a hierarchy in an expression
Use | to represent a hierarchy; for example, the following expression means that Mesh_All is the parent of LOD0, which is the parent of the nodes with Mesh_K in their names.
|Mesh_All|LOD0|*Mesh_K*
You can also use a wildcard to represent the hierarchy; for example, this pattern:
aTransform|*|*
Will match all of the following when the Collection Filters is set to Shapes:
|aTransform|WildMiddle|aShape
|aTransform|Something|aShape
|A|Starting|Path|aTransform|SomethingElse|aShape
|Another|Path|aTransform|OutOfNameIdeas|aShape
In other words, all aShape nodes that are grandchildren of aTransform are included, regardless of whether aTransform starts at the root.
This expression represents both a hierarchy and a namespace. All nodes with names beginning with a c that belong to the set namespace, and that are children of the parent node in the set namespace are included:
|set:parent|set:c*
If you use a mix of transforms and shapes in your hierarchy, such as parenting a transform under a shape node, you may need to adjust the Collection Filters to ensure that all the nodes you want are included.
For example, you may want to use the Custom filter and include both Transforms and Shapes.
Combine expressions
You can combine multiple expressions by separating them with a comma, semi-colon, or whitespace. For example, the following expressions combined allow you to include all of livingRoom_substances:couchB, livingRoom_substances:chairB_v08:chairB, and diningRoom_furniture:chairA_v07:chairA.
livingRoom*::c*; diningRoom*:*:ch*
Use expressions to exclude
To use an expression to exclude nodes, start the expression with a -. Continuing the example above, the following expression subtracts the cushion nodes from the couch and chair members included in the first expression.
livingRoom*::c*; diningRoom*:*:ch*; -livingRoom*::*cushion*
Remember that expressions are case sensitive; therefore, if you do not spell cushions and Cushions consistently in your scene, you may need to use two exclude expressions; for example:
livingRoom*::c*; diningRoom*:*:ch*; -livingRoom*::*cushion*; -livingRoom*::*Cushion*
Order of expressions is important. Expressions are interpreted from left to right, and you can re-add nodes that you have previously subtracted. Continuing the example above, the following expression re-adds the right cushion (and only the right cushion among all cushions) back to the collection:
livingRoom*::c*; diningRoom*:*:ch*; -livingRoom*::*cushion*; -livingRoom*::*Cushion*; livingRoom*::*cushion_right*
Add members by static selection
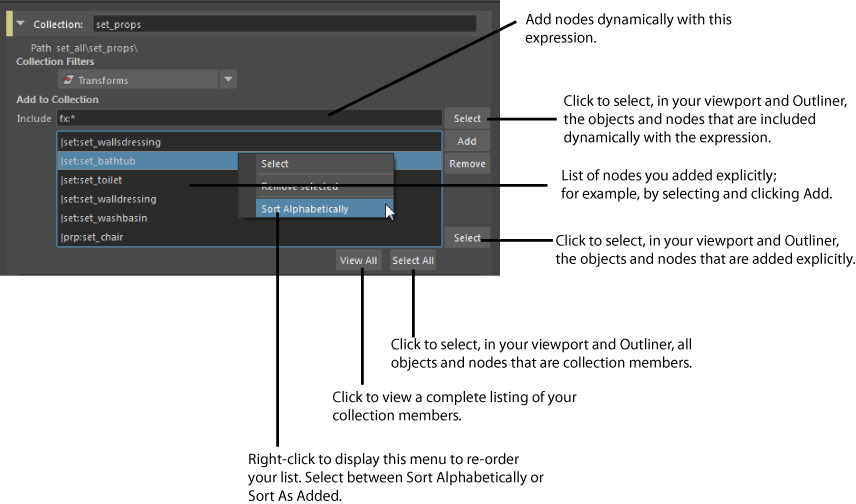
You can add members to your collection statically (by explicitly selecting nodes and adding them) instead of dynamically (using an expression, as described above). To do so, middle-mouse drag and drop nodes from the Outliner to the Property Editor. Alternatively, you can select the nodes in the Outliner and click Add in the Property Editor.
If you have included an expression as well as manually added a list of nodes, your collection will include both the nodes that match your expression and the nodes you list.
You can order this list alphabetically, or in the order in which you added the objects. Right-click the list in the Property Editor and select Sort Alphabetically or Sort As Added.
If you populate a collection using this method, you should exercise caution when reparenting your nodes. If you add a node to your collection, then later reparent it from one root node to another root node, you may lose this node from the collection. A | is used to denote the hierarchy of each node. For example |group1|group2|group3 denotes that group3 is the child of group2 which is the child of group1. If you add group3 to a collection, then later move group3 to be a child of group4, group3 will no longer remain a member of that collection. See Identify missing members in a collection for information on how to identify missing nodes in a collection.
By default, only transform nodes are included in a collection as the Collection Filters is set to Transforms. If you select a shader in the Outliner and click Add in the Property Editor, the shader appears in the node list but is greyed out to represent that it is filtered out. In other words, it is not part of the collection.
It is not necessary to add the shader to a collection in order to override the shading of an object, as it is done for you automatically when you create the override. For advanced users, however, this can also be done by selecting the Shaders menu from the Collection Filters drop-down list.
Verify the membership of your collection
Click View All in the Property Editor for a listing of your collection members.
Alternatively, you can also click Select All to select the collection members in your scene and in the Outliner.
In addition, separate Select buttons exist for members included via expression and members included via selecting and adding. Use these buttons to verify the collection members added via each of the two methods. See Identify the objects that belong in your collection.
Remove members from a collection
To remove members added via drag and drop, right-click the node (or multiple nodes) in the collection Property Editor and select Remove. You can also select the node and click Remove.
To remove members added via expression, delete the expression.