A “pose” is a snapshot of an object (or character) in 3d space in a scene at a specific moment in time. The snapshot will consist of the values recorded for a set of properties (keying mode or group) which is active at the time you create the pose. For example, you can place an object in your scene, transform it (translation, rotation, scale properties) and then create your pose.
See Keying Mode menu for information about what the standard keying modes are.
See Creating a custom keying group and Mapping pose and keying group properties for more information about how you can key properties for objects.
- Select an object in a scene
- Choose the keying group of properties you require from the keying mode menu in the Key Controls window
- Select the Pose Controls tab in the Asset Browser
- Click Create
- MotionBuilder will take a thumbnail picture of the pose and add the pose to the Pose browser.
- The new pose will take the name of the object on which it was based—and will be numbered incrementally for each pose created for an object. If more than one object is selected for the pose, the names of the objects will be concatenated for the name of the pose.
See Poses.
Object pose workflow
You can apply a pose to an object also—the property values from the pose’s keying group will be applied to the object(s) selected in the scene.
- Move the timeline indicator to point when you want to create a keyframe.
- Select an object in the scene.
- Select the Pose Controls from the Asset browser.
- Select a pose from the Pose browser.
- Click Paste.
- Press “K” to create a keyframe.
See also
Mapping pose and keying group properties
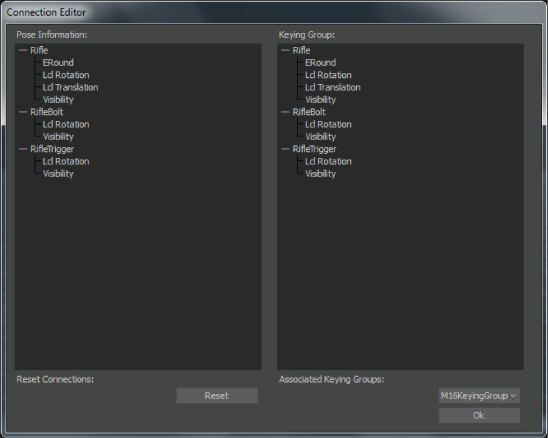
Use the Connection Editor to map channels between a custom object keying group (either “Object Type” or “Global”) and a pose—so that when you apply that particular pose to another object, the only properties that are keyed are the specific ones you’ve selected. You can create many object poses with the same keying group—and then use the Connection Editor to create a mapping of object keying group properties to pose properties that is unique for each pair (keying group and pose).
This feature is particularly useful if you’re keying many different instances of the same type of object or character movement. For example, your scene may have two different gun props in it—each with bolts and triggers. The action (or poses) of each gun may be the same (the bolts and triggers may move the same way), but some properties will be different (textures, rotation and translation may be “local” for each gun). Using the Connection Editor, you can map specific properties that will always be the same for some keying groups and poses, while the gun objects can still have their own local keying groups maintained.
To customize the mapping between keying group properties and a pose:
- Create an Object Keying Group of either “object type” or “global”. See Creating a custom keying group.
- Create a pose that uses the custom keying group created above.
- In the Pose Controls window, right-click the new pose in the Pose browser, and select Display Connection Editor.
- Select a Pose Information property from the left column, and then in the right column, click the Keying Group property you want to map it to.
- You can undo your mappings by clicking Reset. This will restore the default mappings that were created automatically for the pose between corresponding properties.
- Click OK to close the Connection Editor and save the relationship between the pose and the keying group.
