Use the Chamfer milling page to specify the chamfer tools and the options for the chamfer milling strategy.
Curves definition specifies the curves you want to machine and adds the machining properties to those curves.
 Create pattern — Click to create a new empty pattern.
 Selected pattern — Select a pattern from the list. If no pattern is displayed, or
 is selected, then no pattern is selected. The list contains a list of all available patterns.
 Select picked pattern — Click to select a pattern by picking in the graphics window, rather than by name in the
Select pattern list.
Select picked pattern — Click to select a pattern by picking in the graphics window, rather than by name in the
Select pattern list.
Clicking
displays the
Pick Entity tab. Select a pattern in the graphics window to close the
Pick Entity tab and display the pattern in the
Selected Pattern field.
 Collect curves — Click to copy the selected curves into the pattern. This provides a fast, powerful means of extracting curve geometry from a surface model and copying it into the active pattern/boundary. For more information, see the
collecting curves example.
Collect curves — Click to copy the selected curves into the pattern. This provides a fast, powerful means of extracting curve geometry from a surface model and copying it into the active pattern/boundary. For more information, see the
collecting curves example.
Edit machining sections
 — Specifies:
- which regions of the curve are machined
- which side of the curve is machined
- the machining strategy.
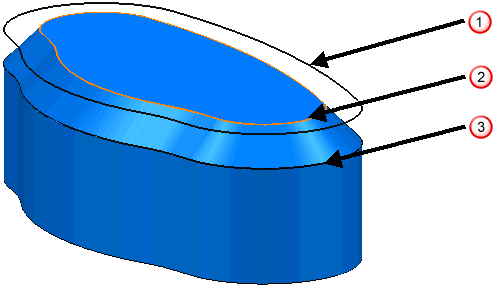
Position — Select the option which specifies the location of the pattern relative to the chamfer.
 —
—
 Corner — Locates the pattern at the corner of the chamfer.
 —
—
 Top — Locates the pattern at the top of the chamfer.
 —
—
 Bottom — Locates the pattern at the bottom of the chamfer.
Tolerance — Enter a tolerance value to determine how accurately the toolpath follows the pattern.
Cut direction — Select the milling technology.
Select a Cut Direction from the following:
-
Climb — Select to create toolpaths using only climb milling, where possible. The tool is on the left of the machined edge when viewed in the direction of tool travel.

-
Conventional — Select to create toolpaths using only conventional or upcut milling, where possible. The tool is on the right of the machined edge when viewed in the direction of tool travel.

- Any — Select to create toolpaths using both conventional and climb milling. This minimises the tool lifts and tool travel.
Curve thickness —Enter the distance between the tool and the chamfer feature, normal to the chamfer.

— Curve thickness
 as radial thickness sets the thickness on the model which is considered during gouge checking.
Chamfer definition

—
Chamfer Angle
—
Chamfer Width
—
Chamfer Depth
Angle defined by — Select the method used to determine the chamfer angle.
-
 Tool — The tool taper angle determines the chamfer angle.
-
 45
45 — The chamfer angle is 45.
-
 Angle — The
Chamfer angle field determines the chamfer angle.
Angle — The
Chamfer angle field determines the chamfer angle.
-
 Setback — The values specified in the
Width and
Depth fields determines the chamfer angle.
Setback — The values specified in the
Width and
Depth fields determines the chamfer angle.
Chamfer angle — Enter the chamfer angle. This option is available only if you have an
Angle defined by of
Angle
. If you select any other option this field displays the actual chamfer angle, but you cannot edit the value.
Width — Enter the width of the chamfer. This is calculated automatically if you specify an Angle and a Depth.
Depth — Enter the depth of the chamfer. This is calculated automatically if you specify an Angle and a Width.
Tool position — Select the position the tool relative to the chamfer.
-
 Top axial depth — The distance the tool extends above the top of the chamfer.
 — Top axial depth
-
 Bottom axial depth — The distance the tool extends below the bottom of the chamfer.
 — Bottom axial depth
-
 Gauge diameter — The effective tool diameter at the contact point of the tool on the chamfer.
 — Gauge diameter