You can create fillet surfaces between sets of surfaces as follows:
- Along creases of surfaces.
- Between two lists of surfaces.
- Between surfaces and a 3D curve.
- A variable fillet between curves and surfaces.
To create a fillet surface:
- Click Surface tab > Manufacture panel > Fillet.
- Select at least two surfaces in your model.
The surface normal arrows of the selected surfaces are displayed. In the example shown below, all the surfaces are selected:
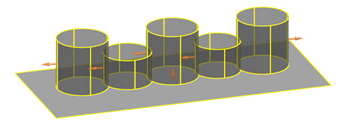
- Use the
Fillet surface dialog to provide initial data to create a fillet surface:
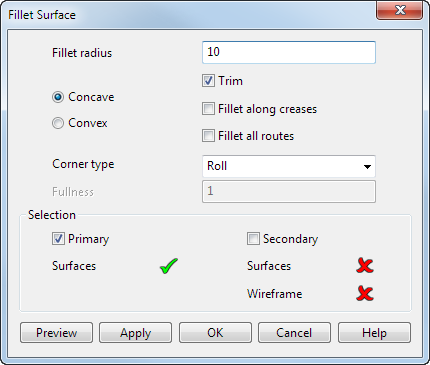
- Fillet radius — Enter the nominal radius of the fillet. Generally, set the radius to the smallest radius on the fillet. If the fillet runs around a corner, try a radius approximately equal to the fillet radius in the corner.
-
Concave/Convex — Determines how the fillet is created between the two surfaces.
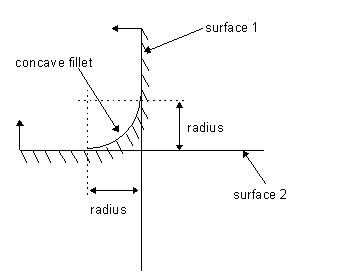
A fillet produced between two surfaces depends on:
- whether Concave or Convex is selected
- the direction of the surface normals on both surfaces
The example below shows a fillet solution between two surfaces using the Concave option. The arrows pointing out from the surfaces indicate the surface normals.
The example below shows a fillet solution between two surfaces using the Convex option. The arrows pointing out from the surfaces indicate the surface normals.
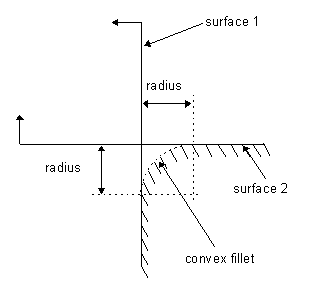
To obtain fillets in the bottom left and top right, one of the surfaces must be reversed, as shown in the example below. If you wish to change the direction of the surface normal of a surface, click the surface normal arrow.
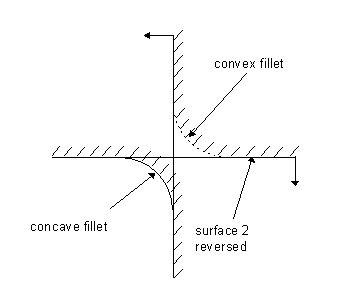 Note: You should always keep the surface normal pointing out from the material. This ensures surfaces are correctly combined into solids.
Therefore, for any two surfaces, four possible fillet solutions can be obtained.
-
Trim — Select this option to trim surfaces to the fillet surface when the fillet is generated. If deselected, you can still generate the pcurves and not the trim boundaries by turning on the
Keep pcurves generated by filleting option on the
Surfaces page of the
Options dialog (this dialog is displayed by selecting File > Options > Application Options).
For further details on pcurves and trim boundaries, see Trimming surfaces.
- Fillet along creases — Select this option to fillet along creases in the selected surfaces.
-
Fillet all routes — Select this option to create fillets along all the fillet routes between the selected surfaces.
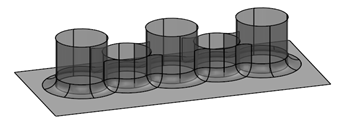
-
Corner Type — Select an option to specify a corner type for the fillets:
Roll — Creates a round corner.
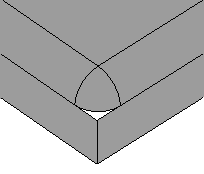
Mitre — Creates a sharp corner.
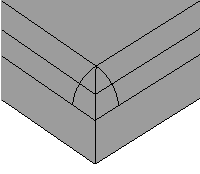
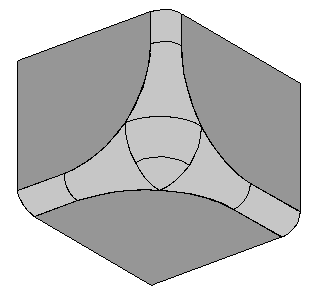
Round — This uses the Fullness value to make rounder corner fillets with branches.
When you click OK or Cancel on the Select Fillet Route dialog, PowerShape searches for any corner fillets as shown below.
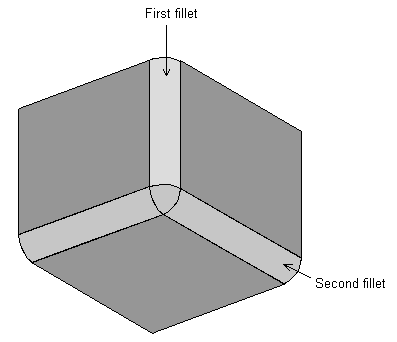
It makes them rounder using the Fullness value.
-
Selection — You can add objects to either the primary or secondary selections. The primary selection can only contain surfaces, whereas the secondary selection can contain either a set of surfaces or a single wireframe object.
Objects in Primary selection
Objects in Secondary selection
What PowerShape does with the selection
At least two surfaces
Empty
Fillet route is calculated between all surfaces.
Empty
At least two surfaces
Fillet route is calculated between all surfaces.
At least one surface
Empty
Fillet route is calculated between all surfaces and along the creases of the selected surfaces, providing Fillet along creases is selected.
Empty
At least one surface
Fillet route is calculated between all surfaces and along the creases of the selected surfaces, providing Fillet along creases is selected.
Surfaces
Surfaces
Fillet route is calculated between the two lists of surfaces.
Surfaces
A single wireframe object
Fillet is created between the surfaces and the wireframe object.
To add objects to a selection, select the appropriate selection toggle (Primary or Secondary) and select the objects. You can add more objects to a selection by pressing the Control key and selecting the objects. Surfaces in the primary selection are coloured differently to those in the secondary.
Note: You can select objects before displaying this dialog. If you select a set of surfaces and then display the dialog, the Selection toggle changes to Secondary and waits for you to add the secondary list of objects if any. If you select a wireframe before displaying the dialog, you are expected to enter the primary selection of surfaces. -
Preview — Displays the calculated fillet routes using the current settings in the dialog. You can continue to change the settings in the dialog until you are satisfied with the previewed fillet routes.
Note: When creating a fillet between a set of surfaces and a wireframe, the fillet surface is displayed.
- Apply — Creates the selected fillets and leaves the dialog open.
-
OK — If the
Fillet all routes option is selected, this creates fillets along all the fillet routes. If the option is deselected, this calculates the fillet routes, removes the
Fillet dialog and displays the
Select Fillet Route dialog. For further details on how to use this dialog and continue creating the fillet, see
Select Fillet Route dialog.
Note: When creating a fillet between a set of surfaces and a wireframe, the fillet surface is created and the Select Fillet Route dialog is not displayed.
- Cancel — Closes the dialog and does not continue creating the fillet.
You edit a fillet surface in the same way as a Power Surface. For further details, see Editing Power Surfaces.