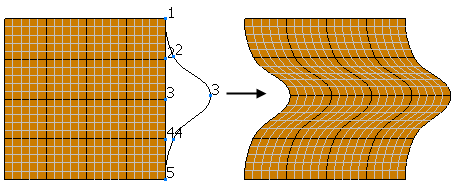
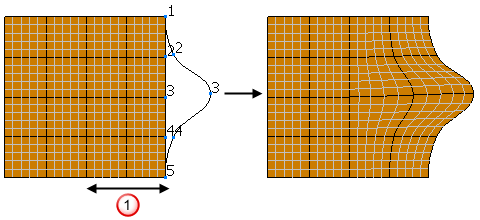
Define the morph using a control and reference curve.
The two-curve method provides more control over the shape of the result than the single point methods.
When morphing with curves:
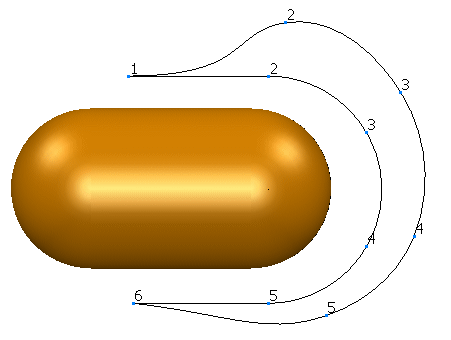
- Both the reference and control curve must have the same number of points.
- Both the reference and control curve must be open or both closed.
- Keep the reference and control curves simple.
- Limit curves or surfaces should not cross the reference curve.
- Keep the limit curve or surface simple.
- If the curves are open, the start and end points of the curves must coincide.
- If open curves are also tangential at the start and end, you will get smoother results in cases where the model to be morphed extends beyond the ends of the curve.
- Avoid discontinuities and sharply curved corners in the reference and control curves and surfaces, as they may introduce kinks or ripples into the morphed model.
- As you move over the model, it is important that there is always a unique closest point on the curve, and that the closest point does not jump from one place to another. Otherwise the morphed model may contain kinks.
- The model being morphed may be as complicated as you like.
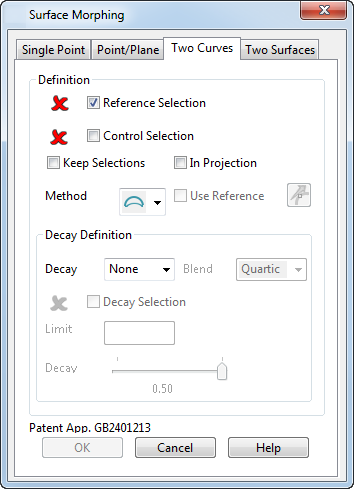
Two curves dialog
- Select Reference Selection and select the reference curve on the screen.
- Select Control Selection and select the control curve on the screen.
- By default, the reference and control curves are deleted from the model after you have used them for morphing. If you want to keep them, select Keep Selections.
- Select a
Method suitable for the shape of your reference and control curves.
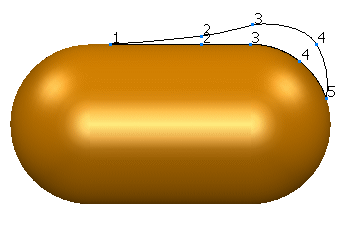
 — Select this method if your curves are open and have only a small turning.
 — Select this method if your curves are open and have a large turning.
 — Select this method if your curves are closed.

If your curves are open and you are not sure which method to use, try methods
and
and select the one that gives the best results.
In Projection — This option projects certain objects onto the principal plane so that PowerShape can calculate how to morph the surfaces.
To fully understand this option, you need to know how objects are morphed.
The principal plane is selected by choosing one of the buttons
 from the
Status bar. For example, if you want to select the YZ principal plane, select the button with
X on it. If no workplanes exist in the model, the world workspace is automatically used.
from the
Status bar. For example, if you want to select the YZ principal plane, select the button with
X on it. If no workplanes exist in the model, the world workspace is automatically used.
Use Reference — (Only available if you use the closed curves method
and the
In Projection option is on). This allows you to select the reference axis that is used to calculate the corresponding points on the reference curve. When using closed curve morphing, it is recommended that you use a reference axis if the object to be morphed lies mainly inside the curve. Click the
 button to display the
Direction dialog. Use this dialog to select the axis.
button to display the
Direction dialog. Use this dialog to select the axis.
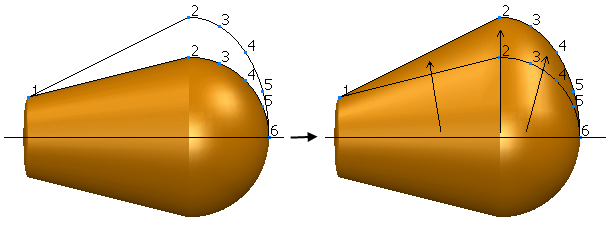
See Moving points using the two-curves morphing method for information on how objects are morphed.
- Select the
Decay option. This decides how much the points on the selected surfaces move as you move away from the reference curve. If the points to be morphed lie on the reference curve, they are moved onto the corresponding point on the control curve regardless of the decay option. Points that are not on a reference curve are moved according to the selected
Decay option.
The following options are available:
None — Points are moved by the distance between the corresponding points on the two curves.
Distance — Points are moved depending on the distance from their corresponding point on the reference curve
 .
.
If the distance is less than the value given in the Limit box, a point moves by the distance defined by its corresponding points on the two curves and the Decay scale. The closer the distance is to the value given in the Limit box, the less the point moves.
If the distance is equal to or more than the value given in the Limit box, the points are not moved.
Curve or Surface - Points are moved depending on the distance from their corresponding point on the reference curve and distance from the closest point on the selected limit curve or surface.
The closer the distance is to the limit curve or surface, the less the point moves. Beyond the selected curve or surface, the points are not moved. The curve or surface should not cross the reference curve.
The Curve and Surface options take longer to process, and should only be used when other options fail to produce the required solution.
- Select a Blend from the drop-down list. For all types of decay other than
None, you can define how the shape of the morphed region blends into its surroundings using the following options:
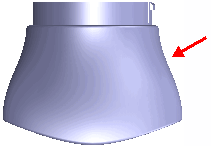
Quartic — This is the default option It provides a smooth blend and join to the surroundings and a smooth shape as it crosses the reference curve. This option should give the correct result in most cases.
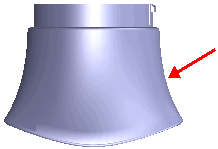
Cubic — It provides an S-shaped blend, with a smooth join to the surroundings, and a smooth shape as it crosses the reference curve.
The Quartic and Cubic options give similar results, so it is best to try each one and use the option that produces the best solution for your model.
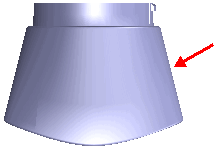
Parabolic — This varies smoothly with the surroundings, but comes to a sharp peak at the reference curve.
It is suitable when the reference curve lies on an open edge of the model, else a sharp edge will be introduced along the curve.
Linear — This varies in a straight line from the maximum on the reference curve to zero at the limit. Therefore, the morph does not blend smoothly with its surroundings.
It is suitable if the entire surface is being morphed, or if there is a limit curve defined along a discontinuity on the model.
- Select Decay Selection if you selected Curve or Surface as the Decay option. Select the required object.
- Enter the Limit. This is the distance used by the Distance option in the Decay list.
- Select the
Decay scale if you selected the
Distance as the
Decay option. This controls how rapidly the shape changes as you move away from the reference curve. You can set a value between
0.05 (rapid change) and 0.5
(slow change).
The decay defines the fraction of the limit distance at which the distortion is halved.