A relative view is a projection of the model from the side of an existing view.
The image below shows four relative views to the view of the top of the model, using third angle projections:

To create a relative view:
- Make sure you have a drawing with at least one view on it.
If you do not have a drawing open, create a drawing or open an existing drawing.
If you have no views on your drawing, create a single view.
- Click Draft tab > View panel > Relative.
- Hold the cursor over a view on your drawing. The cursor changes to an arrow to indicate the direction of the new view in relation to the existing view:
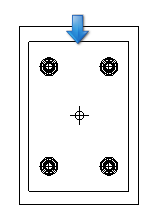
As you move the mouse around the view, the arrow changes direction for the other relative views.
You can create an Isometric view by moving the mouse over a corner of the view.
- When the arrow changes to the direction you want, click the mouse. The new relative view appears on the specified side, ready for you to position.
The side the view appears depends on whether the Third angle option on the Views Options > General page of the Options dialog is selected.
- Click on the drawing to position and create the new view.
The new view is usually created next to the edge of the view where the projection is taken:
