Create a single custom fabric sheet for fabricating unique reinforcement in structural walls or structural floors.
Create a Custom Fabric Sheet
- First, you must define the guidelines used to generate custom fabric sheets. Click Precast tab
 Reinforcement panel drop-down
  (CFS Configuration) to open the Custom Fabric Sheet Configuration dialog.
- Review and modify the following guidelines. Rebar assemblies not meeting these guidelines will not convert to a sheet.
- Maximum Length of CFS: Specifies the maximum length of the custom fabric reinforcement sheet.
- Minimum Length of CFS: Specifies the minimum length of the custom fabric reinforcement sheet.
- Maximum Width of CFS: Specifies the maximum width of the custom fabric reinforcement sheet.
- Minimum Width of CFS: Specifies the minimum width of the custom fabric reinforcement sheet.
- Maximum Length of Wires: Specifies the maximum length of a fabric wire in the custom fabric reinforcement sheet.
- Minimum Length of Wires: Specifies the minimum length of a fabric wire in the custom fabric reinforcement sheet.
- X Direction Increment: Specifies the x-axis offset for the custom fabric reinforcement sheet. origin point.
- Y Direction Increment: Specifies the y-axis offset for the custom fabric reinforcement sheet. origin point.
- Maximum Diameter at Welding Point: Specifies the maximum diameter of the fabric wires at a weld point on a custom fabric reinforcement sheet.
- Minimum Overlapping: Specifies the minimum wire overlap required at the edge of a custom fabric reinforcement sheet.
- Valid Wire Diameters: Specifies the valid rebar sizes required to generate a custom fabric reinforcement sheet.
- Minimum Two Welding Points for a Wire: Specifies that a wire is required to have at least two weld points in a custom fabric reinforcement sheet.
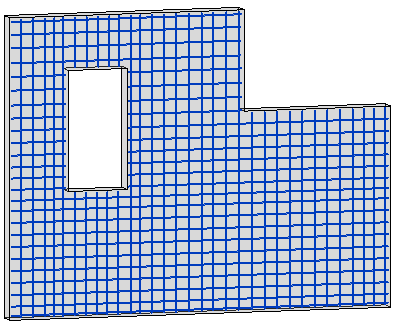
- Sketch rebar instances to design the custom fabric sheet in a structural wall or slab. Please note the following guidelines:
- Rebar must meet all of the restrictions in the Custom Fabric Sheet Configuration dialog.
- Custom fabric sheets can be generated from rebar assemblies containing both rebar sets and/or individual bars.
Note: This also applies to varying distribution and free form rebar.
- All rebar in the design must be sketched or placed in the same plane.
- Select all of the rebar to become the fabric sheet.
- Click Modify | Structural Rebar Create panel
 (Create Assembly).
- In the New Assembly dialog, edit the default Type Name value and then click OK.
- Select the new rebar assembly.
- Click Precast tab Reinforcement panel
 (Custom Fabric Sheet).
- On the Options Bar, click Finish.
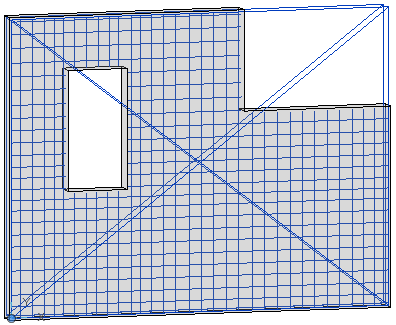
- The rebar assembly converts to a fabric sheet with custom placed wires. The new sheet is also available in the Type selector for quick placement in other structural walls or slabs in your model.
Edit a Custom Fabric Sheet
- Select the custom fabric reinforcement sheet.
- Click Precast tab Reinforcement panel
(Custom Fabric Sheet). The custom sheet reverts back to its source rebar assembly.
- Make adjustments to the rebar and assembly as needed.
- Click Precast tab Reinforcement panel
(Custom Fabric Sheet) again to convert back to a custom fabric reinforcement sheet. The edited rebar and assembly must continue to adhere to the guidelines above in order to convert properly.
Note: You can create a Custom Fabric Sheet using the Convert to Custom Fabric Sheet checkbox in the in the Steel Bar tabs of the
Precast Wall Area Reinforcement Type and
Precast Slab Area Reinforcement Type dialogs.
Note: You can view fabric sheets and custom fabric sheets in 3D views as solid or unobscured. To do this:
- Select a fabric sheet.
- On the Properties palette, click the View Visibility States Edit button.
- In the Fabric Sheet View Visibility States dialog, select the 3D view in which you want the fabric sheet to be viewed unobscured or as solid.
Note that the visibility options are instance related and not type related. Therefore, you should select all the instances for which you would like to set the solid/unobscured representation.