Use Envelope sub-objects to adjust the way skin behaves. Each link has an envelope, and the shape of the envelope determines which vertices are affected by the link's movement. An envelope has an inner and an outer bound: outside these bounds, vertices are not effected. Inside these bounds, the envelope's influence is strongest at the inner bound. A Falloff setting lets you control how quickly influence falls as it approaches the outer bound.
Envelopes also control blending: they provide smooth deformation of the skin across joints. Vertices that fall between overlapping envelopes receive influence from each, thus creating a smoothly blended transition. The outer bounds of the envelopes of adjacent links should overlap enough to provide a smooth blend at the joints. You can adjust the relative strength of envelopes, giving one link's envelope more influence than another.
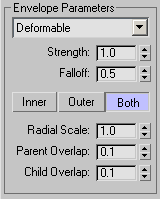
At the Envelope sub-object level, in addition to the settings already mentioned, you can adjust an envelope's Radial Scale. This is useful for making sure the envelope encloses vertices along the length of the link. The settings for Strength, Falloff, Radial Scale, and Overlap are grouped under Envelope Parameters.
Envelopes have cross sections. You can add cross sections to refine the shape of an envelope, and you can move or scale a cross section's control points to change the cross section's shape. (Cross sections are also used to create bulges.)
Workflow
The goal is to modify the envelopes so each vertex in the mesh is encompassed by at least one link's envelope.
Usually the first adjustment is to assign a rigid envelope to the character's head. A rigid envelope blends with other envelopes but retains the shape of the mesh. The head should not deform with the deformation spline.
With Initial Skeletal Pose turned on, check that the envelopes enclose all areas of the mesh. If you turn off Initial Skeletal Pose, the character adopts its animated position at the current frame. Use an animation that stretches the character around, such as a run or dance motion. Find a frame where the envelopes need adjusting, and edit the envelope parameters. Changing the envelopes with the character in an animated position will always reference the Initial Skeletal Pose.
These are some frequently encountered problems with the default vertex assignment:
- Vertices that don’t follow the skeleton.
To correct this, increase the Radial Scale of an envelope's outer boundary.
- Vertices at joints get pushed or dented in.
Too many envelopes might be affecting these vertices. Try reducing the Radial Scale of the inner bound, and reduce the Overlap values of the links on both sides of the joint.
- Bending appears too linear or broken at the joint.
Increase the envelope’s outer Overlap value toward the link on the other side of the joint.
Some further adjustments are described in the “Procedures” section that follows.
Procedures
Interface
Controls for Envelope sub-objects are on the Blending Envelopes rollout.

Selection Level group

-
 Link
Link - Turn on to select links in the viewports and edit the selected link's envelope parameters.
For example, you might turn on Link, select a biceps link, Ctrl+click to add the opposite bicep to the selection, then edit envelope parameters for both links at the same time.
-
 Cross Section
 - Turn on to edit envelope cross sections, changing the envelope's shape and thus its area of influence.
For example, you might turn on Cross Section, select a cross section on the inner or outer boundary of an envelope, and then move or scale it. You might Non-Uniform Scale the cross section of a collar envelope so it avoids vertices in the chest area.
-
 Control Point
 - Turn on to edit the control points on a cross section.
For example, you might turn on Control Point, select a point on a cross section of an envelope, and move the point to change the envelope's shape and area of influence.
-
 Previous and Next
 - Click to move to the next or previous link, cross section, or control point, depending on which selection level is active.
Active Blending group

- Deformable
- When on, enables a deformable envelope for the selected links. Default=on.
By default, deformable envelopes are shown in red.
- Rigid
- When on, enables a rigid envelope for the selected links. Default=off.
By default, rigid envelopes are shown in green.
Attention: You can have both a deformable and a rigid envelope turned on for the same link. Normally, you use one or the other. By non-uniform scaling the rigid and deformable envelopes for one link, you can position one envelope on top of the other. For example, you could control the shoulder with a rigid envelope and the armpit with a deformable envelope. Both envelopes can also be turned off for a link. - Partial Blending
- Turns on partial blending for the selected links. Leave either a deformable or rigid envelope on, and then turn on Partial Blending. Physique calculates the weights of each link on a given vertex. If Partial Blending is off, and the total weight is less than 1, Physique normalizes the combined weight to 1. If Partial Blending is on, the weights are allowed to remain at a value of less than 1. The remainder is filled in by the root node, the equivalent of no influence. See Partial Blending and Weight Assignments for a detailed explanation of how Physique calculates these values.


Partial Blending on all the deformable envelopes for the bones in this character’s jaw allows smooth mesh deformation when the bones are moved.
Envelope Parameters group

- [envelope type drop-down list]
- Shows the type of the selected envelope. If the link has both a rigid and a deformable envelope, you can use this list to choose which envelope's parameters you are adjusting.
- Strength
- Changes the strength of the envelopes. Range=0.0 to 100.0. Default=1.0.
Strength applies to both the inner and outer envelope bounds.
Used primarily for areas where envelopes overlap, and you want one to be more influential than the other.
- Falloff
- Changes the rate of falloff between the inner and outer bounds of an envelope. This is a Bezier curve function. Range=0.0 to 1.0. Default=0.1.
Vertices within the inner bound are fully influenced (weight=1.0) and those beyond the outer bound get no influence from the link (weight=0.0). Falloff determines the rate at which the influence falls off from 1.0 to 0.0.
The Inner, Outer, and Both buttons determine whether the controls that follow, Radial Scale, Parent Overlap, and Child Overlap, apply to the envelope's inner bound, its outer bound, or both at once. First, use the buttons to choose which bounds to adjust, then change values in the spinners.
- Inner
- Turn on to change the values of the inner bound.
- Outer
- Turn on to change the values of the outer bound.
- Both
- Turn on to change the values for both inner and outer bounds at the same time.
When Both is selected, the values displayed for Radial Scale and Parent and Child Overlap reflect the values for the inner bound.
- Radial Scale
- Radially scales the envelope bounds. Range=0.0 to 100.0. Default=1.0.
- Parent Overlap
- Changes the envelope's overlap with the parent link in the hierarchy. Range= -1.0 to 10.0. Default=0.1.
A value of 0.0 causes the end of the envelope to fall on the joint. Values less than 0.0 bring the envelope inside the link, and values above 0.0 will overlap onto the adjoining link.
- Child Overlap
- Changes the envelope's overlap with the child link in the hierarchy. Range= -1.0 to 10.0. Default=0.1.
A value of 0.0 causes the end of the envelope to fall on the joint. Values less than 0.0 bring the envelope inside the link, and values above 0.0 will overlap onto the adjoining link.
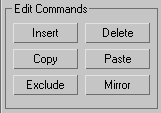
Edit Commands group

- Insert
- Inserts a cross section or control point on a cross section.
- Delete
- Deletes a cross section or control point.
- Copy
- Copies an envelope or cross section.
- Paste
- Pastes an envelope or cross section.
- Exclude
- Clicking this button displays the Exclude Envelopes dialog. You can exclude a link from influencing another link. For example, you can exclude the right thigh link from influencing the left thigh link. Or, rather than scale the index finger envelopes to avoid influencing middle finger vertices, exclude the middle finger links from the index finger links.
- Mirror
- Mirrors the envelopes on a selected link, or mirrors selected cross sections in an envelope.
After a Mirror operation, you can adjust the orientation by clicking Rotate on the Main toolbar, choosing Local coordinates, and then clicking and dragging the link or cross section.
Tip: To copy an envelope to its mirror, the sequence should be Copy, select the opposite link, Paste, then Mirror.
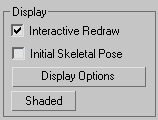
Display group

- Interactive Redraw
- When on, Physique dynamically updates the mesh while you adjust envelopes. When off, the mesh updates only when you enter a final value (you press Enter or Tab, or release the mouse). Default=on.
- Initial Skeletal Pose
- When on, puts the mesh character in the pose it was in just before Physique was applied. Default=off.
- Display Options
- Clicking this button displays the Blending Envelope Display Options dialog, which lets you customize envelope display.
- Shaded
- Toggles shaded display of vertex weights in the viewports. Default=off.