Assembling an EDL
Use an EDL to rebuild a timeline using original source footage that matches the edited timeline from the offline editing stage of post-production. It is also possible to add the assembled EDL to a new layer of the current timeline.
To assemble an EDL:
Load the shots that you want to assemble into the Library.
Click Editing, and then click Assemble.
The Assemble menu appears.
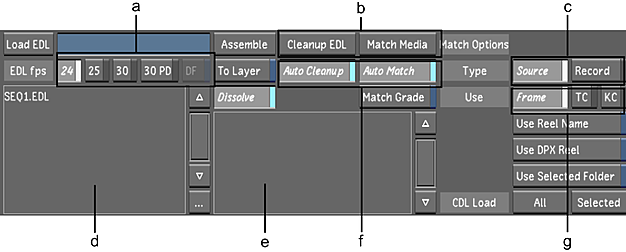
(a) Frame Rate buttons (b) Manual options (c) Base of assembly buttons (d) EDL list (e) Log window (f) Assemble options (g) Timecode buttons
(Optional) Import an EDL into the EDL list. See Importing an EDL, ALE, or Cutlist File.
Select the EDL you want to load from the EDL list.
Determine the base of assembly by enabling one of the following.
Source
Recreates a timeline according to how the source footage was arranged.
Record
Assembles the timeline using the timecode of the final edited clip.
Note:If you selected Record as your base of assembly and your shots include dissolves, enable First-Last Key Anim Type on the Setup page of the Animation menu. See Synchronizing Keyframe Functionality.Click the Frame Rate button that corresponds to your EDL's frame rate. The following frame rates are supported.
Enable: To: 24 Load a 23.98 or 24 fps EDL. 25 Load a 25 fps (PAL) EDL. 30 Load a 29.97 or 30 fps (NTSC) EDL. 30 PD Convert an NTSC EDL to 24 fps and load the converted EDL. DF Load a 29.97 fps drop frame mode (NTSC) EDL. Enable Match Name to match the timecode and tape name in the EDL to your shots.
Lustre tries to detect the Tape name in the EDL to the shots' directory path. This path is fixed—the correct directory should be one level above the resolution directory. For example, if the tape name in the EDL is BTE164, the matching shot is at:
< HOME >\scans\BTE164\2048x1556\0002487.dpx
Tip:To match the EDL reelname to the reelname in the DPX header, enable the Use Reel Name button in the System & Menu page of the user configuration. See System & Menu Settings.Enable Dissolve to include any dissolves in the EDL.
Note:Only dissolve transitions are supported when loading an EDL. Other transitions are replaced by cuts.Warning:Continuing this process creates a new cut from the EDL. If you have not saved your work, it will be lost. Therefore, it is a good idea to start from an empty cut before loading an EDL.Enable either Frame or Timecode depending on how you want Lustre to read the shot's timecode when assembling the EDL.
- Enable Frame to convert the shot filename to a timecode value.
- Enable Timecode to use the timecode value stored in the file header.
Note:For information on Keycode assembly, see Keycode Assembly.Click Load EDL.
The system checks to make sure that the EDL is a valid CMX3600-formatted EDL. If the EDL is not valid, a message appears in the Load log and the EDL is not loaded.
Note:ALE and Cutlist files are also valid. See Keycode Assembly.To perform an EDL cleanup, do one of the following:
- Click EDL Cleanup to perform cleanup prior to assembling.
- Enable Auto Cleanup to automatically perform cleanup during assembly.
When Lustre performs an EDL cleanup, it arranges EDL events according to record timecode and deletes problematic events. For example, if an EDL has two events with conflicting timecodes, the event with the lower number is deleted during cleanup.
To match EDL event timecodes to shot timecodes in the Library, do one of the following:
- Click Match Media to match EDL event timecodes to available shot timecodes in the Library prior to assembling.
- Enable Auto Match to automatically match EDL event timecodes to available shot timecodes in the Library during assembly.
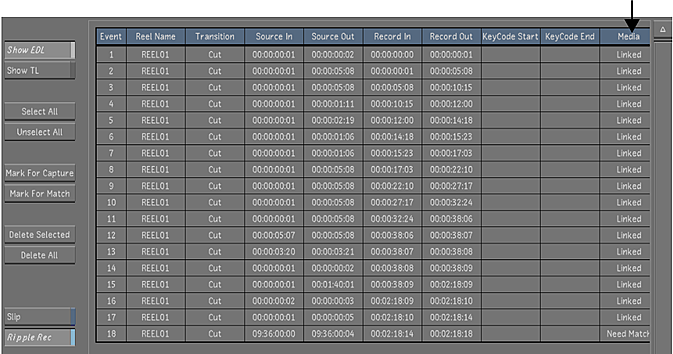
The matching process links EDL event timecodes to media timecodes in the Library. The match status is indicated in the Media column of the Assembly window. Successful matches are indicated by a Linked status, whereas unsuccessful matches generate a Need Match status.
 Note:It is not necessary for all shots to be available prior to conforming. For example, shots with a Need Match status can be captured after the initial conform and assembled with the rest of the EDL later. In the meantime, media metadata will be maintained and black frames will be added where the shots would have appeared. You can also update shots after conforming. See Metadata Maintained for Missing Shots.
Enable or disable the To Layer depending on how you want to assemble the new cut.
- Enable To Layer to assemble a cut to a new layer above the existing layer(s) in the currently loaded cut.
- Disable To Layer to overwrite the currently loaded cut with the newly assembled cut.
Click Assemble to conform the EDL.
Note:If a timeline has not been loaded, then a cut is automatically created with the same name as the EDL.Note:When a timecode gap occurs between EDL events, black frames are inserted between the events to fill the gap.(Optional) To manually match shots in the Library to EDL events, use the Replace Shot tool to add the correct footage into the blank shots. See Replacing Shots.
After working on a previously assembled EDL, to ensure the same grading is applied to the newly assembled EDL, you need to apply the match grade option. See Match Grade.
To assemble an EDL to the currently opened Timeline:
In the Editing menu, click Assemble.
Enable To Layer.
Load the EDL.
The EDL is now assembled to a new layer in the current Timeline.
Note:The record timecode of the EDL is used as the in point when assembling an EDL to a layer of an existing Timeline.
To load the EDL as a new Timeline:
In the Editing menu, disable To Layer.
Load the EDL.
The EDL is loaded to a new Timeline. If there is already an existing cut, it replaces the current cut with the newly assembled EDL.