This workflow example provides an overview of how you can create LOD meshes and set up an LOD group in Maya, then transfer them to your game engine. In this workflow, we'll automatically generate the lower resolution versions of the mesh, but you can also work with a set of meshes that you've already reduced. In that case, you can skip the first few steps here and instead see Create an LOD group.
- Load and select a high resolution mesh.
For this example, we'll call it Sven_Mesh.
- Select
Edit > LOD (Level of Detail) > Generate LOD Meshes >
 .
.
- In the
Generate LOD Meshes Options, set the following options to determine how your high resolution mesh gets reduced to generate the lower level resolution meshes:
- Specify whether you want to copy skin weights from the selected mesh to the new meshes. (Enable or disable the Copy skin weights check box.)
- Set the Reduction Method to reduce the number of polygons by percentage, vertex, or triangle count. (In this example, we use Percentage.)
- Specify the
Number of LOD levels you want to create, and enable the check box for each one in the list.
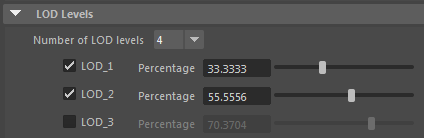
- Set any other shape and preservation options you want. (See Generate LOD Meshes Options for details.)
Now you have an LOD group with sub-groups for each mesh you generated, which you can view in the Hypergraph or Outliner. For example:- LOD_0
Sven_Mesh
- LOD_1
Sven_Mesh
- LOD_2
Sven_Mesh
Note: The names given to the auto-generated meshes are the same as the original, but you can rename them when you're finished generating the lower resolution versions.By default, the LOD group is set up with its Threshold Type set to Screen Height Percentage, which means the LOD meshes will be swapped out based on the percentage of screen height taken up by the overall LOD group in the current camera frame. See Level of Detail attributes for more information.
Your scene now displays geometry from only one level at a time, and as you move the camera the level that displays changes.
- (Optional) Add additional LODs, or add more objects to the existing levels. See
Add and edit levels of detail.
For example, if you initially added your character mesh to an LOD group, you can add the character’s weapons to the same structure.
- LOD_0
Sven_HiRes
Sven_Gun_HiRes
- LOD_1
Sven_MedRes
Sven_Gun_MedRes
- LOD_2
Sven_LowRes
Sven_Gun_LowRes
- LOD_0
- Zoom in and out in the scene to test the default LOD switching settings. See Test or preview LODs.
- (Optional)
Edit LOD threshold values.
If you find that the default LOD switching threshold values don't produce the results you want, select the LODn_group node and adjust the default values for triggering each level. For example, to make the switch to LOD_2 happen when the object is further away, change LOD_2_Display Start to a higher value.
Zoom in and out in the scene to test your changes.
- When you're satisfied with the LOD switching in
Maya, you can export the group to your game engine.
When you export your LOD group as an FBX file, the LOD switching and Threshold settings you have specified can be properly transferred. See Export LOD groups to your game engine.