After you have created a cluster deformer, you can edit the deformer’s effects in the following ways.
Manipulating the cluster handle (C icon)
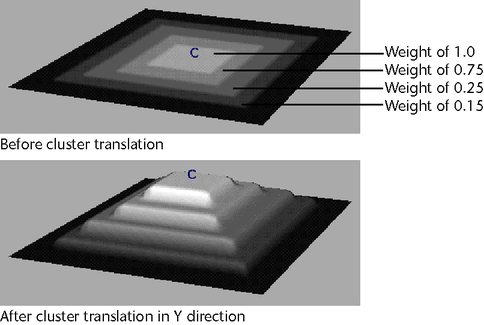
Each cluster deformer includes a cluster deformer handle. In the scene, the handle is a C icon (the letter “C”). You can select the handle, and move, rotate, and scale it to create deformation effects. The effects of manipulating the handle depend on the cluster weights, which in turn control the effect of the cluster deformer on the deformable object’s points (NURBS CVs, polygonal vertices, or lattice points). See also Editing cluster weights and Painting cluster weights.
Note that wrinkle deformers use cluster deformers, and that you can also manipulate the effects of wrinkle deformers with the cluster deformer handle’s C icon. For more information on wrinkle deformers, see Wrinkle deformer.
You can control the placement of the cluster handle by changing the handle’s Origin values in the Attribute Editor. Select the handle, find the clusternHandleShape tab in the Attribute Editor, and set the X, Y, and Z-axis co-ordinate values you want.
To select a cluster deformer handle
- Select the area with the cluster "c" icon.
- Shift-select to exclude everything else from the selection.
Select the "c" and shift-select to remove everything else, or select the clusterhandle in the Outliner.
Editing cluster weights
After you create the cluster, set up the percentages based on the amount that you want the points or control vertices to be affected.
For some cases, you may set one percentage for the whole object. For example, a stick on moving water, in which the cluster handle is set to move at 50% of the transformation of the water.
At other times, you may want some parts of the geometry to be affected more or less than other parts. For example, you could have a scene with waving trees, where the treetops are affected the most, and the trunk near the ground affected by 0%.
With the Component Editor, you can directly modify the values of individual cluster weights. You can also paint cluster weights.
About painting cluster weights
Using the Paint Cluster Weights Tool, you can set cluster weights simply by painting over the clustered surface. Although you can transform the cluster first, then paint weights on the surface, the Paint Cluster Weights Tool provides color feedback so you know which parts of the clusters have different weights before you transform the cluster. Weights display as a range of grayscale values, with a weight of 1 displaying as white and 0 as black. See Paint Cluster Weights Tool.
You can also mirror cluster weights using the Mirror Deformer Weights Options. See Mirror deformer weights.
Painting weights on restricted areas
When you paint weights over selected vertices, your strokes are applied only to the weights corresponding with the selected vertices. In effect, the unselected vertices act as a mask, where only selected vertices are affected by any painting or flooding you do.
Before creating the mask you must first create the cluster. For details on masking surfaces, see Restrict an area for painting.
Flooding clusters
Flooding a cluster is like taking a huge brush and applying its settings to the entire cluster. When you flood a cluster, the weight of each vertex in the cluster changes according to the value and operation set for the tool.
To flood a cluster, follow the steps under Paint cluster deformer weights, but instead of painting in step 7, click the Flood button or use the hotkey Alt+f (Linux and Windows) or Option+f (Mac OS X).
To smooth the transition between cluster weights, select the Smooth paint operation and flood the cluster.
Pruning cluster deformer sets
By pruning cluster deformer sets, you can remove points from the set that are not presently being affected by the deformer. You can prune the deformer set to avoid unnecessary calculations for points that are not part of the deformation effect. Refer to the steps To prune deformer set membership in the topic Edit cluster deformers.
Mapping weight values to clusters
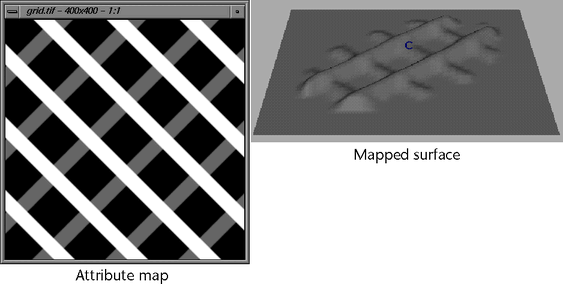
Using the Paint Cluster Weights Tool you can map attribute values onto surface vertices relative to the UVs. The settings for the tool are applied to the cluster vertices using the mapped values.
In the following example, notice that only the cluster is affected by the map.
For details on mapping, see Map attributes.
Painting weights on rigid skin objects
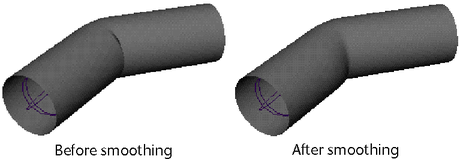
When using rigid skinning, Maya creates a joint cluster node for each joint of the skeleton. The joint cluster nodes assign weights to the rigid skin points to control how the rigid skin objects deform. You can use the Paint Cluster Weights Tool to modify the rigid skin point weights.
In the following example, notice how the surface folds at the joint. You can use the Paint Cluster Weights Tool to quickly smooth out the fold.
Setting the cluster relative to the parent transform
Using the Relative attribute, you can set the cluster deformation to be active only when the direct parent of the cluster handle is transformed. This lets you create effects where a hierarchy of parent objects do not all affect the cluster deformation.
For example, if you parent the cluster handle to a wrist joint and turn on its Relative attribute, you can rotate the shoulder without the cluster affecting the skin around the wrist, even though the wrist’s position changes. When you move the wrist itself, the cluster deforms the geometry as desired.
Controlling the deformation percentage of the entire cluster
You can control the percentage of deformation for the entire cluster using the Envelope channel. Change Envelope to scale all the cluster weights in the same way. If you set the Envelope value and also various values for cluster weights, all the values affect the deformation.
Using weighted nodes
You can use another object for the cluster handle, the movement of which controls the cluster. Specify the object you want to use in the cluster handle shape node, under the Weighted Node attribute.