The MASH Editor can be used to view, select and modify MASH networks in your scene. You can access it via in the Animation or FX menu sets, or via the MASH shelf.
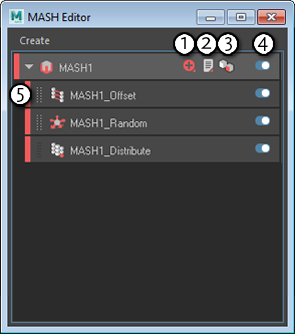
For a list of functions, see the table below this image.
|
1 - Add node |
Click this button to display a drop down list of nodes. Select one to add it to the MASH network at the top level. For more information on specific nodes, see MASH Nodes overview. |
|
2 - Add utility |
Click this button to display a drop down list of utilities. These utilities include: |
|
3 - Select repro / instancer |
Selects the Repro or Instancer node depending on the MASH network's current geometry type. |
|
4 - Toggle node |
Disables / enables the corresponding MASH node. Clicking the top-level button affects the Distribute node. |
|
5 - Move node |
Drag nodes with a dotted white handle to reorder them in the stack. Nodes only affect whatever is below them, so reordering them can change the effect of a node on a MASH network. Nodes with a dark solid handle cannot be reordered. |
|
Change label color |
Right-click a network's top-level and select Label Color. Label colors are useful for quickly discerning between different MASH networks in the MASH Editor. |
|
Duplicate a network |
Right-click a network's top-level and select Duplicate Network. |
|
Delete a node or entire network |
Right-click a node and select Delete or Delete Network. Note: If you delete a network, the ReproMesh will remain in the scene.
|
|
Change label color |
Right-click a network's top-level and select Label Color. Label colors are useful for quickly discerning between different MASH networks in the MASH Editor. |
|
Create a new MASH network |
Go to . |