You can specify a point location using an angle (quadrant bearing, whole circle bearing, angle or deflection) and a distance from a reference point.
Before you can specify an angle and distance within the Side Shot command, you must define a temporary reference line from which all the subsequent points are calculated.
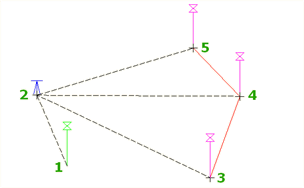
The last two entered points define the reference line, which is reused if you take multiple shots within the command. Specify an angle and distance to the next point. From the reference line (1-2) and start point (2), specify points (3, 4, 5) by side shot.
To define a line, you can either select an existing line in the drawing or enter two points. If you have already entered one point in the command, you are prompted to enter a second point to define the reference line.
In this command, the reference line is not updated; it remains the same for all points entered.
- When you are prompted to enter a point in a command, do one of the following:
- Click Transparent tab
 Plan panel
Side Shot
Find.
Plan panel
Side Shot
Find.
- Right-click to display the Transparent Commands context menu
Side Shot.
- Activate the Transparent Commands toolbar and select Side Shot
 .
.
- Enter 'ss.
- Click Transparent tab
- If you have not yet entered any points in the main command, you must specify a temporary reference line by doing one of the following:
- Select a line.
- Enter p, then specify a start point and endpoint for the line.
- If you have entered one point in the main command, that point is used as the starting point for the temporary reference line. Specify the ending point for the temporary reference line.
- Enter an angle by doing one of the following:
- Enter an angle in angular units for the drawing.
- Enter b, then specify the angle by specifying a quadrant and a quadrant bearing.
- Enter d, then specify a deflection angle.
- Enter z, then specify a whole circle bearing.
- Enter c to switch the direction of the angle between clockwise and counterclockwise.
- Specify a distance by either clicking in the drawing or entering a distance.
- If you are prompted, enter a level. For more information, see To Enter a Level for a Transparent Command.
Note: Level prompting for transparent commands is controlled by the Transparent Command setting Prompt For 3D Points. For more information, see About Transparent Command Settings.
- If you are working within a running command, do one of the following:
- To enter another side shot using the same angle type, enter the angle and repeat Steps 5 and 6.
- Press Esc to end the Side Shot transparent command.
Additional side shot locations are calculated using the reference line established at the start of the transparent command.