The Soft Selection controls allow you to partially select sub-objects in the vicinity of an explicit selection. This causes the explicit selection to behave as if surrounded by a "magnetic field." Partially selected sub-objects within the field are drawn along smoothly as you transform the sub-object selection; the effect diminishes with distance or the “strength” of the partial selection.
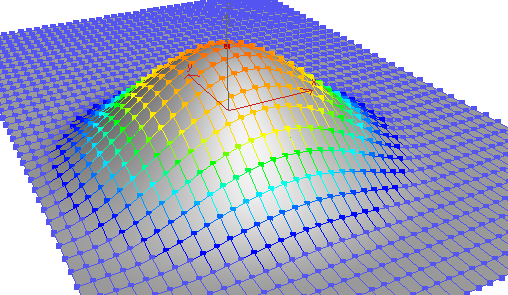
This falloff is visible in the viewports as a color gradient surrounding the selection, conforming to the first part of the standard color spectrum: ROYGB (red, orange, yellow, green, blue). Red sub-objects are those you select explicitly. The highest-value soft-selected sub-objects are reddish-orange; they have the same selection value as red sub-objects, and respond the same way to manipulation. Orange sub-objects have a slightly lower selection value, and respond to manipulation a bit less strongly than do red and reddish-orange vertices. Yellow-orange sub-objects have an even lower selection value, and then yellow, green-yellow, and so on. Blue sub-objects are effectively unselected and don't respond to manipulation, except as required by neighboring soft-selected sub-objects.
Normally, you designate a soft selection procedurally, by setting parameters and then selecting sub-objects. You can also “paint” a soft selection explicitly on poly objects. See Paint Soft Selection group.
By default, the soft-selection region is spherical without regard to geometric structure. Alternatively, you can use the Edge Distance option to limit the selection to vertices in contiguous faces.
If a sub-object selection is passed up the modifier stack, and Use Soft Selection is on, the results of modifiers that deform the object, such as Bend and XForm, are affected by the Soft Selection parameter values.
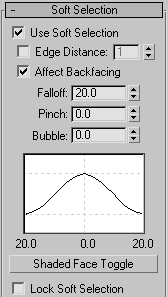
The controls in this dialog let you modify Soft Selection parameters. All sub-object levels share the same Soft Selection parameter values. Soft Selection is available for NURBS, mesh, poly, patch, and spline objects.

Soft selection colors and effect on the surrounding area
Soft Selection Controls in the Caddy
When an editable poly or Edit Poly object is selected, the Select And Manipulate tool is active, and Use Soft Selection is on, the Falloff, Pinch, and Bubble controls are available in a special Manipulate The Caddy Interface in the active viewport:

At the Vertex and Edge sub-object levels, additional controls appear in the Manipulate caddy; those are covered in the applicable sections of the help.
The caddy controls for Soft Selection are as follows:
For instructions for using the caddy, see The Caddy Interface.
Procedure
To edit a soft selection in the viewport:
- From the Customize menu, choose Customize User Interface; this opens the Customize User Interface dialog to the Keyboard panel. From the Group drop-down menu on the dialog, choose the feature set with which you wish to use Edit Soft Selection Mode, such as Editable Poly.
- In the group’s Action list, check the action for Edit Soft Selection Mode (or Edit Soft Selection). If it’s not already assigned, or you wish to change the keyboard shortcut, highlight the action and use the standard method to set a Hotkey. Alternatively, switch to one of the other panels and set, for example, a toolbar button for the action. When finished, close the dialog.
 Select an object to edit and activate the feature set from step 1. On the
 Modify panel, go to the sub-object level you wish to edit, such as Vertex.
- If necessary, expand the Soft Selection rollout and turn on Use Soft Selection.
- Make a sub-object selection.
The viewport shows your selection in red and the surrounding, soft-selected sub-objects in a color gradient.
- Press the hotkey for Edit Soft Selection mode, or otherwise activate the action.
The mouse cursor switches to the Falloff symbol.

- Press and hold the mouse button, and drag vertically: upward to increase the Falloff value, or downward to decrease Falloff.
As you drag, the color gradient changes to show the modified Falloff, as does the Falloff value on the Soft Selection rollout.
- When you’ve finished editing the Falloff, release the mouse button and then click once.
The mouse cursor switches to the Pinch symbol.

- Drag to adjust the Pinch value.
- When you’ve finished editing Pinch, release the mouse button and then click once.
The mouse cursor switches to the Bubble symbol.

- Drag to adjust the Bubble value.
- You can continue cycling through the three editing modes by releasing the drag and then clicking once.
- To finish using Edit Soft Selection Mode, right-click in the active viewport.
This procedure describes usage of the Customize User Interface  Edit Soft Selection Mode feature for editing the Falloff, Pinch, and Bubble values for soft selection.
For more information, including a list of feature sets with which Edit Soft Selection Mode is available, see Edit Soft Selection Mode.
Interface

- Use Soft Selection
-
Affects the action of Move, Rotate, and Scale functions at sub-object levels of the editable object or Edit modifier, as well as the action of deformation modifiers applied to the object if they are operating on a sub-object selection (the latter also applies to the Select modifiers). When on, 3ds Max applies a spline curve deformation to the unselected sub-objects surrounding the selection you transform. To take effect, this checkbox must be on before transforming or modifying the selection.
- Edge Distance
-
When on, limits the soft-selection region to the specified number of edges between where you select and the maximum extent of the soft selection. The affected region is measured in terms of "edge-distance" space, along the surface, rather than real space.
This option is useful in cases where you want to select only contiguous sections of geometry. For example, if a bird's wing is folded back against its body, selecting the wing tip with Soft Selection would affect body vertices as well. But if you turn on Edge Distance, set the numeric value to the distance (in edges) along the wing that you wish to affect, and then set Falloff to an appropriate value, selecting and then moving the wing tip would move only the wing geometry.
- Affect Backfacing
-
When on, deselected faces whose normals face in the opposite direction to the average normal of the selected sub-objects are affected by the soft-selection influence. In the case of vertices and edges, this applies to the normals of faces to which they're attached. Turn off Affect Backfacing when you want to manipulate faces of a thin object, such as a thin box, but don't want to affect faces on the other side of the object.
Note: Affect Backfacing is not available when editing splines. - Falloff
-
Distance in current units from the center to the edge of a sphere defining the affected region. Use higher falloff settings to achieve more gradual slopes, depending on the scale of your geometry. Default=20.
Note: The region specified by the Falloff setting is depicted graphically in the viewports as a color gradient in vertices and/or edges (or, with editable polys and patches, optionally in faces). The gradient ranges from the selection color (normally red) to the non-selected sub-object color (normally blue). In addition, this gradient is updated in real time as you change the Falloff setting.Note: If Edge Distance is on, the Edge Distance setting limits the maximum falloff amount. - Pinch
-
Raises and lowers the top point of the curve along the vertical axis. Sets the relative "pointedness" of the region. When negative, a crater is produced instead of a point. At a setting of 0, Pinch produces a smooth transition across this axis. Default=0.
- Bubble
-
Expands and contracts the curve along the vertical axis. Sets the relative "fullness" of the region. Limited by Pinch, which sets a fixed starting point for Bubble. A setting of 0 for Pinch and 1.0 for Bubble produces the smoothest bulge. Negative values for Bubble move the bottom of the curve below the surface, creating a "valley" around the base of the region. Default=0.
- (soft selection curve)
-
Graphically displays how Soft Selection will work. You can experiment with a curve setting, undo it, and try another setting with the same selection.
- Shaded Face Toggle
-
Displays a color gradient corresponding to the soft selection weights on faces within the soft selection range. Available only when editing patch and poly objects.
If the Vertex Color display property of an editable poly or editable patch object is off, clicking the Shaded Face Toggle button will turn on Soft Selection Color shading. If the object already has an active Vertex Color setting, clicking the Shaded Face Toggle overrides the previous setting and changes it to Soft Selection Color.
Note: Use the Undo command if you do not want to change your vertex color shading properties. - Lock Soft Selection
-
Locks the soft selection in order to prevent changes to the procedural selection.
Using Paint Soft Selection (see following) turns on Lock Soft Selection automatically. If you turn it off after using Paint Soft Selection, the painted soft selection is lost and cannot be restored with Undo.
Edit Soft Selection Mode
In addition to the controls described in the preceding section, you can edit the soft selection in the viewports with interactive controls based on a Customize User Interface action named Edit Soft Selection Mode. This mode is available for the following feature sets:
- Editable Mesh surface
- Editable Poly surface
- Edit Mesh modifier
- Edit Patch modifier
- Edit Poly modifier
- Edit Spline modifier
- HSDS modifier
- Mesh Select modifier
- MeshSmooth
- Patch Select modifier
- Poly Select modifier
- Projection modifier
- Vol. Select modifier
For each feature set, open the Customize User Interface dialog from the Customize menu, and choose the feature from the Group drop-down list. For many feature sets, but not all, the Edit Soft Selection Mode keyboard shortcut is set to B by default. For the rest, such as Editable Poly, you must set the keyboard shortcut with the Customize User Interface controls.
For the basic method of using Edit Soft Selection Mode, follow this procedure.
To enter Edit Soft Selection Mode, press the keyboard shortcut (or click the toolbar button, etc.) assigned in Customize User Interface. When active, drag to use the current mode and click to switch to the next mode. To exit, right-click in the active viewport.
The three Edit Soft Selection Mode modes, along with their mouse-cursor symbols, are:
- Falloff
-

- Pinch
-

- Bubble
-

Paint Soft Selection group

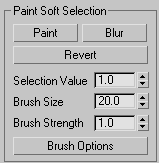
Paint Soft Selection lets you specify, blur, or revert a soft selection explicitly by dragging the mouse over the selection. This feature is available at sub-object levels with Editable Poly objects, as well as with objects with the Edit Poly or Poly Select modifier applied.
Painting a soft selection does not select sub-objects explicitly; the range of painted selection values goes from orange to blue, rather than red to blue as in standard soft selection. So one possible application is to create a normal selection using standard methods, and then to paint a soft selection around it that would not be possible otherwise. For example, you could select a column of polygons, which normally results in a surrounding vertical oval of soft-selected polygons, and then use painting to widen the soft selection to a horizontal oval (or any other shape).
- Paint
-
Paint a soft selection on the active object using the current settings. Drag the mouse cursor over the object surface to paint the selection.
- Blur
-
Paint to soften the outlines of an existing painted soft selection.
- Revert
-
Paint to reverse a soft selection on the active object using the current settings. Drag the mouse cursor over the object surface to reverse the selection.
Note: Revert affects only a painted soft selection, not a soft selection made by normal means. Also, Revert uses only the Brush Size and Brush Strength settings, not the Selection Value setting. - Selection Value
-
The maximum relative selection value of the painted soft selection. The values of surrounding vertices within the brush radius fall off towards a value of 0. Default=1.0.
- Brush Size
-
The radius of the circular brush used for painting the selection.
- Brush Strength
-
The rate at which painting a soft selection sets the painted sub-objects to the maximum value. A high Strength value reaches the full value quickly, while a low value requires repeated applications to reach full value.
- Brush Options
-
Opens the Painter Options dialog, with settings for brush-related properties.