Here are bare-bone steps on how to set up and use the Backburner Manager and Server utilities to perform batch rendering.
If your system is already properly configured for TCP/IP protocols (for example, if your computer has an Internet connection), information in this topic will help you get started with batch rendering in a few basic steps.
- From the Start menu, open the Backburner folder inside the Autodesk program group and run the Manager and Server applications.
- Start 3ds Max, and load the first scene you want to batch render.
- Open the
 Render Setup dialog and adjust the various rendering parameters for the way you want to render the scene, including active viewport, file output, and so on.
 - From the Render Setup dialog
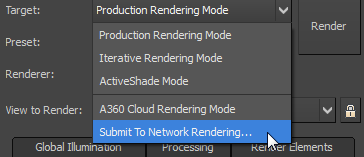
 Target drop-down list, choose Submit To Network Rendering.
- In the resulting Network Job Assignment dialog, click the Connect button.
- Click the Submit button. Note: Each job should have a unique output file name and/or path to avoid overwriting output files. If you get an alert dialog that says, "Another job is using the same output name…," you can click the No button, click Cancel to exit the Network Job Assignment dialog, and then change the output name and/or path. Otherwise, you can click the Yes button and let the job overwrite the frames from the other job in the queue.
- Load the next scene you want rendered, and then repeat steps 3 through 6.
Make sure you're using a recent, up-to-date version of the Windows operating system.
Once you’ve submitted all rendering jobs, you can exit 3ds Max, if you want. If power is lost before all jobs are rendered (either by accident or by intentional powering down of your computer), when you restart the Backburner Manager and Server programs, the rendering process will resume where it left off.