Use this procedure to create a clipped Model view of a building level.
If a level is crossed by a spanning element like a curtain wall or an elevator shaft, you want to display only those parts of the spanning element that actually lie on that level. You can create a clipped Model view that displays only those objects and object ranges within the user-defined display range.

Clipped Model view
Some display settings for a clipped Model view are influenced by the materials assigned to the clipped objects:
- Display of object ranges outside the display range: You can display the parts of a spanning element that are outside the display range of the level. In some cases, you might want to display those parts of the object in a lighter color and thinner lineweight to imply the complete shape of the object.
How those parts are displayed is set in the Sectioned Body component of the object’s materials.
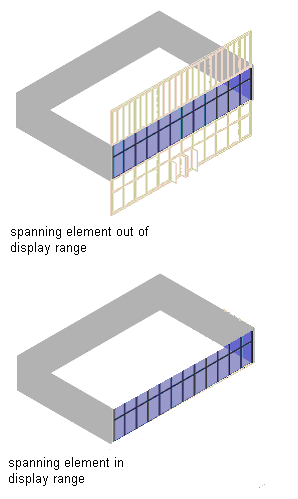
3D view of spanning element in and out of display range
- Display of a section hatch and a section boundary where the display range cuts the spanning object: You might choose such a display to highlight the cut line.
How the section hatch and boundary are displayed is defined in the Section Hatch component of the materials for the object.
- Create a view containing the desired level.
- If necessary, switch to a Model view: for example, SW Isometric.
- Click
 .
. 
- Expand Configurations and select the current display configuration.
It is displayed in bold text.
- Click the Cut Plane tab.
- Set the Above and Below display ranges to be identical to the level height.
For example, if your level is 2.75 meters high, set Display Below Range to 0.0 meters and Display Above Range to 2.75 meters.
Note: For a clipped model view, it is not important how you set the cut plane, as the cut plane is displayed only in plan views. Either keep the original value, or enter any value within the display range: for example, 1.4 meters. - Expand Sets and select the current display set (displayed in bold text).
- Click the Display Options tab and define the display of the clipped model view.
If you want to… Then… display the objects in the display range defined in step 6 with their regular display settings, and the objects outside of the display range as Sectioned Body select Section AEC Objects by Display Range defined in Display Configuration. show a section hatch and a section boundary where spanning objects are cut by the display range select Show Materials where Display Range Intersects AEC Objects. hide all parts of spanning objects outside of the display range select Hide Sectioned Body Component. suppress the surface hatch of objects within the display range select Hide Surface Hatching. - Click OK.