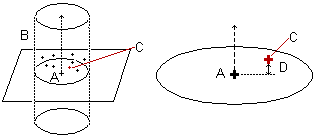
When you probe a single point, PowerInspect calculates a catchment zone (B) around the vector of the nominal point (A). The measured point (C) closest to the nominal is then probe compensated and projected down the vector, and the item reports the 2D distance (D) between the measured and nominal points along the probe compensation vector.
Note: You can measure Probed Single Point items by probing only when inspecting the part on a CNC or Manual machine
To probe a single point:
- In the inspection sequence, right-click the single point, and select Play Item from the context menu.
PowerInspect displays the CAD view in full-screen mode with the nominal point displayed as a target
 . It also displays the
Feature probing dialog that shows the:
. It also displays the
Feature probing dialog that shows the:
- Actual values of the location of a probed point
- Distance to the target point
- Distance to the target plane
- Distance on the plane
- In the
Feature probing dialog, click the
Parameters
 button. The
Measure Parameters dialog is displayed.
button. The
Measure Parameters dialog is displayed.
- In the
Measure Parameters dialog, select the
Guided Single Point tab and edit the settings:
- To record the point with one touch, deselect the Record all points in the catchment zone check box. The point must be within the catchment zone.
- To use the closest point to the nominal as the measured point, but record all points taken within the catchment zone, select
Record all points in the catchment zone check box. The points are listed in the
Info
tab. You can also view the points in the
Feature Probing dialog by clicking
 .
.
- To resize the catchment zone, type a new value in the Catchment zone radius box.
- To stop recording points as soon as you take a point within a specified distance of the nominal, select the Stop recording when the distance from the incoming point to the target axis is less than check box and enter the distance.
- To take multiple points, deselect the Stop recording when the distance from the incoming point to the target axis is less than check box.
- Click OK to save your changes and close the Measure Parameters dialog.
- Probe the point. If your measuring device supports tracking, PowerInspect displays the probe's current position in the CAD view. You can also display the probe's position using the Co-ordinates dialog.
- Configure the Feature probing dialog to view the CAD nominals of the target, any deviations from the nominals, and error values that are related to specified tolerances.
- Use the options on the
Feature probing dialog to specify how you want to treat the point. Click:
 to save the point.
 to retake the point.
 to cancel the point.
- Optionally, if you are playing a geometric group that contains more than one Probed Single Point item, click:
 to accept the current item and move onto the next one
 to go to the previous item and probe it again.