Specify whether and how a wall join cleans up in a plan view.
 Video: Modify Wall Joins
- Click Modify tab
 Geometry panel
 (Wall Joins).
- Move the cursor over the wall join, and click within the square that displays.
To select multiple intersected wall joins for clean up, draw a selection box around the joins, or while pressing Ctrl, select each of the joins.
- You can select to allow or disallow joins:
- To allow the walls to join in the current configuration, on the Options Bar, select
Allow Join, and for Display, select one of the following options:
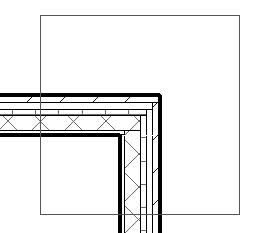
- Clean Join. Displays a smooth join. While the join is selected for editing, temporary solid lines indicate where the wall layers actually end, as shown below; these lines disappear when you exit the Wall Joins tool and do not print.
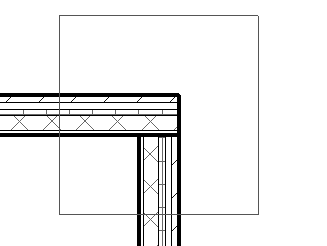
- Don't Clean Join. Displays the wall ends butting up against one another as shown.
- Use View Setting. Cleans wall joins according to the view’s Wall Join Display instance property. This property controls whether the cleanup applies to all wall types or only to walls of the same type.
- Clean Join. Displays a smooth join. While the join is selected for editing, temporary solid lines indicate where the wall layers actually end, as shown below; these lines disappear when you exit the Wall Joins tool and do not print.
- To specify that the wall ends for the intersecting walls should not join, on the Options Bar, select
Disallow Join.
Disallow Join determines the join behavior for the wall end no matter where this wall is placed. For example, if you move the wall away from the current intersection, the wall end will not automatically join with any other wall.
Note: When you select an intersection of joined wall ends, and choose Disallow Join, each wall end at the intersection is set to Disallow Join. You now have disjoined, independent wall ends at the intersection (not a single join). To restore the join at this intersection, draw a selection box around the join location to select all of the wall ends (single-clicking the location only selects one wall end), then select Allow Join. The wall ends will clean up and join properly. - To allow the walls to join in the current configuration, on the Options Bar, select
Allow Join, and for Display, select one of the following options:
- Click Modify to exit the tool.