Running an Optimisation
When your grading objects, various constraints and objectives are set, you can begin the optimisation process. The process is interactive and can be stopped and restarted as needed. It is likely that several iterations of optimisation, adjusting constraints and restarting the optimisation will be required to achieve a viable grading.

The Progress Bar on the Optimisation Toolbar displays both a visual reference of the progression of the processing and what is happening at specific stages.
Start the Optimisation
Start the optimisation process by clicking Optimise on the Optimisation Panel or the Optimisation Toolbar.
Stop the progress at any time in the event you want to make changes. You can then either click Optimise again to continue, or Reset to set the surface back to its original state.

Once started, the optimisation begins by loading the grading object data such as their constraints, locations and their vicinity to each other and the surface. This prepares the calculations required for optimisation and is a quickly executed stage.
Surface Retriangulation

The surface will then enter the retriangulation stage. Surface retriangulation is based on the grading object locations and their configurations.
Any grading objects with a break line enabled will be used in the retriangulation. Building Pad and Kerb grading objects will also retriangulate along their boundaries.
Calculation Precheck

Once the surface retriangulation is complete, the calculation precheck stage is executed. At this time, high-level errors can be discovered based on the new triangle data, global constraints, project objectives, object constraints and geometry locations. If detected, you are alerted by the Notification Centre.
Errors detected during precheck are typically issues that can prevent a feasible optimisation. It is recommended to review the notifications, stop the optimisation and make changes to the project as necessary to avoid wasted time waiting on a failed grading optimisation.
Optimisation

The final optimisation stage will then run. Elevations of triangle points are adjusted in the model. Each iteration of the optimisation will try to improve the surface gradient based on the grading objects, the global constraints and objectives specified for the project.
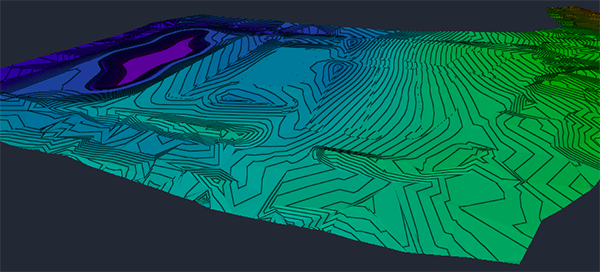
This is a long process depending on the iterations you specified in the Optimisation Options dialog. During this stage you can observe and analyse the changes as they occur in real time in the visualisation display and using several themes on the Visualisation Toolbar.
Use the Optimisation Panel for examining slope constraint issues and progress in cut and fill balance.
Use the Convergence Plot for a broader look into this analysis and progress.
If the project is not tracking a feasible solution, stop the optimisation, make changes to the objects or project constraints and objectives and rerun the optimisation.
Important: Grading Optimization is an interactive and iterative process based on observing what is happening and analysing the violation feedback. A number attempts and adjustments will be likely needed to achieve success.
Completion

Once complete, review your project in the various visualisation themes available and the Optimisation Panel. If it meets your criteria withing reasonable thresholds, it is ready to be sent back to your source drawing as an optimised surface.