Within Services, users can create Support Specifications to be used in conjunction with Design Line. This method of support or hanger assignment allows a breakpoint style table to be assigned to each Design Line for automatic placement of hanger nodes.
Important: There are two different methods or strategies that can be used for automatic assignment of supports. For accurate estimating of costs associated with support lengths and ancillary quantities, a decision is required as to which method is to be used in the configuration. It is strongly recommended that one method be chosen, and remain consistent with using that method throughout a configuration. Otherwise if a mixture of both methods of defining supports is used within a configuration, duplication of supports could occur, resulting in inaccurate costing data and models.
1.) The first decision when configuring supports is to decide whether the supports are to be priced inclusive in the item's rate, under the Material breakdown itself. This method would be used when there is no need to draw the supports visually in the view or model. This method is commonly used with Estimators who, for analysis and quantifying purposes only, need to assign a description of a support build up in the specification. See Supports for more information on this method.
OR
2.) The second method requires supports to be disabled through Item Specifications, and instead, be allocated though Service Support Specifications. This method of hanger definitions allows each hanger to be individually entered with their own item rate when drawn visually in Design Line.
Service-based Support Specifications
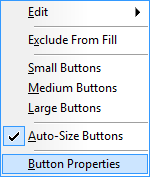
Service-based hangers items can be allocated to the service with a Button Code. Adding across the hanger required for use and then selecting right-click
 Button Properties, which allows entry of a Button Code.

Keeping the Button Code generic across multiple sizes allows for product-listed hangers to be successfully drawn.

User are able to construct a service support specification which forms the rules of when the hanger is to be used and populated onto the Design Line.
Hanger nodes can be made visible on the Design Line, which indicate to the user where the hanger is to be positioned when filled in 3D using Design Line. Once the following has been performed, hanger nodes will start to appear on the Design Lines being drawn by that service.
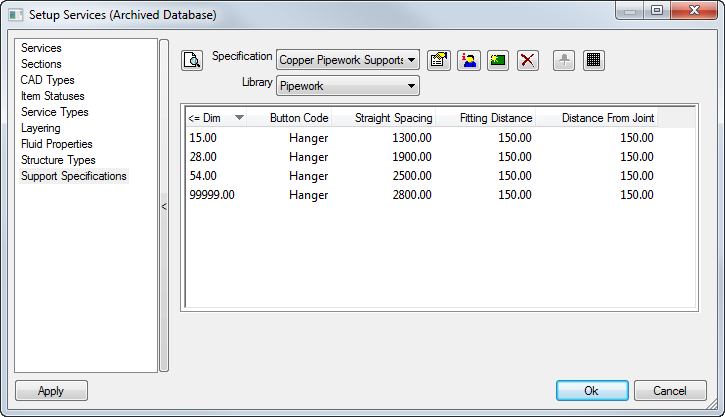
Spacing requirements (Straight Spacing) can be entered per size to determine the allocation of when a support is required along the length of the Design Line being drawn, with the exception of Fitting Distances and Distance From Joint options. These two additional options control where the hanger nodes are to be positioned away from joint and fitting areas.
Once the specification has been configured with spacing requirements, the service template needs to know which specification is to be used for that particular range of products. Editing your service and selecting the Service Information button allows editing of the service template, and in particular, the support specification assignment.
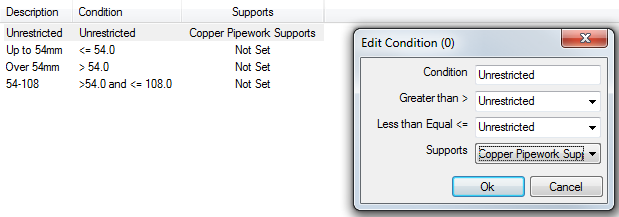
Using the Supports field of the unrestricted condition allows the supports to become active against all sizes. You can assign variant support specs to conditions if you want to control variant styles, but this can also be achieved from the specification using Button Codes to call for the particular hanger item at variant sizes; for example, Gripple type, up to 200mm, and then another hanger type of Split Rings above this size.
When the action to Fill in 3D is performed, the hanger will display as an individual item with the rod extension calculating itself to the section's Soffit height, which is calculated from the elevation the item has been drawn at.
The example below shows spacing requirements falling on or around the 90 elbow. Due to the support specification assigned, the Distance From Joint and From Fitting values cause the hanger to adjust accordingly, and position the hanger after the bend.

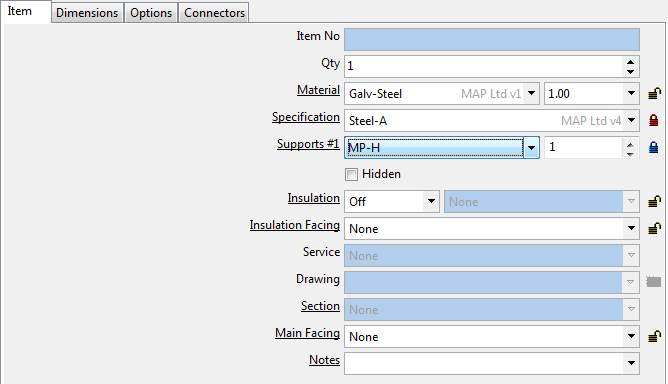
If users are looking to price and quantify the ancillaries each support is generating, then the item is required to be locked against a support ancillary. The support assigned needs to contain the makings and build up of the relevant ancillaries. The example below shows the service item being assigned (and locked) with a quantity of "1" for the MP-H hanger type.
Each time the support specification calls for the hanger to be filled with Design Line, the cost breakdown of the MP-H will be used x1. For more information on the configuration and behavior of supports, see Support Types and Breakpoints which details advanced costing and ancillary assignment.
The Rod height and extension will be calculated based on the Section Soffit height the hanger belongs to. Users can specify the section, along with other Carry Over properties, when drawing each Design Line. If wanting to quantity ancillaries used, then locking a support ancillary build up onto the service hanger item will allow for an advanced breakdown of ancillaries used, as shown below.