You can create ancillary kits for support rods that allow you to change the hanger support rod diameter while automatically updating data.
Changing the support rod diameter could be necessary when increasing the load on a bearer; for example, when you have to stretch a bearer to span multiple ducts, or when you need to suspend additional or other equipment and or services from a bearer. If you use ancillary kits to control support rod diameters, any costing data associated with the support is automatically updated when the support is changed.
For example, if you need to replace a 1/4-inch support rod with a 1/2-inch support rod, you could do so by replacing the 1/4-inch support rod ancillary kit with the 1/2-inch support rod ancillary kit. When using this method to control rod diameters, the associated costing data for the support rods is automatically updated.
Conversely, if you did not use ancillary kits to control rod diameters, and you changed from a 1/4-inch support rod to a 1/2-inch support rod (by changing the Diameter field on the pattern Options tab), using this method, any costing data associated with the supports is not updated.
-
Hanger Pattern Options - In the hanger pattern Options tab, you can use the Drop Rod Diameter field, shown below, to control the hanger drop rod size.

-
Support Ancillary Specification - Hanger support rods can be sized automatically by using a support ancillary specification.
-
Support Rod Ancillary Kits - If desired, you can create ancillary kits that define all ancillaries associated with a single support rod of a specific size. Using this method, each ancillary kit contains all ancillaries for a single support rod of one specific size. The kit can then be used in the support ancillary specification and in the pattern override.
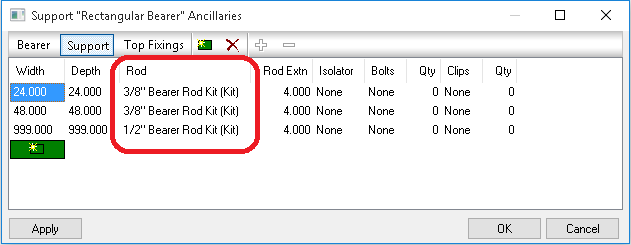
The rod diameter is derived from the support rod ancillary kit that is assigned in the Rod field, as shown in the example below.

All support ancillaries can be defined in a kit, and a kit can be assigned in the Rod column, as shown above. When a kit is assigned in the Rod column, all columns located to the right of the Rod column are ignored (Rod Extn, Isolator Bolts, Clips, Qty).
When using this method to specify support rod diameters, costing data is automatically updated when a new ancillary kit is assigned to the hanger. For example, the costing data shown in the sample Cost Breakdown dialog below is updated when a new support rod ancillary kit (with a different diameter) is assigned to the item.

To create ancillary kits that control hanger support rod diameter, and maintain accurate costing data:
- Create an ancillary for each support rod component.
For example, create an ancillary for each type of support rod, clip, fixing (generic nuts, washers), gasket, isolator, and any other ancillary components. For more information, see Ancillaries.
To do this, click Database
 Fittings
 Ancillaries. Select the Type of Ancillary in the drop-down list, and click New. For each ancillary, enter all of the data needed to define that ancillary, including cost, weight, fabrication time, installation time, and so on. For Support Rods, you must also specify a valid diameter for the rod.
Note: The Diameter field is included on the Support Rod ancillaries dialog for Autodesk Fabrication products version 2017 Update 2 and greater.
 - Next, create ancillary kits that include all the ancillary components for each support rod size.
The example below shows the following support rod ancillary kits that have been created to specify support rods for three different sizes:
- 1/2" Bearer Rod Kit
- 1/4" Bearer Rod Kit
- 3/8" Bearer Rod Kit

Note that each support ancillary kit should contain all of the ancillaries for a single support rod. Therefore, if you need two support rods to suspend a part, then you need to assign two of the ancillary kits. size. For more information, see Ancillary Kits.
- Assign the desired support rod ancillary kit to the Rod field in the associated support ancillary specification.
This is shown in the example below. Support rod ancillary kits have been assigned to three different support sizes (types).
 Note: When an ancillary kit is assigned in the Rod column, all columns located to the right of the Rod column are ignored (for example, Rod Extn, Isolator, Bolts, Qty).
 - In the model, select the part, and display the Options tab on the Takeoff dialog.
- On the Takeoff dialog Options tab, set the following options:
- Use Support Settings: Set this to Yes. Setting the Use Support Settings option to Yes ensures that the appropriate costing data specified in the ancillary kit is applied to the part. If the Use Support Settings option is set to No, ancillary costing data associated with the part is ignored. For more information, see Hanger Patterns.
- Override Support Rods: You can use this option to assign a support rod ancillary kit to a hanger. For more information, see Override Support Rods.