Activity 2: Create projected and detail views
In this activity, you:
- Create projected views.
- Edit view properties.
- Create detail views.
Prerequisites
- Activity 1 is complete.
Steps
Initiate a Projected View.
Now that we've created a base view of the model assembly, let's create projected views and edit their properties to create a complete drawing layout.
From the Create Toolbar, select Projected View.
Click the base view to select it as the parent view from which the projected views will be created and associated.
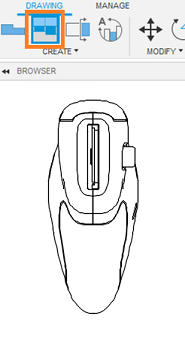
The Projected View command is located under the Create drop-down list.
Place the Views.
Drag the cursor to the right of the base view, and notice that the projected view is previewed based on this alignment.
Click to the right of the existing base view to place a projected view.
Click to the bottom of the existing base view to place a second projected view.
Press
Enterto finish the task.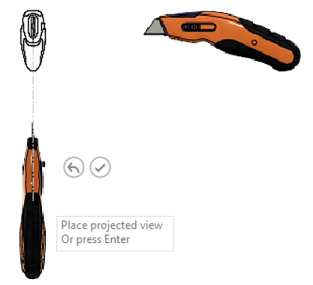
Placing the projected views.
Note: A projected view inherits all its properties from the parent. When the properties of the parent view change, the corresponding properties on the projected view also change. You can change the properties of a projected view by double-clicking it.
Create an Isometric Base View.
From the Create Toolbar, select Base View.
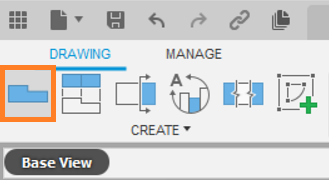
The Base View command is located under the Create drop-down list.
Click to place the view in the lower right of the sheet layout, above the title block.
Set the Orientation to NE Isometric.
Click OK to commit the view.
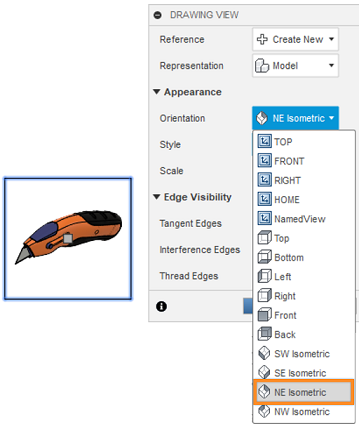
The Orientation settings in the Drawing View dialog.
Note: A projected view inherits all its properties from the parent. When the properties of the parent view change, the corresponding properties of the projected view also change. You can change the properties of a projected view by double-clicking it.About Projected Views and View Options
Projected views maintain a parent-child relationship with the base view it was generated from. They inherit their properties from the parent base view. If necessary, you can override them after you create the projected view.
The projection angle defines the method employed to generate projected views.
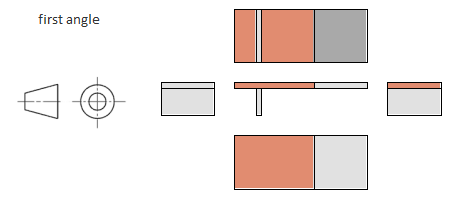
First angle projection.
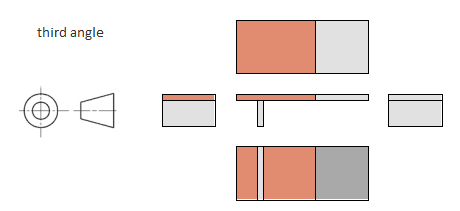
Third angle projection.
First Angle Projection: When you use first angle projection, projected views placed to the right of a base view depict the appearance when viewing it from the left. Projected views placed below the base view depict the appearance from above. The ISO drafting standard specifies that drawings use first angle projection. By default, when the drawing format is set to ISO, the Drawings workspace will use first angle projection.
Third Angle Projection: When you use third angle projection, projected views placed to the right of a base view depict the appearance when viewing it from the right. Projected views placed below the base view depict the appearance from below. The ASME drafting standard specifies that drawings use third angle projection. By default, when the drawing format is set to ASME, the Drawings workspace will use third angle projection.
Edit the Isometric Base View.
Now that you have created a base view and several projected views of the model, let’s use the Drawing View settings to further customize the view layouts.
Double-click anywhere inside the selection boundary of the isometric view to activate it.
In the Drawing View dialog, select 1:1 from the Scale drop-down list to scale the base view.
Click Close to accept the drawing view changes.
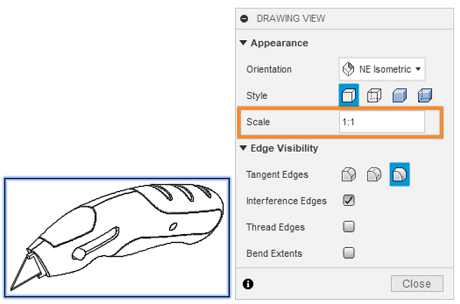
The scale settings in the Drawing View dialog.
Edit the Right Projected View.
Double-click anywhere inside the selection boundary of the right projected view to activate it.
In the Drawing View dialog, select Visible and Hidden Edges from the Style options to display hidden lines in this view.
Click Close to accept the drawing view changes.
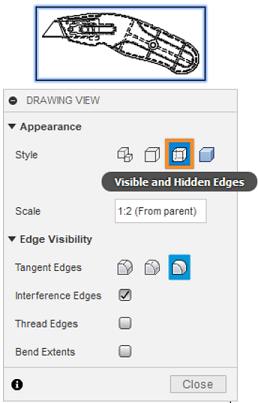
The Style settings in the Drawing View dialog.
Note: Once the projected view properties are changed, they no longer inherit the settings of the base view. If you change the properties back to “From parent,” they will once again inherit properties from the parent view.
Edit the Bottom Projected View.
Now that you have created the base view and several projected views of the model, let’s use the Drawing View settings to further customize the view layouts.
Double-click anywhere inside the selection boundary of the bottom projected view to activate it.
In the Drawing View dialog, select Full Length from the Tangent Edges options to display full length tangent edges in this view.
Click Close to accept the drawing view changes.
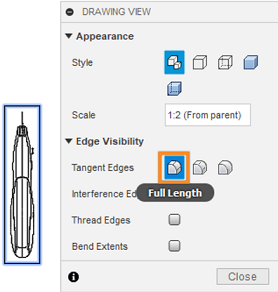
The Tangent Edges settings in the Drawing View dialog.
About Drawing View
Hidden Lines: Select Visible and hidden edges or Shaded with visible and hidden edges from the Style options to display hidden lines within the selected base view. The Hidden-line representation suppresses or exposes lines, edges and other objects that are located behind other three-dimensional objects. This view property can be particularly helpful when trying to visually communicate the inner workings or dimensions of a complex assembly or part.

Tangent Edges: Select Full length, Shortened, or Off from the drop-down list to display tangent edges within the selected base view. Tangent edges mark the transition between a flat surface and a rounded edge, most commonly seen as filleted edges.

Interference Edges: Select On or Off by checking or unchecking the checkbox to display of interference edges within the selected base view. An interference edge occurs when two faces of two components intersect. When Interference Edges are turned on, an edge is displayed that shows where the two components meet. When enabled, associated drawing views display both hidden and visible edges that were previously excluded due to an interference condition. Interferences include press fit or interference fit conditions and threaded fasteners in tapped holes (where the hole is modeled using the minor diameter).
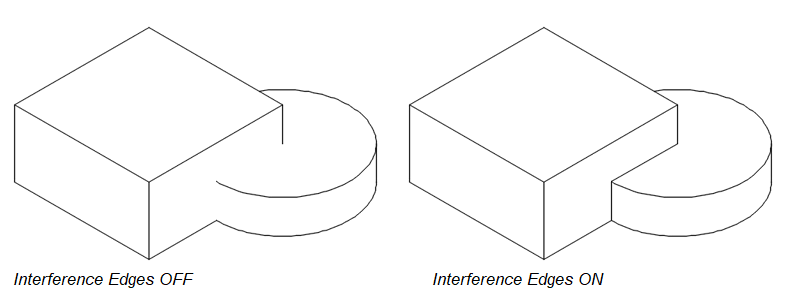
Create a Detail View.
A detail view is a projected view that shows a specific portion of a view at an enlarged scale.
From the Create toolbar, select Detail View.

The Detail View command is located under the Create drop-down list.
Select the right side projected view as the parent view.
Click the center point for the detail boundary (as shown in the image below).
Click again to specify the size of the detail view boundary.
Click to place the detail view in a clear area of the drawing sheet.
In the View Properties dialog, select 2:1 from the Scale drop-down list to make the detail view larger.
Click OK to generate the detail view.
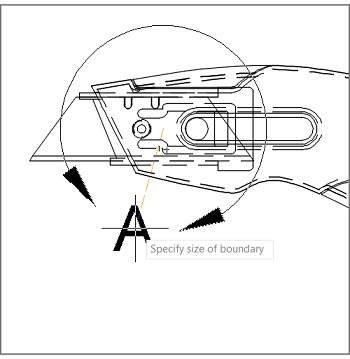
The detail view boundary.
Move Objects.
Click anywhere on an object to select it.
Click the gray grip at the center of the object.
Click a new location for the object.
Note: The Move action works the same way for all views, text objects, dimensions, and balloons.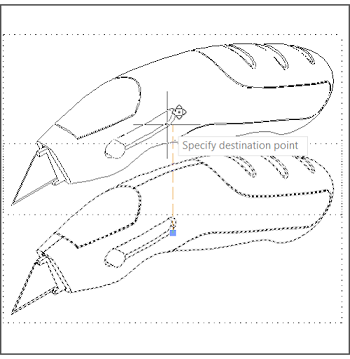
Moving objects.
Move around the objects on your drawing so that they are nicely spaced, leaving the top right portion of the drawing space open. We will place a Parts List there later.
By now, your drawing should look something like this:
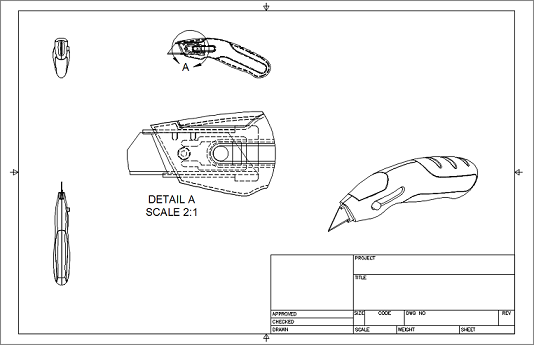
The Final look of the drawing by the end of Activity 2.
Activity 2 summary
In this activity, you:
- Created projected views.
- Edited view properties.
- Created detail views.
- Moved objects.