Tutorial: Creating a drawing with multiple views, dimensions, parts list and balloons
You can create 2D drawings from your Fusion designs, which enables you to generate PDF and DWG documentation of your Fusion model. When you create a drawing, it is generated as a derived document of a Fusion model, and it shows up in the Data Panel as a unique item in the active project.
In this tutorial, you:
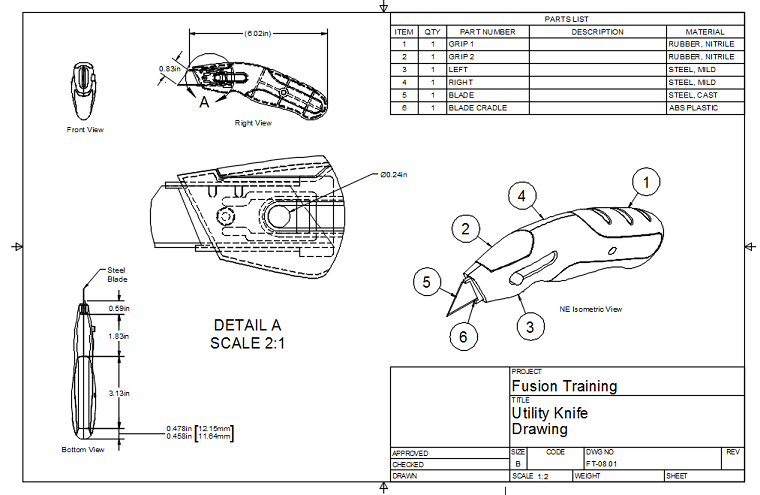
- Create a drawing from the Fusion design.
- Place base, projected and detail views.
- Create text and leader note annotations.
- Add dimensions, parts list and balloons.
- Export the drawing as a PDF file.

A finished drawing with base, projected, detail views, dimensions, parts list, and balloons.
How to Get the Dataset
In the Samples section of your Data Panel, browse to:
Basic Training > 08 - Drawings > 08_Drawings Utility Knife
Double-click the thumbnail image or model name to open the model. Then, follow the steps in the activities. This dataset is used for all activities in this tutorial.
- If the Data Panel is not shown, click the Show Data Panel icon
 at the top of the screen. The Data Panel appears on the left side of the program window.
 - The top level (home view) of the Data Panel is divided into three subsections - PROJECTS, LIBRARIES and SAMPLES. Scroll to the bottom of the PROJECTS list if necessary to see the SAMPLES list.
- Locate the Basic Training entry under SAMPLES and double-click it. The Data Panel now displays a list of the folders containing the datasets used in the tutorials.
- Locate the folder of interest and double-click it to see a list of the available model files. Some tutorials only contain a single dataset. Others contain multiple datasets.
Tip: Press the
S key to display the Toolbox, then search for specific commands you want to use in the current workspace.