Working with the Layer Stack Manager
This topic describes how to use the Layer Stack Manager to designate the layers, materials, and blind, buried, or micro vias.
Using the Layer Stack Manager
- On the Design tab, in the Layers panel, click Layer Stack Manager
 .
. - In the Layer Manager dialog, specify the number of layers your board will have.
- Select the Material and Type to use for each layer.
- Specify the other Layer Properties.
- For multi-layer boards, you can select from the presets or use Add Layer Pair
 to get the number of layers you need. Use Remove Layer Pair
  to adjust the layer count.
Maintain Symmetry is the default setting for adding conductive or prepreg layers, layer count is always even.
 - Use Add vias
 to specify the different via types needed for your board. User Remove vias
  to eliminate unused vias. When adding vias you can specify whether or not the via is a micro via.
Micro vias connect adjacent layers.
Enable Display Drills
- Make sure that Display Drills is enabled in Preferences > General > Electronics > Misc.
This is so you can see the vias in your board.
Using the Default Layer Presets
Multi-layer presets are provided to ensure symmetry and ease in defining the layer structure. If you prefer to manually set up multiple layers, start with the outer layers, then progressively add inner layers; for example, 1 and 16, then 2 and 15, and so on.
Click Design > Layers > Layer Stack Manager.
Select the number of layers in the Preset dropdown list.
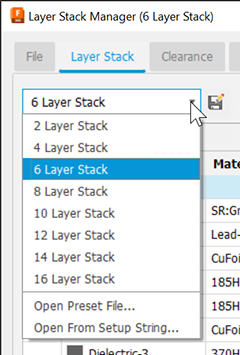
If you need additional layer pairs, click Add Layer Pair
 . You can also remove layers in pairs using Remove Layer Pair
  .
.Adjust the layer materials, types, and so on.
Define Custom Layer Presets
Once you've set up a layer stack you may want to use it again for another design. You can save the layer stack as a preset.
In the Layer Stack Manager, complete your set up of the multiple layers, their properties, and vias.
Click Save Current Layer Stackup as Preset and enter a descriptive name for the preset.
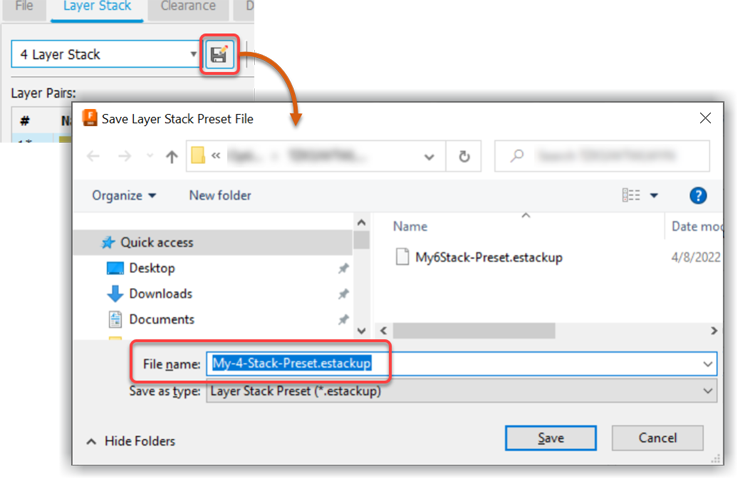
Navigate to where you want to store your presets and click Save.
Using a Custom Layer Preset (.estackup) file
- In the Layer Stack Manager, click the Layer Stack dropdown. At the bottom, click Open Preset File….
- Navigate to and select a saved preset file. You may want to give them unique names to easily identify them.
- The Layer Manager dialog updates with the preset layer stack up.
Adding blind vias between layers
Click Design > Layers > Layer Stack Manager.
Click Add Via
 on the right side of the dialog.
Select the From and To layers in which to allow blind vias.
A blind via travels from an outer layer to an inner layer; for example, from 1 to 3.
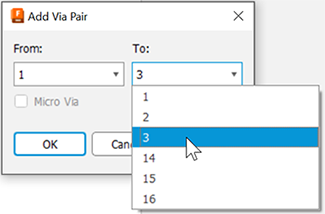
This enables you to create direct connections (vias) between layers 1 and 3.
Click Apply to continue adding vias or OK if done adding vias.
To remove vias, select the via and click

In the Layer Stack Manager dialog, the change is previewed in the layers illustration and the Via Pairs list.
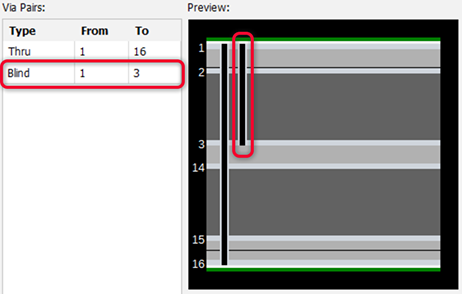
This enables you to specify blind via connections between layers 1 and 3, while leaving space on the other layers for other purposes. The actual blind vias are created when you create the routes.
Adding micro vias between layers
Follow the same steps as when creating blind vias to open the Add Via dialog.
Select adjacent From and To layers in which to allow micro vias, a blind via type.
Micro vias travel between adjacent layers only; for example, layers 1 to 2.
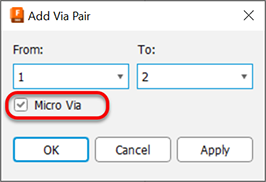
Select the Micro vias option to designate the via as a micro via.
Click Apply to continue adding vias or OK if done adding vias.
In the Layer Stack Manager dialog, the change is previewed in the layers illustration and the Via Pairs list.
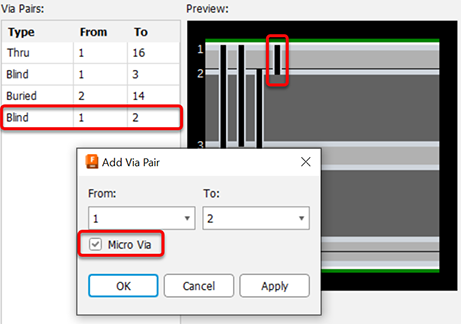
This enables you to specify micro via connections between adjacent layers, while leaving space on the other layers for other purposes. The actual micro vias are created when you create the routes.
Adding buried vias between layers
Follow the same steps as when creating blind vias to open the Add Via dialog.
Select the From and To layers in which to allow buried vias.
Buried vias used inner layers only, instead of one outer layer like in blind vias; for example, layers 2 to 14.
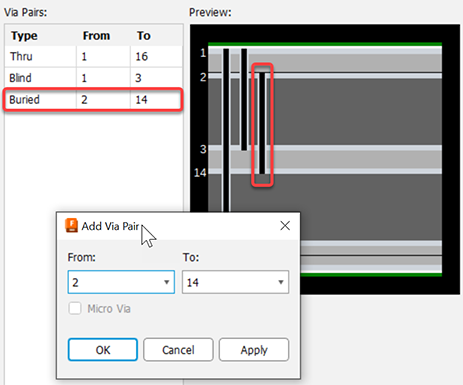
This enables you to create connections (buried vias) between layers 2 and 14.
Click Apply to continue adding vias or OK if done adding vias.
In the Layer Stack Manager dialog, the change is previewed in the layers illustration and the Via Pairs list.
This enables you to specify buried via connections between layers 2 and 14, while leaving space on the other layers for other purposes. The actual buried vias are created when you create the routes.