General workflow to run a simulation study
Open or create a model
You need a model on which to perform the simulation analysis. You can use either a single part or an assembly for an analysis. Create your model using Fusion modeling tools, or open an existing model using the Data Panel.
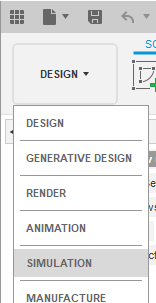
Switch to the Simulation workspace
Click and expand the workspace menu, then select Simulation.
 Note: A New Study dialog appears automatically, the first time you switch a model to the Simulation workspace.
Create a new simulation study
All the commands to setup and run a simulation study are found on the Setup tab of the Simulation toolbar. The commands on the toolbar are specific to each study type and change as you switch from one study type to another. To set up a study, work your way along the toolbar, invoking each of the commands.
Optionally, simplify your model for analysis.
Make simulation-specific changes, while preserving your original design model.
- Remove unnecessary features that complicate the analysis and do not provide useful information.
- Take advantage of Symmetry, when appropriate, to reduce the simulation model size and solution time.
- Split faces to confine loads or constraints to a only portion of a larger face.
- Make any desired geometry changes that you do not yet want to perform in the production model.
Apply materials
Material for the simulation study can differ from the materials specified in the Design workspace. For example, define nonlinear material plasticity properties to determine permanent deformation in a Nonlinear Static Stress or Event Simulation study.
Apply boundary conditions
Apply boundary conditions (loads and constraints, or heat, or injection locations, etc depending on the study type). This process along, with defining materials, is the Setup phase of simulation (also referred to as preprocessing).
Note:- One Fusion model can contain numerous analyses or studies. Each study has its own representation in the browser.
- One Fusion design model can also contain multiple simulation models, each a different variant of the original model. Use the Simplify contextual environment to generate simulation models.
Optionally, revise your model and re-solve the study
If you did not receive acceptable results, first, double-check your study setup to ensure that the boundary conditions are properly defined. If necessary, revise the geometry and re-solve the study until you receive acceptable results. There are two ways to revise the geometry (that is, two different workspaces in which you can perform the modifications):
- Design workspace: If you want to change the production model geometry, use the Design workspace. Changes made here are propagated to all related simulation models.
- Simplify environment of the Simulation workspace: If you are doing "what if" analyses and are not yet sure how you might change the design model, use the Simplify contextual environment. Changes are confined to the simulation model being modified. The design model and all other simulation models are undisturbed.