Injection molding simulation study
The injection molding simulation study in Fusion determines if your plastic part can be molded, if it will have specific visual defects, and how much it is likely to warp. You can also determine how much a flat surface deviates from flat, to determine if this might impact its performance in an assembly.
What Is Injection molding?
Injection molding is one of the most common methods for manufacturing very high volume custom plastic parts. Injection molding is the process of making plastic parts by injecting molten plastic material at high pressure into a metal mold. After the molten plastic is injected into the mold, the mold is cooled and opened to reveal a solid plastic part.
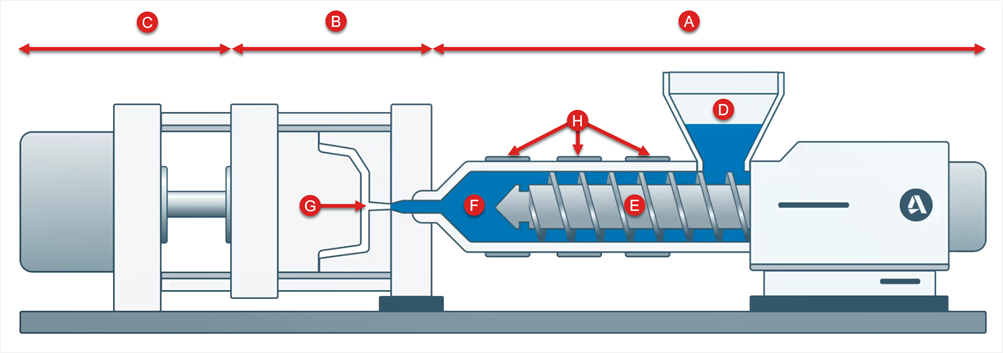
In principle, injection molding is simple: melt plastic pellets, inject it into a mold, let it cool and, then, take a plastic product out of the mold. In reality, injection molding is an intricate and complex process. An injection molding machine has three main parts: the injection unit (A), the mold (B), and the clamp (C).

The process starts when plastic pellets are put into a large funnel, called the hopper (D), that feeds it into the area that is called the barrel (F). In the barrel, a screw (E) transports the pellets forward into the molding machine. The barrel also has heater bands (H) that, together with the ‘work’ of the screw heat up the plastic and turn it into a liquid. While the screw mixes and pumps the plastic forward, the screw itself moves backward slowly, creating a reservoir of plastic in front of the screw. At some point, the machine will force the screw forward and the plastic gets injected into the empty part of the mold called the cavity image (G).
The injection typically goes quickly under high pressures. The molding machine keeps the mold closed under enormous pressure. After the molten plastic is injected in the mold, it is cooled by the mold and the mold is opened to reveal a solid plastic part.
When the plastic cools down the material will shrink. The molding machine will keep pushing more plastic into the mold according to the set packing pressure to compensate for the plastic shrinkage. Once the plastic solidifies sufficiently, the mold will open and the part will be pushed out. The mold then closes, and the process repeats.
Injection molding simulation results
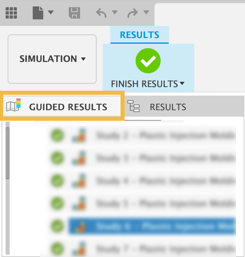
Results are viewable as soon as intermediate results become available. Guided Results provide you with assistance to interpret the Fill, Visual defects, and Warpage results. Switch to the Results tab to view standard results that you can analyze and interpret in more depth.

Injection molding simulation examples
The following list contains a few examples for which injection molding simulation might be appropriate:
- Chairs
- Toys
- Cases for consumer electronics
- Disposable cutlery
- Bricks
- Containers
- Household products
Result interpretation
Guided results
For users with little or no experience with plastics injection molding, the Guided Results panel helps you interpret the results, to answer the fundamental questions 'Will my part fill?', 'Will my part warp?', and 'Will my part have visual defects?'. In the Guided Results panel you can also find suggestions for what you could adjust to improve the results, with buttons that take you directly back to the appropriate dialog in the Setup tab, where you can make the changes.

Standard results
If you have more experience with plastics injection molding, the Results panel helps you interpret detailed results, such as:
- Fill time result
- Confidence of fill
- Quality prediction
- Injection pressure
- Pressure drop
- Temperature at flow front
- Average temperature
- Time to reach ejection temperature
- Frozen layer fraction at end of fill
- Air traps
- Weld lines
- Grow from
- Volumetric shrinkage at ejection
- Sink marks
- Deflection, all effects
- Warpage indicator