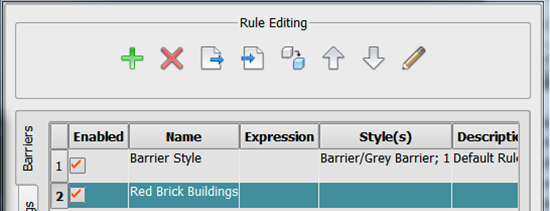
To define style rules
Style Rules use expressions to specify criteria that determine which styles will be applied to individual features in a feature class, based on the values of a data source property or model property you specify.
Click Manage
 Display
 .
.In the Style Rules Panel, click the tab for the desired feature class to style. The tabs are on the left side of the Style Rules panel. For example, to create a rule for buildings, click the Buildings tab.
Click to create a new style rule. When prompted, enter a name for this style rule, for example, "Red Brick Buildings." After clicking OK, the new style name appears in the Rule Editing window.

Select the new style rule and click
 or double-click it to open the Rule Editor. Optionally, enter a description for the style.
Click
 under the Expression field. In the Create Filter Expression dialog box, create an expression to filter the features you wish to style, then click OK.Note: If you don't create a filter expression for the Style Rule, the Style Rule you create will apply to the entire feature class.
In the Rule Editor, click
 to display the Select Style dialog box. Select the style you want. Features that meet the criteria of the expression you created for this style rule will use the style you specify.
When you are finished with this rule, click OK.
Note: If you are defining Rule Style rules, continue adding style rules until you have defined one for each Rule Style value.
Example Style Rule Expressions
| Feature Class | Style Rule Expression | Result |
|---|---|---|
| Buildings | BUILDING_COMPLEX_ID = Downtown Hospital Complex OR BUILDING_COMPLEX_ID = Uptown Hospital Complex | Use the designated style for any building that is part of one of these hospital complexes. |
| Roads | LANES_BACKWARD > 2 AND LANES_FORWARD > 2 | Use the designated style for roads that are two lanes or more in both directions. |
| Pipes | LOCATION:INSIDE:CIRCLE.ID1 Note: The syntax for this type of expression is inserted automatically when you draw the circle. | Use the designated style for pipes within the circle you draw on the model. |
Advanced Tips
- You can assign multiple styles to one style rule. Use the Probability column in the Rules Editor to increase or decrease the frequency that each style in the style rule will be used.
- When you import data and then configure data, you can map one property from your original data source to the Rule Style model property. Define one style rule for each value of the RULE_STYLE property. You can override the Rule Styles property with the Manual Styles property.
- You can also create style rules that behave like feature class subsets. For example, if you enter the expression ROOF_HEIGHT > 24, all buildings whose ROOF_HEIGHT property is more than 24 will use this style.
- You can also override the style for an individual feature, or a set of features by dragging styles from the Style Palette to individual features, or even individual surfaces on a feature, such as one side of a building facade.
- If you sketch or import multiple 3D model objects at once, such as a row of barriers or a row of trees, you can change the object spacing and variance in the Stack.