-
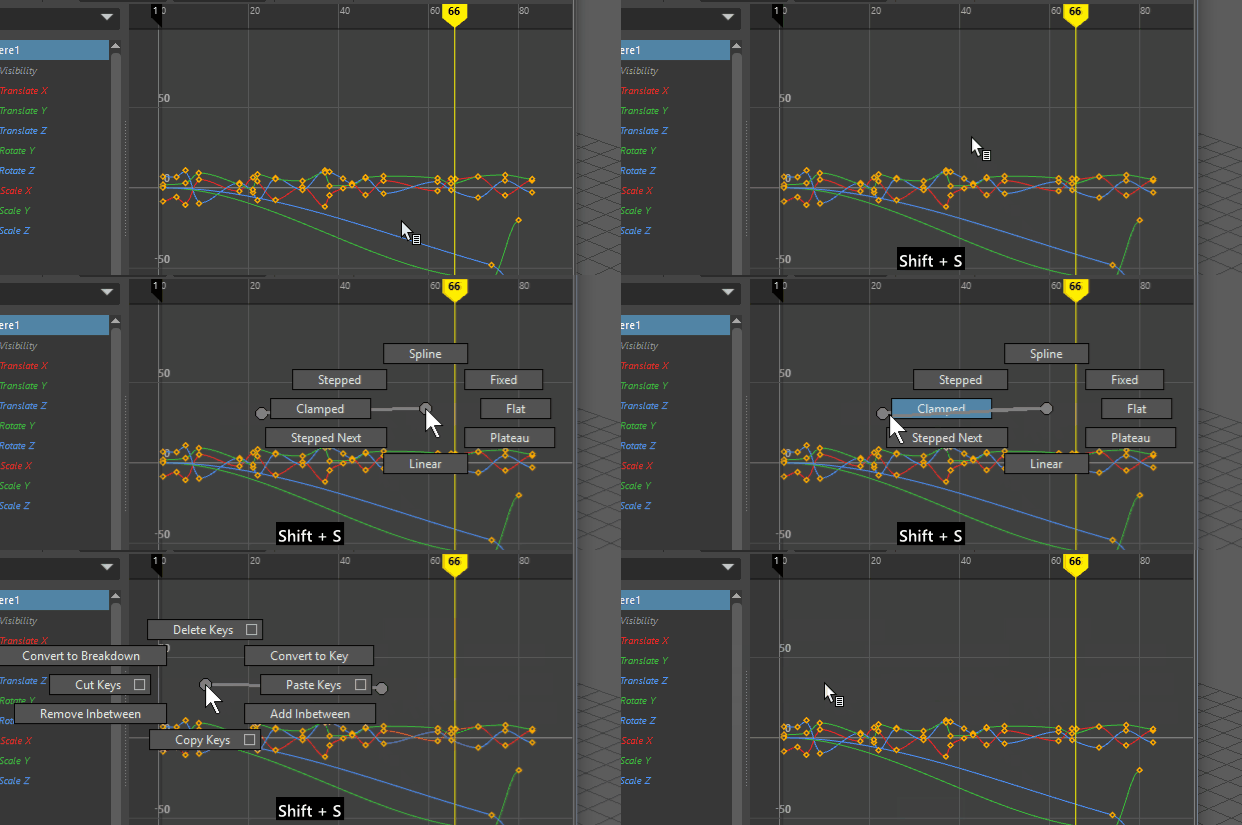
Press Shift + s in the Graph Editor Graph view and slide left to open the Keys section and right to open the Tangents section.

Keys
- Delete Keys
-
Deletes the current keys. Select Delete Keys >
 to open the
Delete Key Options.
- Convert to Key
-
Converts selected breakdowns to keys.
- Paste Keys
-
Pastes the keys currently in the virtual clipboard to the time line where the current time indicator is located. Select Paste Keys >
 to open the
Paste Key options.
- Add Inbetween
-
Inserts an inbetween at the current time.
- Copy Keys
-
Copies the current keys to the virtual clipboard. See Copy and paste keys and Cut keys.
-
Select Copy Keys >
 to open the
Copy Keys Options.
- Remove Inbetween
-
Removes an inbetween at the current time.Note: When you use Remove Inbetween, the space between keys is decreased. This may cause keys to conflict and act unpredictably.
- Cut Keys
-
Cuts the current keys and stores them on the virtual keys clipboard.
Select Cut Keys > to open the
Cut Keys Options window. This window has the same options as the
Copy Keys Options window, plus the following:
Adjustment Specifies how the key set is copied to the keys clipboard after it has been cut (available if Segments is on). None Specifies cutting keys within the specified range. If there are keys remaining adjacent to both ends of the deleted area, the animation curve(s) produced will retain the out tangent and in tangent of the key in the cut area. Collapse Specifies removing keys within the specified range. Any keys preceding the cut are moved to the start time of the cut area, effectively “shuffling forward” the animation curve to fill the resulting gap. Connect Adjusts the keys clipboard curves in value and adjusts the segment of the original curve following the pasted segment. This prevents discontinuity in the animation (available if Collapse is on). - Convert to Breakdown
-
Converts selected keys to breakdowns. See Breakdowns for more about the difference between Breakdown keys and default keys.
Tangents
- Spline
-
Specifying a spline tangent creates an animation curve that is smooth between the key before and the key after the selected key. The tangents of the curve are co-linear (both at the same angle). This ensures that the animation curve smoothly enters and exits the key. When animating fluid movement, a spline tangent is an excellent place to start. You use a minimum number of keys to achieve your look.
- Fixed
-

Specifying a fixed tangent allows a key’s tangents to remain unchanged as the key is edited.
When animating a ball, you may find the ball isn’t falling from a desired height, yet its impact with the floor and everything else is perfect. Using a fixed tangent lets you change the height of the ball while retaining the tangent’s angle. This is somewhat different from Key > Bake Animation.
This process is useful when you want to:
- Add keys to an existing curve
- Flat
-

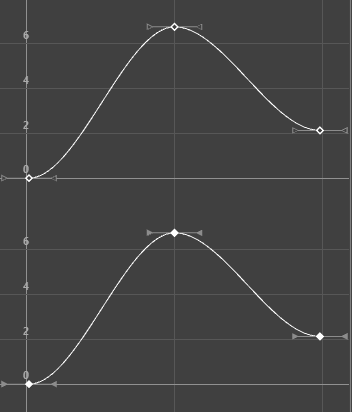
Flat tangents set on a curve with Weighted tangents
Sets the in and out tangents of the key to be horizontal (with a slope of 0 degrees). When a ball reaches its ascent, it hangs in the air for a brief time before starting its descent. You can create this effect by using a flat tangent.
- Plateau
-

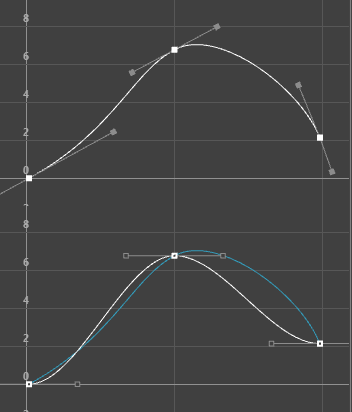
Plateau tangents set on a curve with Weighted tangents
Plateau tangents ease animation curves in and out of their keyframes like spline tangents, but also flatten curve segments that occur between equal-valued keyframes like clamped tangents. The plateau tangent normally behaves like a spline tangent, but ensures that the minimum and maximum values along a curve are all at keyframes.
Plateau tangents are useful when you want the positions of your keyframes to be exact, because they ensure the maximum and minimum values (‘hills and valleys’) of the curve do not extend past their keyframes. For example, picture an animation of a ball rolling off a table, falling to the floor, and then rolling on the floor. With spline tangents, the ball falls through the floor, then comes back up to the floor. With plateau tangents, the ball will not fall through the floor. The tangents guarantee that your animation will not wander beyond the values you keyframed.
To do this, if a spline tangent would produce a minimum or maximum between two keyframes, the plateau tangent flattens the keyframes in question. Keyframes at local minimum and maximum points along the curve are also flattened. Finally, the first and last keyframe along a curve are always flattened if they have plateau tangents.
- Linear
-

Specifying a linear tangent creates an animation curve as a straight line joining two keys. If the in tangent type is linear, the curve segment before the key is a straight line. If the out-tangent type is linear, the curve segment after the key is a straight line. When animating the color of a heating element on a stove, you would use linear to achieve that gradual change in color from charcoal gray to burning hot red.
- Stepped Next
-

FBIK animation keys use the stepped next tangent type by default. This tangent type differs from regular Stepped tangents in that its interpolation values jump immediately to that of the next key, rather than holding the value of the current key until the next key is reached.
- Clamped
-

-
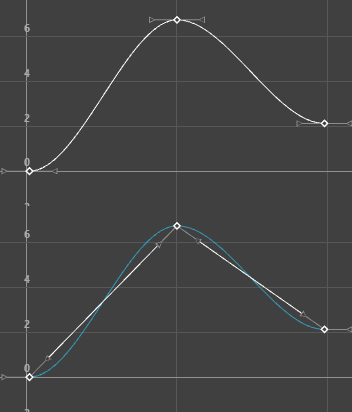
Specifying a clamped tangent creates an animation curve that has the characteristics of linear and spline curves.
-
The keys’ tangents will be splines unless the value of two adjacent keys are very close. In this case, the out tangent of the first key and the in tangent of the second key will be interpolated as linear.
-
When animating a skeleton in a walk-cycle, you may notice a slipping of the pelvic and foot joint position. This occurs because the value of the keys on the curve are either the same or close to (within tolerance of) the value of the other. Maya assigns a default spline tangent to describe what occurs between these keys. This is why you get the joint positions slipping.
-
By setting the tangent type to clamped for these keys, the slipping is corrected and the tangents becomes a combination of linear and spline.
In the Maya environment preferences, Clamped is the default tangent type.
- Stepped
-

Specifying a stepped tangent creates an animation curve whose out tangent is a flat curve.
The curve segment is flat (horizontal), so the value changes at the key without gradation.
The light from a strobe light turns on and off. To create a strobe-like effect, you would use a step tangent.
Tip: To get a quick preview of your animation as if all keys have Stepped tangents, right-click the Time Slider and toggle the Enable Stepped Preview option. When Enable Stepped Preview is on, playing back your animation lets you quickly view the position of objects as they hit each keyframe. Curves return to their original tangent types when you turn off Enable Stepped Preview.
