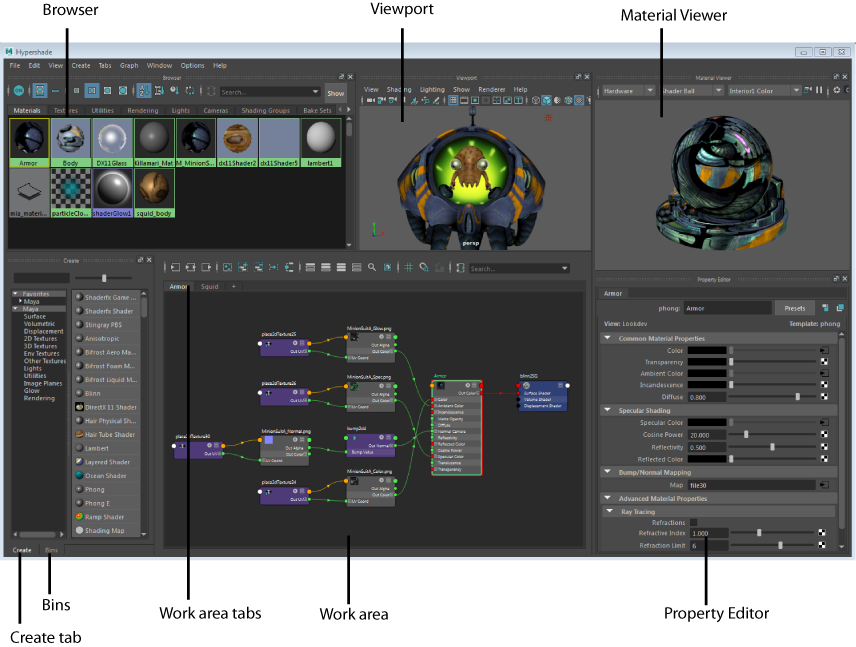
The Hypershade is made up of several panels that you can use to build and edit materials while instantly previewing your results.
- Click
 on the
Status line (toolbar).
- Select Windows > Rendering Editors > Hypershade.
A Node Editor tab is automatically created in the work area. This is where you create your shading networks.
The Hypershade includes the following panels by default, each of which helps to simplify your look development workflow and enable you to achieve your results faster:
- Browser : This panel lists your materials, textures and lights, sorted by tabs.
-
Material Viewer
: This panel renders your shader or soloed material.
Choose between the hardware renderer and Arnold for Maya, and choose from among several geometry types.
Adjust your shading network and see the render update in real-time.
When rendering with Arnold for Maya, you can add image based lighting to your render by selecting from various preset environments or adding your own.
Bump maps and flat textures can be rendered in the Material Viewer, and you can apply color management to your renders as you would in the Render View
-
Create
: Click a node in the
Create tab to create and add nodes to your shader graph.
Alternatively, you can also click Tab and enter the type of your node, or drag and drop a node from the Create tab to the work area.
-
Work area: This panel allows you to create nodes and build your shader network as you would in the Node Editor. You can also display the nodes in the same view modes: simple, connected, full, and custom. By default, nodes in the Hypershade appear in custom mode where only the commonly used attributes are displayed.
See Create and connect nodes in the Hypershade.
Select Show > Objects from the marking menu to determine the nodes that are displayed in the work area. By default, cameras, shading groups and shading nodes are shown, but you can customize this set of filters.
You can create multiple tabs, each with its own set of nodes displayed. This way, you can work with multiple shader graphs and edit them simultaneously without the need to regraph.
To create additional tabs, click + beside the right-most tab. You can create new tabs, delete them, rename or duplicate them, and re-order them in the work area. Right-click any tab for its tab menu options. Your tabs are retained when you close the Hypershade and when you save your file.
-
Property Editor
: View your shading node attributes in the Lookdev template view. This template is optimized for look development workflows. It has a simpler layout that lists only the most commonly used attributes, making it easier for you to find and adjust your shading node attributes. Click
 to switch to the classic
Attribute Editor view.
- Bins: Sorting bins act as containers for shading nodes (materials, textures, and so on), to help you organize and track shading nodes in your scenes.
Include other panels, such as the viewport, Render View, or the Outliner, as one of your panels by selecting from the Window menu and docking it into the Hypershade. You can further customize the layout of the Hypershade by undocking and rearranging the panels. See Customize your layout in the Hypershade. This allows you to cover your entire look development workflow within one editor.

Related topics
- Look development using the Hypershade
- Render your shading network in real-time in the Material Viewer
- Adding image based lighting with a preset or custom environment in the Material Viewer
- Create and connect nodes
- About soloing
- Solo a node in the Hypershade
- Viewing your attributes in the Property Editor
- Creating a lookdev view template for your custom node
- Pause material and texture swatch generation