Create a Workspace
If you're a Fusion user, this feature is not currently available.
Follow this process to create and configure a new workspace for your Fusion Manage site.
1. Add a new workspace
- Go to Administration > Workspace Manager.
- In the Workspace Manager, click New Workspace.
- Complete the fields and click Save.
Complete workspace setup
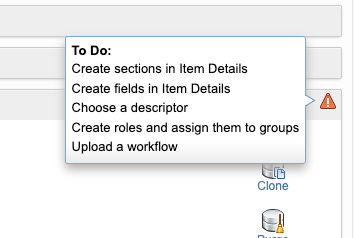
After the workspace is created, you may see caution icons next to it on the Workspace Manager page. These icons indicate "to do" tasks that must be completed before the workspace can be used.
Hover over a caution icon to view details about the required tasks. Once all tasks are completed, the icons will disappear.

2. Create sections in Item Details
Before adding fields and tables to the workspace's Item Details tab, create one or more sections to organize them.
For more help, see Configure the Item Details Form
3. Add fields to Item Details
Once sections are in place, you can add fields and assign them to the appropriate section(s).
For more help, see Configure the Item Details Form
4. Specify descriptor fields
Each item in Fusion Manage is identified by a "descriptor", which acts as its title or header. Descriptors are set up individually for each workspace.
Select up to 4 Item Details fields that will make up the descriptor for this workspace. For guidance, see Specify Descriptor Fields
5. Set up roles and permissions
Although the workspace is created, users won’t be able to access it until a role with the appropriate workspace permissions is created and assigned to them.
To grant access:
- Create a role for the workspace.
- Assign workspace permissions to the role.
- Add users or user groups to the role.
For detailed instructions, see Set up Permissions