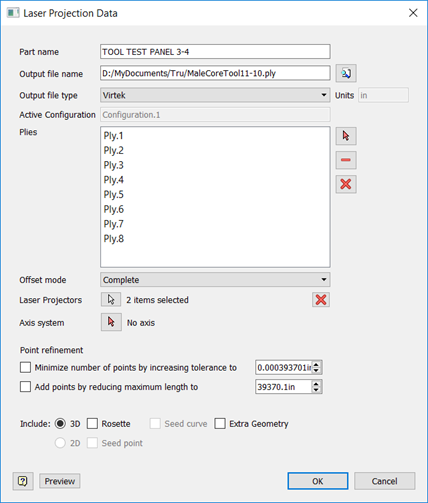
Laser projection data is information in an output file that is used by laser projection software, such as Autodesk TruLaser, to project part outlines onto a work surface using laser points of light. The Laser Projection Data dialog box uses the most recently-used settings and options to generate a Laser Projection output file. This topic includes two procedures; one for creating laser output using the most recent settings, and one for how to change the settings.
Create a Laser Projection Output File
- Click
Laser Projection
 on the
TruPlan ribbon.
The Laser Projection Data dialog box opens.

- Enter a part name for your model.
This will be readable by the laser projection software.
- Enter a name and location for output.
You can set default locations for laser and target data in the Laser Projection Output tab of the TruPlan Options dialog box.
- Select which laser file format to use.
- Virtek: Virtek Vision International, Inc.
- LPT: FARO (Laser Projection Technologies)
- LAP Laser: LAP Laser Applications
- SL Laser: SL-Laser Systems LP
- Assembly Guidance: Assembly Guidance Systems, Inc.
- Aligned Vision: Aligned Vision laser projection
- DXF: A 3D DXF of the ply geometry and thicknesses that can be read in other Autodesk software, such as A360.
Beside the Output File Type box, the default length unit is shown. This is set by the host application (for example, Inventor). Many laser file formats do not include units, so make a note of what units your model is using, or remember to check the output report that is generated along with your output file.Tip: Add unit type text (for example, "mm") to your part name to make it clear what units are being used. - Click OK to create the output file.
The output file is created in the folder you specified.
A report file of the same name with suffix -report.htm is also created. This report includes information such as which units and axis system were used, number of plies, information messages, geometry settings, and so on. This information can be useful when trying to recreate an output file later on.
Adjust Laser Projection Settings
- Specify which plies you want to include in laser project data.
By default, all plies in the active configuration are included. If a ply is divided into sub-plies, only its active subdivision is included.
- To remove an item from the list, select it, then click
Deselect
 .
.
- To remove all items from the list, click
Deselect All
 .
.
- To restore a ply or its sub-plies to the list, click select
 , then select the ply, its parent sequence, or its parent layup, in the
TruPlan browser.

- To remove an item from the list, select it, then click
Deselect
- Select an offset mode:
- None: Ply geometry is on the surface and not offset.
- Complete: Each ply is offset from the surface by the thickness of the plies underneath. For example, if you have a sequence with 15 plies underneath it, the ply will be offset by 15 thicknesses. You need to have enabled thickness offset calculation for your part, either on plies or in your strategies, for this to work.
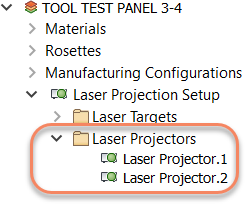
- To add projectors that you created for your project, click the
Laser Projectors selection arrow and select them from the
TruPlan browser.

- If you want to switch coordinate systems, click the
Axis System selection arrow
 and select a rosette system in the
TruPlan browser.
If you do this, the geometry in the output file will be relative to the rosette system. You might do this to:
and select a rosette system in the
TruPlan browser.
If you do this, the geometry in the output file will be relative to the rosette system. You might do this to:- Match an existing set of tooling files.
- Change from right-hand axis system to left-hand to do a mirrored projection.
- Move to a local coordinate system to eliminate large point location values, for example in aircraft coordinate systems.
By default, TruPlan uses the global coordinate system for laser output.
- Adjust Point Refinement.
- Minimize Number Of Points By Increasing Tolerance To: This sets the tolerance for the number of discretization points on the trajectory; these represent the points of light to be projected by the laser. A lower tolerance forces more sampling to be added to the display and output file. This adds discretization points whenever the distance between points is larger than the minimum tolerance value entered. In other words, points on a straight line will be at least this distance apart from each other. This also increases the accuracy of ply offsets in transition zones. However, adding too many points can slow down the laser projector and cause flicker in your laser projection. A higher tolerance reduces the amount of discretization points to be added to the laser output file. The default value is large enough that no intermediate points are created on any geometry.
- Add Points By Reducing Maximum Length To: Set the maximum distance allowed between points of light. Use this in coordination with your tolerance value. The smaller the length, the more points there will be.
- Use the buttons at the bottom of the dialog box to select what types of geometry will be included in the laser output.
- 3D: 3D ply geometry; this is a toggle switch with 2D. In most cases you want your output to be 3D.
- 2D: 2D flattened geometry. This is a toggle switch with 3D. This is only available if flatten geometry exists within the part, and is sometimes used to make sure the ply shapes are correct. You might also use this to lay several plies on top of one another to be cut all at once. 2D shapes are projected at their location in the model.
- Rosette: Include a rosette for each ply in the output file. A rosette shows the direction of a ply at the rosette origin. The long end of L shape indicates the grain direction for each ply. Rosette size is controlled in Options.
- Seed Point: The seed point that was defined in the strategy; it defines where you first place the material before spreading it out. This is only available if a seed point exists in the model and if Rosette is selected. If Seed Point and Rosette are both selected, the rosette will be moved to the location of the seed point.
- Seed Curve: The seed curve that was defined in the strategy. This is only available if a seed curve exists in the part.
- Extra Geometry: Include any extra geometry you created for the part.
- Click
Preview to highlight the lines and normal vectors that will be projected by the laser.
The default color is green; you can change normal vector color and size in the Options dialog box.