
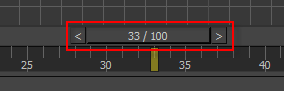
The time slider works in conjunction with the track bar to allow you to view and edit your animation. The slider itself shows the current frame and lets you move to any frame in the active time segment by dragging. Right-clicking the slider bar opens the Create Key dialog, which lets you create transform keys without keyframing.
The Time Slider can be floated and docked, to customize your workspace.
When Set Key is off, you can copy selected objects' transform data from a source frame to a destination frame, creating a key at the latter, by right-button dragging the time slider from the source to the destination. Set parameters as necessary on the Create Key dialog, then click OK.
In Set Key mode, holding down the right mouse button and dragging the time slider allows you to move a pose in time without losing it in the viewport.
To move one frame back or forward, click the arrow on the left or right side of the time slider, respectively. Or simply click anywhere on the time line to go to that time. In Key Mode, clicking an arrow jumps to the adjacent key.
The Track View Key window displays a time slider as well. The movement of the two time sliders is synchronized. Moving the time slider in the Track View window also moves the time slider below the viewports and vice versa.
Procedures
To toggle the time slider, do the following:
- On the
Alt menu
 Animation menu Timeline panel, click Show Time Slider.
To move to a specific frame in the animation, do one of the following:
- Drag (scrub) the time slider right or left until the frame number is displayed on the time slider.
- Type the frame number into the current frame field in the time controls and press
Enter.

- Click in the empty track to either side of the time slider. The time slider will jump to your cursor position. This is faster than dragging the time slider.
To move forward or back by one key, do one of the following:
- Click the < or > button at either end of the time slider.
- Press the < or > key on the keyboard.
-

 When Key Mode is off, click the Next Frame or Previous Frame button in the time controls.
-
 When Key Mode is on, click the Next Key or Previous Key button in the time controls.
By default,
Key Mode is off, and these controls move a frame at a time. To move between keys, click the Key Mode Toggle button; this turns on Key Mode. When Key Mode is on, the button looks like this:
![]()
To move to the first or last frame of the active time segment:
- Use the time control buttons
 (Go To Start) or
 (Go To End).
To display SMPTE time code on the time slider:
- In the time controls, click
 (Time Configuration), and then under Time Display, choose SMPTE.
To display subframes on the time slider:
- In the time controls, click
(Time Configuration), and then under Time Display choose Frames:TICKS or MM:SS:TICKS.
Each frame is divided into subframes.
To use the time slider to adjust animation, do one of the following:
- To copy a pose from one frame to another, with Auto Key on or off, and Set Key off, right-click the time slider and drag to a new location.
The Create Key dialog appears with Source Time set to the frame you were on when you right-clicked, and Destination Time set to the frame to which you moved the time slider. Toggle the Position, Rotation, and Scale checkboxes as necessary and then click OK to create a key at the destination frame for the pose at the source frame.
- In Set Key mode, if you have posed your character on the wrong frame, right-click and drag the time slider. The pose is moved in time to the new time slider position. Click the Set Key button to set the keys.
To scrub the animation with the mouse but without dragging:
- Open Customize User Interface and on the Keyboard panel, click in the Action list and then press T to jump to the T section. Scroll down to find Time Slider Capture Toggle and click it.
- Click the Hotkey field and then press a keyboard combination to assign as a keyboard shortcut; for instance, Ctrl+T. Click the Assign button.
- Close the Customize User Interface dialog and then press your hotkey for Time Slider Capture Toggle.
- Move the mouse left and right without pressing any buttons.
The time slider moves in tandem with the mouse.
- To exit this mode, press the hotkey again or click any mouse button.
Interface
By default, the active time segment is from frame 0 to frame 100. The slider displays time in frames, SMPTE numbers, or other measurements, depending on the current setting in the Time Configuration dialog.
The slider bar displays the current frame, followed by a slash (/), followed by the total frames in the active time segment. For example 25/100 means frame 25 of 100 frames. The current frame also appears in the current frame field. If animation exists in the scene, it's played back as you drag the time slider.
The buttons at the left and right ends of the time slider move the animation one frame backward and forward, respectively, like the Previous Frame and Next Frame buttons in the time controls. If Key Mode is on, these buttons duplicate the Previous Key and Next Key buttons instead.
Key Mode can jump to all the keys or only the transform keys, depending on the Key steps setting in the Time Configuration dialog.
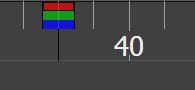
Key colors represent the Axis on which the animation occur
- Red: Represents the X-axis
- Green: Represents the Y-axis
- Blue: Represents the Z-axis
These colors are used to represent axes in many areas of 3ds Max, like the Curve Editor and the Dope Sheet.