When you to open a scene and get an Assertion Failed error, File Open Failed error, or the file does not load. It often means that the file is corrupt.
These errors can be caused by many things, such as:
- A component built in another program has been imported or referenced with an XRef.
- The scene failed to save because due to a power interruption or system crash.
- Mistakes in a plug-in corrupted an object used in the scene.
Problems and Resolutions
Assertion Failed Errors
When you load a file that is corrupt, you get an assertion failed error. The assertion failed error gives you a line number and file name where the corruption occurred.
Sometimes having the line number and file name often does not help you understand what is corrupted in the scene. You can also click Retry or Cancel.
It is a good idea to click Retry a few times and confirm every vertex in the scene until you bypass the object. Sometimes after you click Retry many times, the scene finally opens and can be resaved.
Merging Corrupt Files
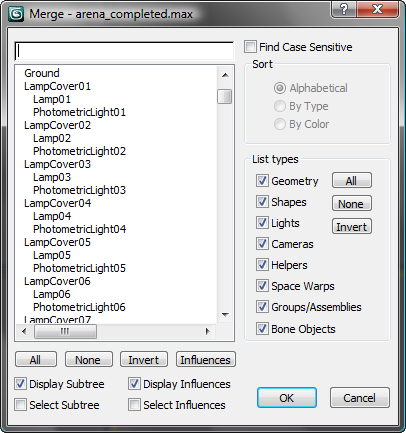
If you can access the Merge dialog, use it to view a list of the components in the scene. This helps to locate the corrupted object that is causing the load failure. Once you find the corrupted object, exclude it from the file and resave.
To use the Merge menu to locate corrupted objects:
- Start 3ds Max.
- Choose File
 Import
  Merge.
The Merge dialog and shows every component in the scene.
- Select the model, click Open, and see if any of the objects or shapes in the scene are corrupt.
- In the List Types group on the right, turn off all options except Geometry, Shapes, and Groups/Assemblies.
- Click
All, and then
OK.
If the objects appear in the Viewport, it means that those scene components are not corrupt.
- Now, do these steps again with other List Types turned on.
When the objects merge successfully, save what you've merged ao you can use it to rebuild the scene. If you are still receiving an error message, it means one of the objects is corrupted. Do the following to locate which object in the list is corrupt. .
- Reset 3ds Max.
- Choose File
 Merge again. and turn off everything except
Geometry,
Shapes, and
Groups/Assemblies.
- This time, select the first
ten objects in the list of components and click OK.
If those objects merge successfully, save the scene and repeat this process with the next set of 10 objects.
- Continue to go through the objects in your scene until you have located the object that reports the error.
- Once you've found the corrupt object, reset 3ds Max and merge all the objects and components but not the corrupted object that you found.
- After everything is merged, save the scene and rebuild the object that was corrupt.
This process is long, but helps you keep some of your work.
Remember Backup Files
By default, the 3ds Max auto backup feature is active, and writes a backup file every five minutes while you're editing the scene for a total of three files. Using backup files is especially helpful if your file became corrupt due to a system crash or power outage.
By default, the /autoback path depends on the operating system you are using:
- Windows:
/users/<username>/my documents/3dsmax/autoback/
If you have set a project folder, the /autoback folder is in that project.
- Start 3ds Max and make sure that the scene cannot load.
- Open Windows Explorer and browse to the \autoback folder.
- Highlight
autobackup01.max and copy the file (Edit
 Copy or
Ctrl+C).
- Browse to the
\scenes
folder, and paste the file.
If you want, you can rename the backup scene file.
- In
3ds Max, choose File
 Open and load the file you copied from the
\autoback
folder.
If it opens, save the scene and rebuild what you lost in the last five minutes.
If you want to customize the Auto Backup settings, change them in the Files panel of the Preference Settings dialog, available with the Preferences command on the Customize menu.