
Symmetry Plane
Set Symmetry Plane
Lets you set the plane across which the automatic symmetrical halves of objects on the layer will be displayed.
Create Symmetric Geometry
Creates real objects from the automatically displayed symmetrical halves.
Symmetry Plane workflows
Set the plane across which the model will be mirrored
- Click the layer(s) for which you want to set the symmetry plane.
- Choose Layers > Symmetry Plane > Set Symmetry Plane.
- Use the plane manipulator to set the symmetry plane:
- Click Set Plane.
How do I use the plane manipulator?
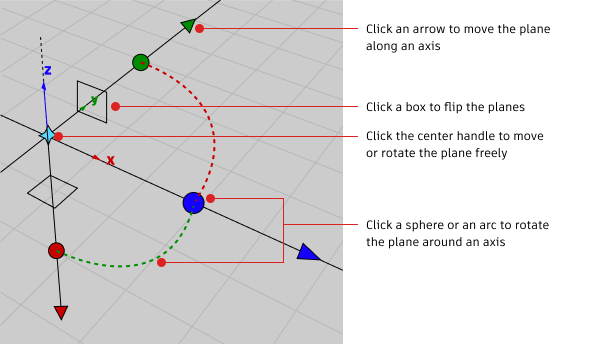
- To quickly snap the manipulator to the end of a curve, click the center move handle, then use curve snapping to snap the manipulator to the curve.
- Drag a handle to move or rotate.
- Click an arrow to change the center handle to the free move handle. Then drag the center handle to move the plane.
- Click a sphere to change the center handle to the free rotate handle. Then drag the center handle to rotate the plane.
Show or hide mirrored geometry
Click the name of a layer that has a symmetry plane set.
A light blue outline appears around the name of the layer.
Do one of the following:
- Choose Layers > Symmetry > On to show the mirrored half for this layer.
- Choose Layers > Symmetry > Off to hide the mirrored half for this layer.
Alternatively, if the Object Lister is open (Windows > Object Lister), click the Layer Symmetry Icon to toggle symmetry on ![]() and off
and off ![]() .
.
Note: If the Layer Symmetry Icon is not visible, select it from the Filter menu. The icon also displays the layer color.
Convert a mirrored half into real geometry
Select the layer or layers on which you want to convert the mirrored geometry.
Choose Layers > Symmetry Plane > Create Symmetric Geometry.
Note: The mirrored geometry becomes new geometry and is no longer affected by changes to the other half.Tip: The geometry on the layer or layers is still being mirrored. To improve performance, turn symmetry off in the Layers menu.