Publish Models to Assemble with the Revit, AutoCAD, or Civil 3D Add-in
Publishing with the Autodesk Add-in
Publishing model information is easy with the Assemble Add-in. Download the add-in at Assemble Add-in Downloads.
The add-in extracts data such as built-in parameters, custom parameters, and geometry (in Autodesk Revit) and publishes that information to Assemble for analysis, management, and verification.
When you are ready to publish your model data, the Assemble Add-in sends all of your model information directly to one or more existing models in Assemble. It can also send information to a new model that you can create within a specific project. A project can contain multiple models and models can have multiple versions.
You can also publish linked models to Assemble. You'll want to verify that the linked models are loaded so that the the Assemble Publisher and Publisher Wizard recognizes them.
To learn more about what file types we support, visit Supported Models in Assemble.
Autodesk Revit
When publishing models from Revit, the Assemble Add-in publishes shared parameters, project parameters, custom user parameters, and geometric data to Assemble.
The Assemble Add-in publishes elements from your main model, including elements that are not visible in your current view or which have been turned off in the Visibility/Graphics window.
Assemble also allows the user to publish multiple primary design options. The design options can be published as versions of a model for cost comparisons or inventory comparisons. To publish multiple design options, identify the design option to publish, and click the Make Primary button in Revit. Then, use the Assemble Publisher Add-in to publish the model to Assemble. Repeat the process with each design option to be published.
Autodesk AutoCAD and Autodesk Civil 3D
When publishing models from AutoCAD, the Assemble Add-in publishes the properties of multi-view parts (MVP), the properties of many third party objects, and block attributes.
Assemble will also publish your main model and any attached references (xrefs). If you do not want the quantities from the external references included in your Assemble inventory, uncheck the check box in the publishing wizard for models that you do not want to publish.
To publish your model
Open a model in Revit, AutoCAD, or Civil3D.
Go Assemble > Publish >
 .
.The Assemble dialog appears.

Enter the URL of the account where you want to publish the model. Select Connect.
The Select a Project dialog opens.
Do one of the following.
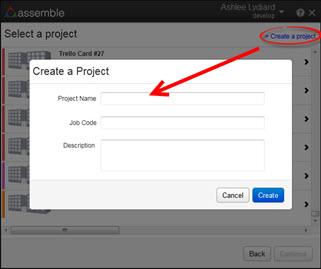
Select + Create a project in the top, right corner of the dialog.

a) Enter the Project Name.
b) Enter a Job Code (optional).
c) Enter a Description (optional).
d) Select Create.Select an existing Assemble project from the list.

The Select Models to Publish dialog appears.

Get your project data ready to publish.
Select Filter using current view's visibility/graphics overrides at the top of the dialog to publish the model(s) using the visibility graphic settings of the design tool. Or, skip this step.
Learn more about Visibility/Graphics settings.
Select an element mesh detail. There are three: Fine, Medium or Course.
Do one of the following to publish your project:
Select an existing Assemble model to publish your project.
Select multiple Assemble models to merge, then publish your project.
In the drop-down list for the model(s), select Create model... to create a new Assemble model to publish your project.
- In Model Name, enter a name for the new model.
- In Description, enter a description for the new model.
- Select Create.
Select Continue.
The Select Sheets dialog appears.
Select one of the following.
Publish sheets from the Revit sheet set. In the drop-down, select the sheet set.
Publish all sheets in the current Revit project.
Do not publish sheets. Only publish 3D and model data.
Note: Autodesk suggests that you publish all sheet sets, but recognizes that sheet publishing times vary. If publishing all the sheets is time consuming, you may want to only publish a particular sheet set, or not publish the sheet sets at all.The Publish a new version of your models dialog appears.

In Version Name, a version number for the project displays. For example, if this is the first time publishing, the project version is V1. Enter any additional information about the project next to the version number.
In the Version Comment, enter any other information specific to the project (optional).
Select Publish.
Assemble begins publishing the project data. Once a model is uploaed, a link to View your Project will appear at the bottom of the page.

Click View your Project or go to the project in Assemble and find the model in the model panel to see the processing status of your model.

