
Camera Tracking Settings
Camera Tracking Settings
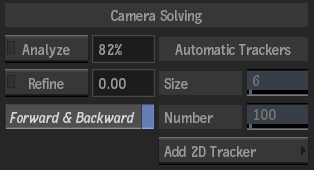
Use the settings in the Camera Solving section to perform an automatic 3D track.
Camera Tracking button
Displays the Camera Tracking menu, where you can track based on the settings of the camera.
Not shown in the screenshot above.
Analyze button
Click to analyze the image (when complete, Analyze button changes to Update).
Update button
Click to delete all previous 3D points, and start tracking based on new information.
Not shown in the screenshot above.
Analyze Progress field
Displays the progress of analyzing or updating. Non-editable.
Refine button
Click to use the current results of the track analysis as a starting point, and refine from this point. Click Refine again to stop the process.
Pixel Error Value field
Displays a representation of the distance of 2D tracks from repositioned 3D points. Non-editable.
Forward & Backward button
Enable to track the image sequence backward after the forward tracking has completed.
Size field
Displays the size of the trackers. Editable.
Number field
Displays the number of 2D tracks created by the analysis. Editable.
Add 2D Tracker button
Click to enter the Stabilizer to add manual trackers.
Reset Tracker button
Resets all tracker data in the Analyzer menu.
Not shown in the screenshot above.
Tracker Display Settings
The settings help you view your trackers in the image window.
![]()
Tracker Display button
Enable to display 2D tracks in the image.
Tracker Display colour pot
Displays the colour of the trackers. Editable.
Point Cloud Display button
Enable to display 3D tracker points in your image.
Points Display colour pot
Displays the colour of the points. Editable.
Transparency field
Displays the transparency level of the trackers and points in the image. Editable.
Point Size field
Displays the size of the 3D points in the image. Editable.
Grid box
Select the type of grid to display in the scene. Use to position objects in the scene more accurately.
| Select: | To: |
|---|---|
| Grid Off | Disable the grid. |
| Grid XY | Use a grid constructed on the X and Y planes. |
| Grid XZ | Use a grid constructed on the X and Z planes. The XZ grid is visible only when the camera is moved from its default position. |
| Grid YZ | Use a grid constructed on the Y and Z planes. The YZ grid is visible only when the camera is moved from its default position. |
You can change the display of the perspective grid with the following settings (available when Perspective Based is selected in the Focal Length box in the Analysis tab):
Show Perspective button
Enable to display the grid corners in the Analyzer view.
Grid button
Enable to display the perspective grid in the Analyzer view.
Grid Colour pot
Displays the colour of the grid lines. Click to change the colour.
Magnifier button
Enable to display the magnifier while dragging a corner of the perspective grid rectangle.
Zoom field
Displays the zoom factor of the magnifier. Editable up to 5x.