
Import network data from CSV files. You can update or delete existing network objects, or you can add new objects.
The files have to be in an appropriate format and may need specific filenames. Further details on format requirements can be found in CSV file formats.
Full details about how to update networks can be found in the Updating Networks topic.
To import a network from CSV files
- Right-click the Model Group in either the Model Group window or Explorer window.
- Choose Import
 Network from CSV files from the context menu. This displays the Import CSV Data dialog.
- Choose the appropriate options from the dialog:
- Choose whether data fields without specified units are to be imported using the current User Units or as InfoWorks WS Pro Native Units. It is up to you to ensure that the units are appropriate for your data.
- The dialog allows you to choose a flag to attach to all the imported data. For each field:
- if the field has a corresponding flag field in the CSV file, the flag from the CSV file will be applied, even if this is blank.
- if there is no flag field in the file and you select a flag here, the imported field will be given the selected flag (assuming flags are valid for this field).
- Select the format of the table header lines in the CSV file from the following options:
- IDs: Select this option if only the Database field name is included as a header in the CSV file.
- IDs, Descriptions: The Descriptions line will be ignored on import
- IDs, Units: The importer will read the Units line. Any suitable units for a field will be used on import, otherwise the User Units or as InfoWorks WS Pro Native Units selected above will be used.
- IDs, Descriptions, Units: The importer ignores the Descriptions line. The Units line is read and used as described above.
- Click OK to continue. This displays a standard Windows File dialog.
- Choose one or more CSV files to import and click Open when ready. The next thing that happen is the same standard Windows File dialog is displayed to give you an opportunity to add more files to the import. This means you can choose files from different directories. Continue choosing files and clicking Open until you have selected all your files. To continue with import, you should click on the file dialog.
- You will be offered a default name for the network. You can change this name if you want. Click OK to complete the import.
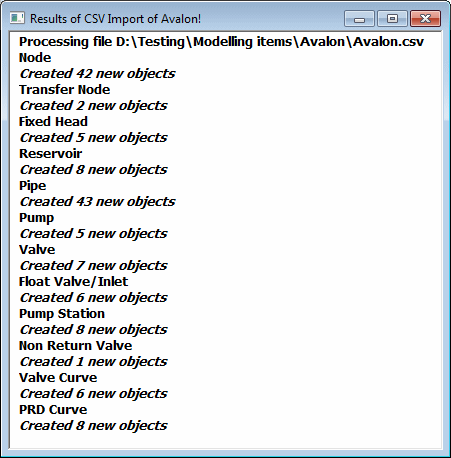
- Finally, a report is displayed, listing the results of the import.
You may import using CSV files if you want to:
- Re-import data that you have exported to another package for additional processing.
- Store data elsewhere in some central repository.
- Use InfoWorks WS Pro as a central repository for data you use with other software.