
MotionMaker: Attribute Editor
MotionMaker Editor vs. Attribute Editor:
Most animation work is intended to be done directly in the MotionMaker Editor. It offers a time-based workspace with tools like layers and path controller tools for efficient motion creation. The Attribute Editor is available for fine-tuning or inspecting node-level details, but it is typically used when deeper control or troubleshooting is needed.
momaCharacter Node
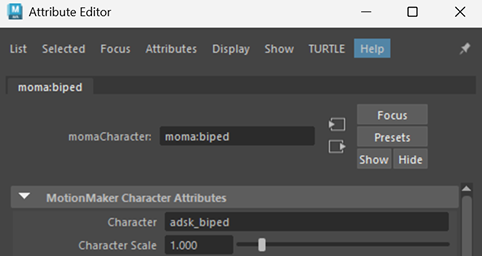
MotionMaker Character Attributes
Character: Displays the type of character definition used by the current momaCharacter node. If the node was created using the motionMaker command, this field is read-only and reflects the character type specified during creation.
Character Scale: Changes the overall size of a character in the scene. For example, setting the scale to 2 makes the character twice as big. After changing the scale, regenerate the motion to ensure the animation “fits” the new character size.
momaGenerator Node
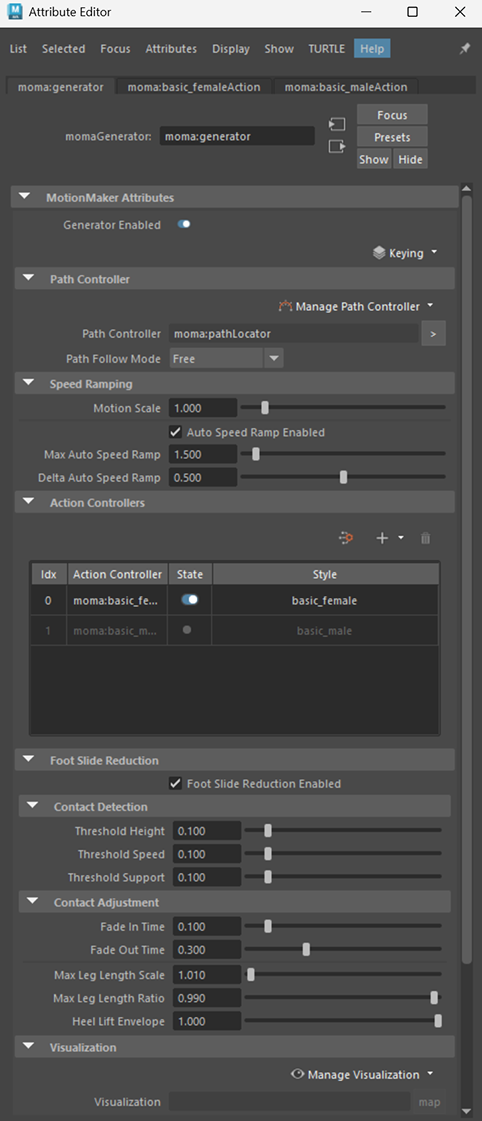
MotionMaker attributes
Generator Enabled: A simple on/off toggle for the currently selected motion generator. When enabled, the generator is active and will be used to generate animation.
Keying: Contains actions for managing keyframes set on the character’s joints.
Set Character Keys: Adds keyframes to the character’s joints using their current values at the active frame.
Copy Character Keys: Copies the current joint values of the character to the clipboard.
Paste Character Keys on Path (Options) Pastes joint keyframes from the clipboard onto the character. The paste location depends on the selected Anchor Point option. Joint transformations are converted from the path locator’s coordinate system at the time of copy to the coordinate system at the time of paste.
Anchor Point:
- Front: Pastes the keyframes starting at the current frame.
- Center: Pastes the keyframes so the current frame aligns with the middle of the pasted keyframes.
- Back: Pastes the keyframes so they end at the current frame, adding keyframes before and up to that point.
Placement:
- All on Path: When pasting a range of keyframes, each joint transformation is adjusted to match the path locator’s coordinate system at the destination frame.
- Relative to Anchor Point: When pasting a range of keyframes, all joint transformations are adjusted using the path locator’s coordinate system at the first destination frame.
Delete Character Keys (Options)
- Time Range: Selects how the time range is defined for keyframe operations.
- Only in Active Window: When enabled, keyframes are pasted only within the current time selection.
Select Joints: Select the character's joints.
Note: Attribute changes affect only the generator shown at the top of the Attribute Editor. This is usually the selected generator, but may differ if the Attribute Editor is pinned or floating.
Path Controller
Manage Path Controller:
- Set Selected as Path Control: Assigns the selected node as the path controller.
- Clear Path Control: Disconnects the current path controller from the generator without deleting the path control node.
- Create New Path Locator: Creates a new path locator node and connects it to the generator.
Path Controller: The path controller currently linked to the momaGenerator.
Path Follow Mode: Controls how closely the character follows the assigned path:
- Free Mode: Character tries to follow the path naturally, not tightly constrained.
- Snap Location: Character’s position is always snapped directly onto the path.
- Snap Full: Character is forced to be on the path at the current time, strictly following it.
Speed Ramping
Motion Scale: Adjusts how fast or slow the character moves along the path. Values below 1 slow the motion; values above 1 speed it up.
Auto Speed Ramp Enabled: Turns the Auto Speed Ramp function on or off.
Max Auto Speed Ramp: Sets the maximum speed multiplier the system can use to help the character catch up to the path locator position.
Delta Auto Speed Ramp: Sets the maximum amount the speed can increase between frames when the character is trying to catch up to the path locator position.
Action Controllers
Generate Motion Button: Generates motion for the currently selected generator only. Use this to update just one generator’s animation without affecting others.
Add a New Action Style Button: Imports a new action style into the current scene. This does not import a new character.
Delete Style Button: Removes a selected action style from the list.
Action Controls Table
- Idx: The index of the action style. Lower index values have higher priority when action clips overlap.
- Action Controller: The name of the action controller node.
- State: Indicates whether the action style is enabled. Only enabled styles are used when generating motion.
- Style: The type/name of the action style.
Foot Slide Reduction
Foot Slide Reduction Enabled: This box enables and disables the Foot Slide Reduction function.
Contact Detection
Threshold Height: Controls how close the foot must be to the ground to count as a contact event. Smaller values mean the foot must be very near the ground.
Threshold Speed: Controls how slow the foot must be moving to count as a contact event. Smaller values mean the foot must be almost still.
Threshold Support: Controls how close the leg must be to a support pose to count as a contact event. Smaller values require the leg to be closer to its support position.
Contact Adjustment
Fade In Time: The amount of time (in seconds) before a contact event starts, during which the leg gradually begins to adjust for slide reduction.
Fade Out Time: The amount of time (in seconds) after a contact event ends, during which the leg smoothly transitions out of slide reduction and back to the original motion.
Max Length Scale: The maximum amount the leg is allowed to stretch to keep the foot on the ground.
Max Leg Length Ratio: The ratio of leg length at which heel lift compensation begins. When the leg reaches this length, the system starts to lift the heel if needed.
Heel Lift Envelope: Sets how much the heel can lift off the ground to help keep the foot planted. A value of 0.0 turns this off; 1.0 allows full use.
Visualization
Manage Visualization:
- Set Selected as Visualization Node: Assigns the selected node as the visualization node.
- Clear Visualization Node: Disconnects the current visualization node from the generator without deleting the visualization node.
- Create New Visualization Node: Creates a new visualization node and connects it to the generator.
Visualization: The name of the connected visualization node.
momaVisualization Node
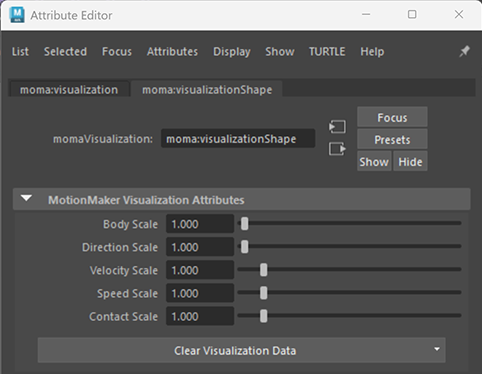
MotionMaker Visualization Attributes
Body Scale: Adjusts the size of the sample points in the visualization for easier viewing.
Direction Scale: Adjusts the size of direction vectors in the visualization to improve visibility.
Velocity Scale: Adjusts how large the velocity arrows appear in the visualization, useful for debugging.
Speed Scale: Adjusts the size of speed indicators in the visualization.
Contact Scale: Changes the size of foot contact points in the visualization. Only applies when Foot Slide Reduction is enabled.
momaPathLocator Node
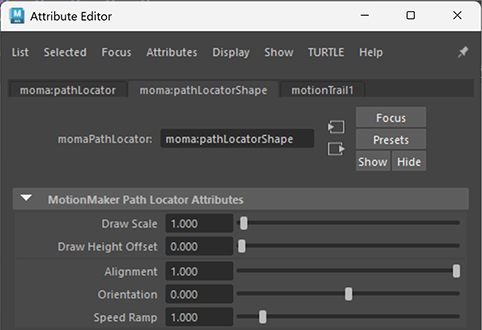
MotionMaker Path Locator Attributes
Draw Scale: Changes the visual size of the path locator for easier selection and viewing.
Draw Height Offset: Raises or lowers the path locator above the ground to match the character’s foot height and improve visibility.
Alignment: Automatically aligns the character’s facing direction to the path when enabled. When disabled, the direction can be set manually.
Orientation: Manually sets the character’s facing direction. Can be animated for custom orientation over time.
Speed Ramp: Enables keyframing of speed changes along the path, allowing the character to accelerate or decelerate at specific points.