While working in Robot, you define many labels describing bars, panels, or solid parameters. These are different sets of parameters used to determine physical and mechanical properties, or applied to design structure elements. Examples of such labels include: bar sections, slab thicknesses, parameter sets used to design steel structure elements, or applied to reinforcement calculations in RC structure elements, as well as definitions of supports, hinges, and so on.
Open the Label Manager dialog using either method:
- Select Tools menu > Label Manager.
- Click
 icon.
icon.
Also, clicking ![]() on the dialogs used for defining labels (Sections, Supports, Releases, and so on). The Label Manager is available for all structure types.
on the dialogs used for defining labels (Sections, Supports, Releases, and so on). The Label Manager is available for all structure types.

The Label Manager stores a library of labels for structure elements, such as, supports, releases, sections, and code parameters. In this library, you can save a user-defined label so you can use it in other structure projects.
The Label Manager does the following:
- Saves labels from the current project to the database.
- Read labels from the database to the current project.
- Views the contents of label definitions.
- Transfers the labels defined from one program installation to another, or from one workstation to another.
Remember that member code labels (that is, steel or aluminum member types, timber member types, concrete member types) are converted to the current design code for steel, timber or RC (theoretical (required) reinforcement) structures. Therefore, member types defined for one code should not be used with other codes, because certain parameters might lose some of their definition. All bars in a given project are designed according to the currently selected code.
For a label for plate and shell reinforcement, it is saved for a specific code of RC structure design (theoretical (required) reinforcement). Therefore, labels for panel reinforcement types can be applied to different projects.
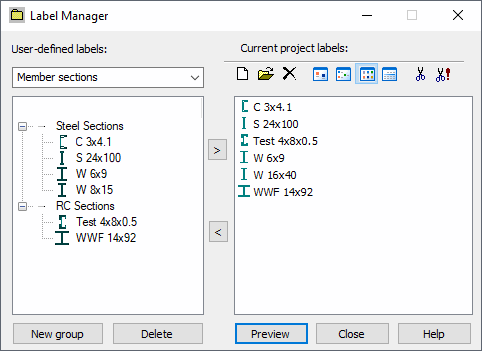
The dialog has the following:
- The User-defined labels field displays the available label types from which you can select a label type (sections, supports, and so on) to be viewed.
- To the left, a list displays user-defined labels saved in the database. Which list displays depends on the label type selected from User-defined labels.
Labels are saved in user-defined groups. Options for allowing modification of the group treelike structure are available in the context menu
- To the right, a list displays the labels in the current project for the label types selected from User-defined labels.
- Above list of project labels, there is a toolbar with buttons for for adding and deleting label definitions.
Clicking Preview opens the dialog used to define a selected label in such a manner that its contents correspond to the label. Contents of a label definition can also be previewed by double-clicking an element in the.
You can select multiple objects on the left-hand side of the dialog, using Ctrl and Shift.
When using the treelike list:
- The first group is created automatically with a text field for defining a name.
- Highlighting (selecting) refers either to a group or to labels in a group.
- Only one group can be selected; however, for labels , you can select any number of them.
Right-clicking the mouse when it is positioned over the left window of the dialog, displays the shortcut menu with the following options:
- Copy
- Move - Moves a selected label to a different group within the same database (selecting Move opens a dialog to select a target group).
- Open - Expands a group after highlighting the group name or previews a label after selecting it.
- Delete - Deletes a group or label.
- New group and Change name are used for group editing.
Two buttons at the bottom of the dialog box: New group and Delete perform the same action as selecting the corresponding options from the shortcut menu.
See also:
