
Use this sample study type with Generative Design in Revit to generate alternatives for placing objects in a room using a rectangular grid or a stepped (diamond) grid.
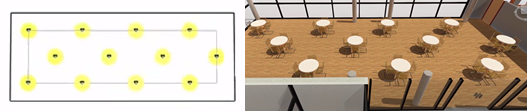
The left image shows an outcome in Generative Design. The right image shows the outcome when it's integrated into the Revit model.
In this topic
- About this study type
- Goals
- Accessing the study type
- Preparing the model
- Inputs
- Outputs
- Known issues and limitations
About this study type
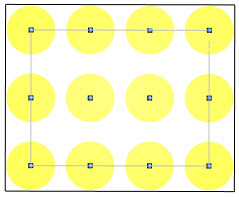
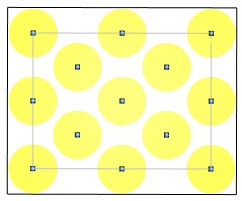
| Rectangular grid | Stepped grid |
|---|---|
|
|
| In a rectangular grid, elements are aligned on both the X and Y axes. Use this formation when you need regularity and straight lines of circulation between elements. A rectangular grid is often used for placing items such as beds in a hospital ward or school desks in a classroom.
To use a rectangular grid, in the Create Study dialog, select Grid Object Placement. |
In a stepped grid, objects create a diamond pattern. To avoid a rigid X-Y formation, they don't align on each axis. Use this formation to place items such as dining tables in a cafeteria, plants in a garden, or seats in a theater.
To use a stepped grid, in the Create Study dialog, select Stepped Grid Object Placement. |
These studies use the Optimize method for object placement. They compare the percentage of total coverage of the room, the number of objects placed, and the amount by which objects may overlap their areas.
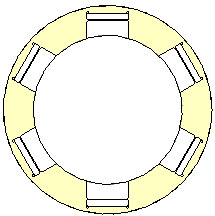
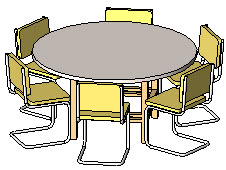
Object area: For these studies, an important concept is the object area. To determine the area covered by an object (element), the study determines the midpoint of the object. It then draws a circle from that point to the farthest edges of the object's bounding box. The resulting circle represents the object area, which is represented by the yellow circles in the above images. For example, in the following image, the yellow circle represents the boundary of the area for a nested family consisting of a table and chairs.
Origin: Another important concept is the family origin. This is the insertion point of an instance for the family type. For example, when placing a desk, the origin may be the front left leg of the desk, so that leg is used when placing the desk in the model. These studies use the origin when placing objects. The origin is also used when measuring distances between objects, and between an object and the wall. Before using this study types, check the origin for the family to be placed. As a best practice, reposition the family origin to be at or near the midpoint of the family.
Goals
Using the Optimize method to place objects in a room, typical goals are as follows:
- Maximize the number of objects and the amount of area in the room that is covered by those objects
- Minimize the amount of overlap of object areas, and objects outside the room
- Minimize changes to the positions of the X and Y grid axes
Accessing the study type
In the Create Study dialog, these study types are available from the Autodesk Samples folder.
To open the study types in Dynamo, navigate to this folder:
- %PROGRAMDATA%\Autodesk\AECGD\Revit\Samples <release>\<language-locale>
If you can't find a study type in that location, you can download them using these links. Each ZIP file contains the DYN file and its Dependencies folder. Unzip (extract) its contents to a folder on your computer.
Preparing the model
During the process of creating a study, you need to select the target room and an instance of the family to be placed.
To prepare the model
- Open the
Revit model.
If desired, you can download and use rac_advanced_sample_project.rvt with this study type.
- Open a view to display the target room.
For example, in rac_advanced_sample_project.rvt, open the 02 - Floor plan. Zoom in on the room in the upper left corner of the building, Lounge 223.
- In the room, place an instance of the desired family.
For example, in rac_advanced_sample_project.rvt, load the family Table-Dining Round with Chairs. (If you have downloaded Autodesk sample content, you can find it in the Revit library under Furniture > Tables.) Select the family with the desired table diameter and number of chairs. Then place an instance of the family in Lounge 223.
- Edit the family, and check the position of the origin. If needed,
move the origin to be at or near the midpoint of the family.
This change will result in better outcomes.
For Table-Dining Round with Chairs, the family origin is defined as the center of the table. No changes are required.
- To make it easier to select elements in the model when creating the study, turn on
visibility of
room reference lines and the category for the target instance (such as Furniture).
For example, for rac_advanced_sample_project.rvt, type VG to open the Visibility/Graphic Overrides dialog. Then expand categories to turn on visibility for the following: Rooms > Interior Fill and Reference, and Furniture.
Inputs
When creating a study, you can specify the following inputs.
Select
- Select room: In the Revit model, select the target room.
- Select family instance: Select an instance of the family type to be placed. If desired, you can select an instance of a nested family, such as Table-Dining Round with Chairs.
Choose variables
- Distance between objects - position X, Y: How far apart should the objects be placed on the X and Y axes? This is the distance between the origin (insertion point) of one object and the origin of the next object. The origin is defined as part of the family.
- Minimum distance from objects to wall: What is the minimum distance between an object (specifically, its origin) and a wall?
If you want these values to vary in the study, select the check boxes. To use a constant value, clear the check box and use the slider to set the value.
Outputs
Each outcome displays the following outputs:
- Number of objects: How many objects were placed in the room?
- Object area - overlap: How much do placed objects overlap each other's areas?
- Object area - outside room: If any objects fall outside the room boundaries, what is the total amount of that object area?
- Object area - inside room: How much of the room's surface is covered by the placed objects?
- Adjustment of X/Y distance: In this outcome, how much does the actual distance between points deviate from the value that was set for the Distance Between Objects on the X axis? on the Y axis?
Known issues and limitations
Families that are internally constructed from meshes (like plants and RPC entourage) do not have a measurable bounding box in Dynamo, so their size cannot be extracted from Dynamo. If you select one of these family types for a study, the circles in the geometry output are not drawn, and the area calculations are incorrect. The study still generates point locations, and you can use those outcomes to generate elements in the Revit model.