
Use this sample study type with Generative Design in Revit to generate alternatives to determine the best position in a room for optimal views to the outside.
The left image shows an outcome in Generative Design. The right image shows the outcome when it's integrated into the Revit model.

In this topic
- Goals
- Accessing the study type
- Preparing the model
- Inputs
- Outputs
- Geometry visualization
- Known issues and limitations
Goals
When creating a study using the Optimize method, you can choose from the following goals:
- Maximize the average angle to windows
- Maximize the View to Outside score
Average angle to windows
For each visible window, the view angle is calculated as the angle between two vectors:
- The vector that is parallel to the window's base line
- The vector from the viewpoint to the window's midpoint
A direct view is 90 degrees (perpendicular) to the window.
View to Outside score
The View to Outside score is intended to indicate the quality of views to the outside from a certain viewpoint in the room.
Accessing the study type
In the Create Study dialog, the study type is available from the Autodesk Samples folder.
To open the study type in Dynamo, navigate to this folder:
- %PROGRAMDATA%\Autodesk\AECGD\Revit\Samples <release>\<language-locale>
If you can't find the study type in that location, you can download it using the following link. The ZIP file contains the DYN file and its Dependencies folder. Unzip (extract) its contents to a folder on your computer.
Preparing the model
To create a study of this type, the Revit model must contain the following:
- A room to evaluate for optimal viewpoints.
- A movable element in the room that defines the viewpoint from which to evaluate views to outside (the target point).
This element can't be hosted on a wall or constrained in a way that would prevent it from being moved independently. For example, you can use a chair or an RPC person. The center point of this element is used to evaluate views. The direction in which the element faces is not considered during this process.
When you integrate a selected outcome, this element is moved to a new position in the room.
- Windows and/or curtain wall panels on one or more sides of the room.
These elements are converted to centerlines and used to calculate view angles and the View to Outside score.
- One or more obstacles.
The room must contain one or more elements that may obstruct a view, such as a column or a cubicle panel. If the room does not contain any natural obstacles, add one in an inner corner of the room away from windows.
To prepare the model
- Open the
Revit model.
If desired, you can download and use rac_advanced_sample_project.rvt with this study type.
- Open a view to display the target room.
For example, in rac_advanced_sample_project.rvt, open the 01 - Entry Level floor plan, and zoom into the room in the lower left corner, Instruction 115.
- Add to the room: the movable element, the windows and/or curtain wall panels, and one or more obstacles.
For rac_advanced_sample_project.rvt, Room 115 already includes curtain wall panels. For the movable object, add an RPC person or a chair. For the obstacle, add a column near an inside wall of the room. (You can remove the column later.)
Make sure that all of these elements are visible in the view so they are easy to select when creating the study.
- To make it easier to select the room, turn on visibility for rooms in the view.
Inputs
When creating a study, you can specify the following inputs.
- Select element to calculate view from: In the Revit model, select the movable element that defines the viewpoint from which to evaluate views.
- Select a room: In the Revit model, select the target room to be evaluated for views.
- Select multiple window or curtain elements: In the Revit model, select one or more windows and/or curtain panels of curtain elements. Be sure to select curtain panels, not the curtain mullions. When you have selected the windows and curtain panels, click Finish on the Options Bar.
- Select obstruction elements: In the Revit model, select one or more elements that will obstruct views. When you have selected the obstacles, click Finish on the Options Bar.
- Viewpoint position X, Y: The X and Y coordinates define the position of the viewpoint (as defined by the movable element) from which views are evaluated. Looking at a room in a plan view, consider the bottom left corner of the room to be X:0, Y:0, and the top right to be X:1, Y:1.
Note: If the room has an irregular shape or is not rectangular, the target viewpoint may be placed outside the room, resulting in blank outcomes.
Outputs
When exploring outcomes of a study, the following outputs are displayed:
- Average angle to windows
- View to Outside score
See the Goals section for more details.
Geometry visualization
The following is a sample outcome.
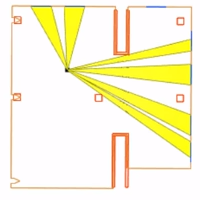
- Solid brown lines are the wall centerlines of the room's core boundary.
- Blue lines represent windows or curtain panels that provide views.
- Red lines indicate the boundaries of obstructions.
- The black dot represents the target point from which views are evaluated.
- Yellow filled areas represent unobstructed views to windows from the target point.
Known issues and limitations
- If the room boundary is not rectangular, the target viewpoint may be placed outside the room. In this case, some of the outcomes may be blank.