
Manage the connection
In this section you can find instructions for editing or deleting a connection and renewing your identity provider certificate.
Page Contents:
Renewing your identity provider certificate
Editing a connection
By editing a connection, you can modify your connection name and identity provider metadata. Additionally, you can find your Autodesk metadata (to add to your identity provider), renew your identity provider certificate, test your connection, and link verified domains.
To edit your connection, perform the following steps:
In Autodesk Account, go to User Management > By User or By Group.
Select your team from the drop-down list and click the Team Settings ⚙️ icon in the upper right-hand corner.
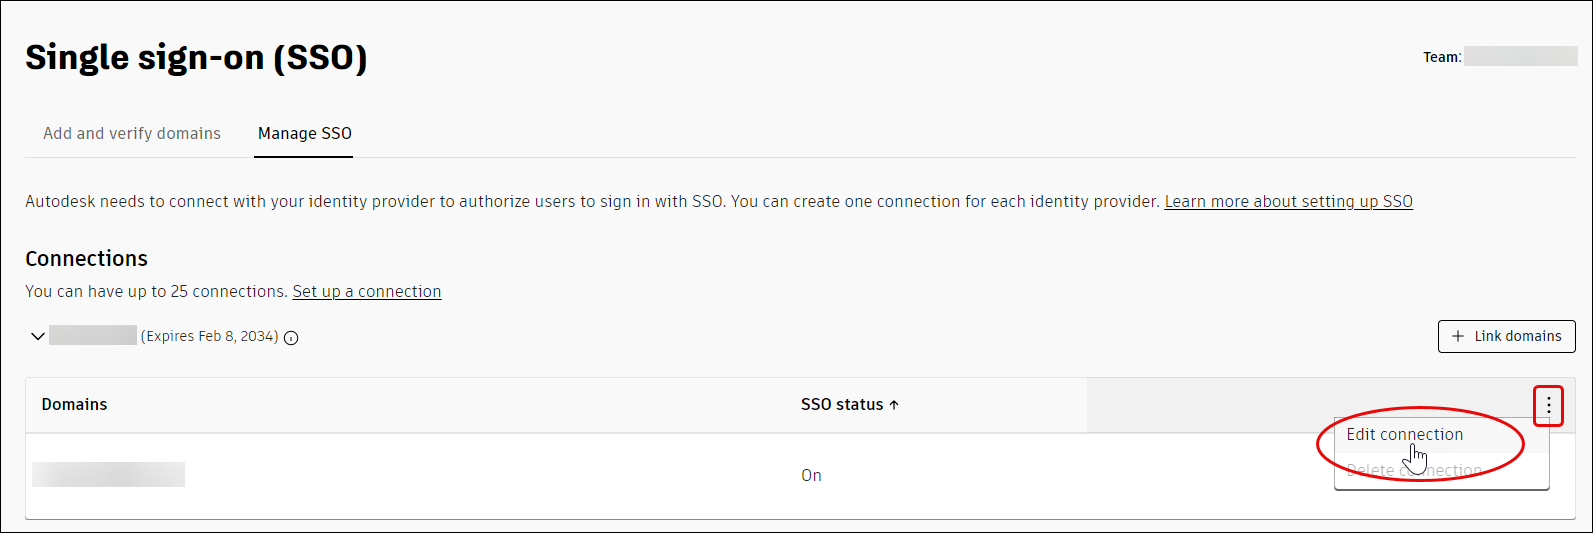
In the Settings page, go to Single sign-on (SSO) section and click Manage SSO.
In the Single sign-on (SSO) page, select Manage SSO tab and find the connection which the {domainName} domain is linked to. Click the three dots in the upper right-hand corner of the list of domains.
Click Edit connection.
Renewing your identity provider certificate
To renew your certificate, perform the following steps:
In Autodesk Account, go to User management > By User or By Group.
Select your team from the drop-down list and click the Team Settings ⚙️ icon in the upper right-hand corner.
In the Settings page, go to Single sign-on (SSO) section and click Manage SSO.
In the Single sign-on (SSO) page, select Manage SSO tab and find the connection which the {domainName} domain is linked to. Click the three dots in the upper right-hand corner of the list of domains.
Click Edit Connection.
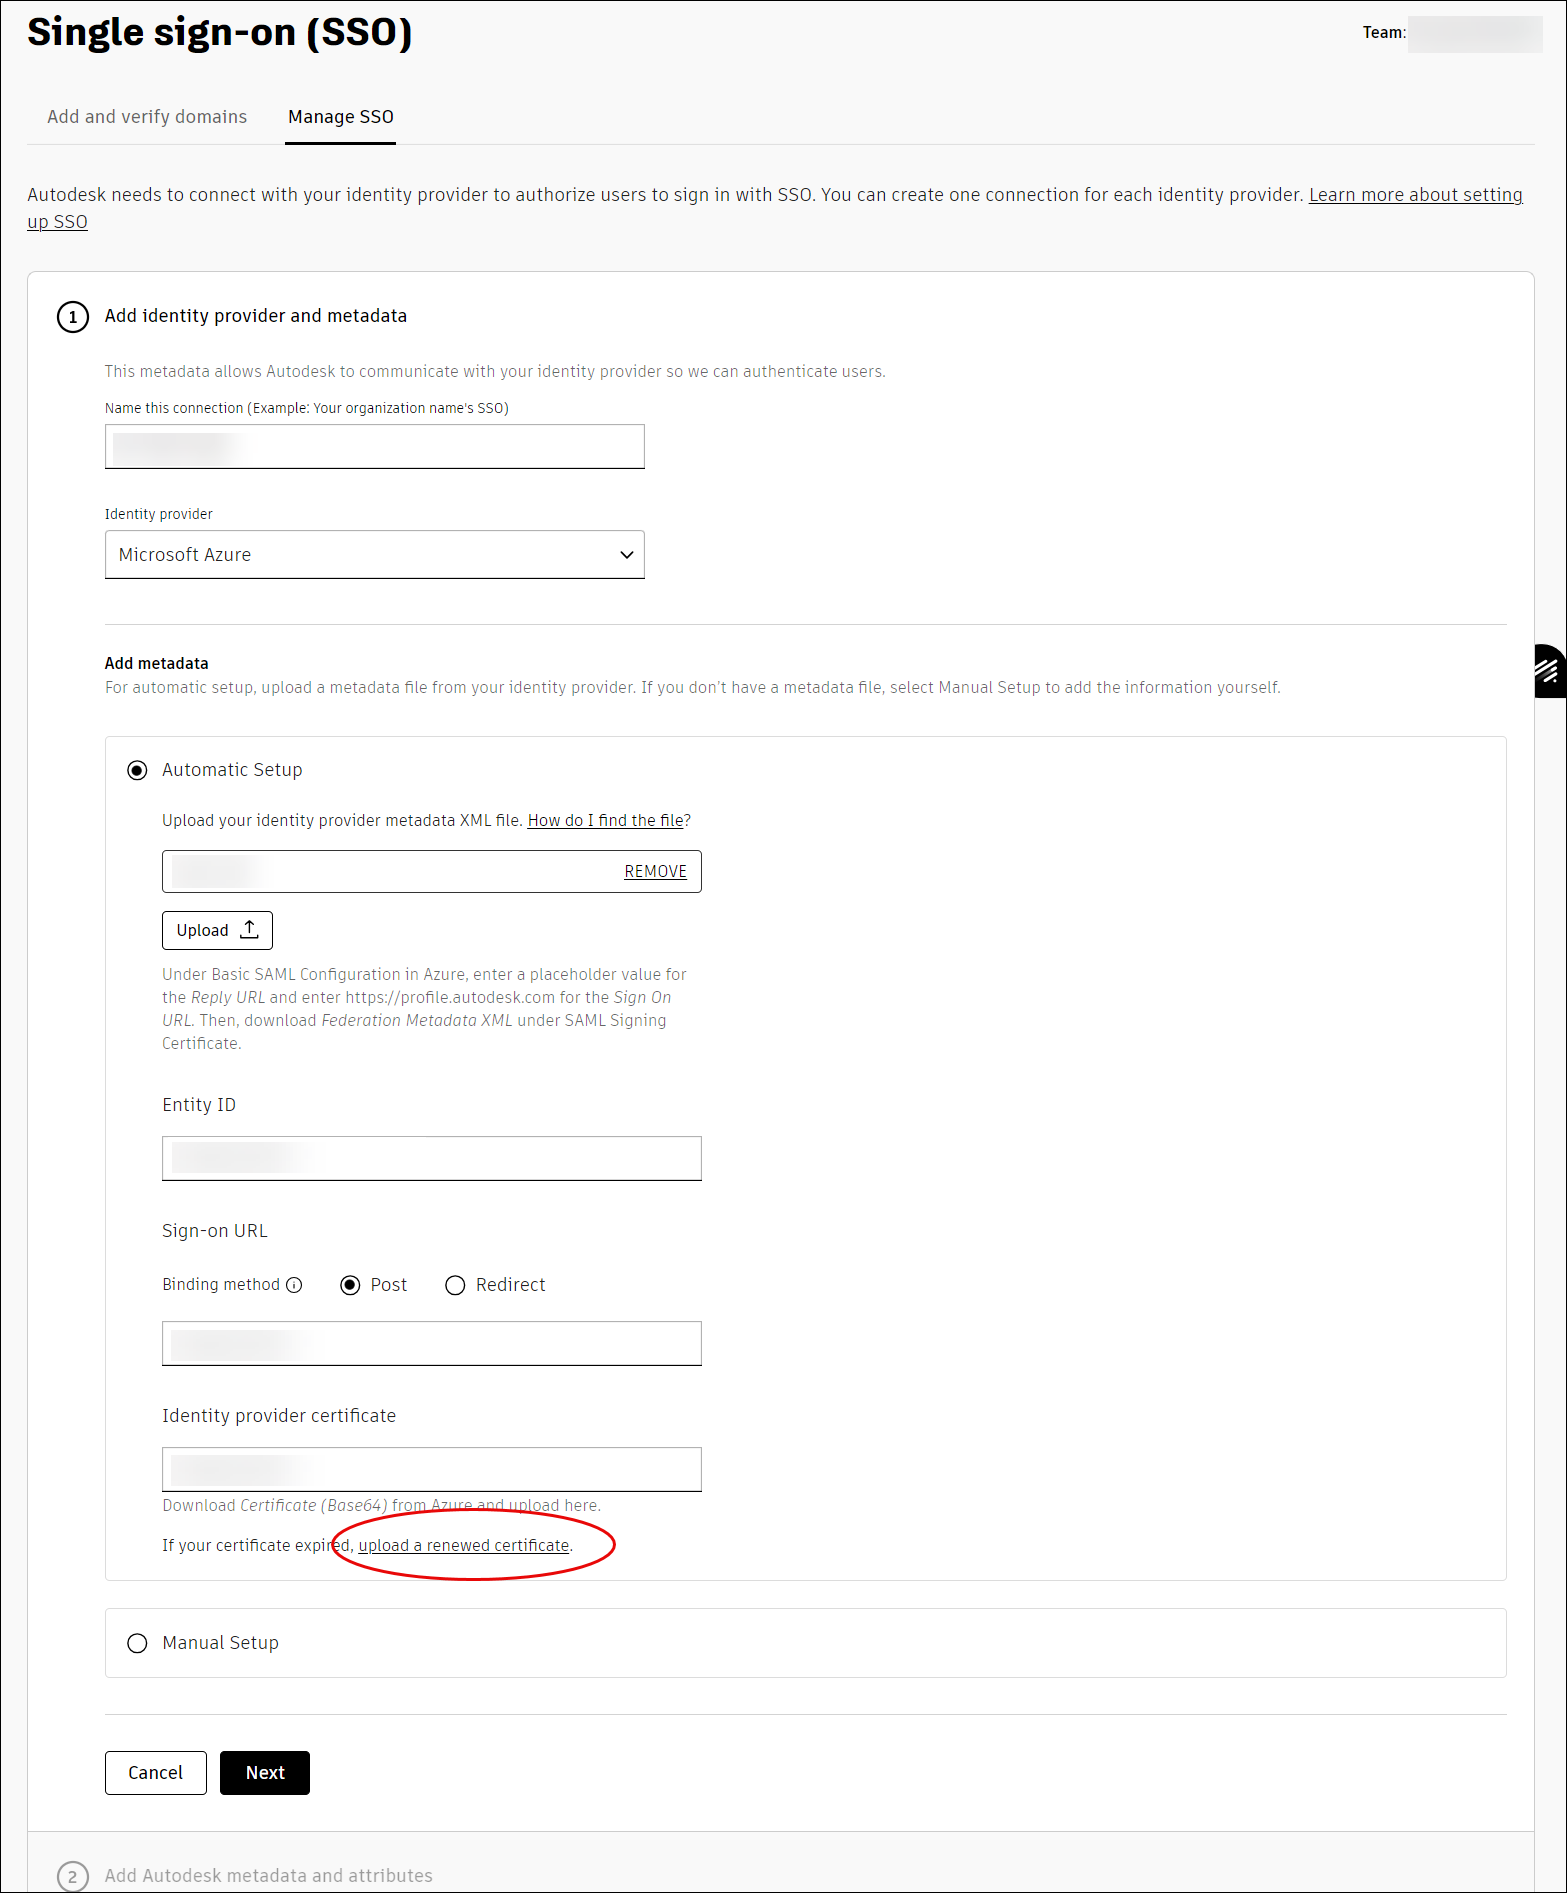
In step 1 (Add Identity provider and metadata), go to Identity provider certificate section and click upload a renewed certificate.
SSO Access: Just-in-time provisioning
When Just-in-time (JIT) provisioning is enabled, a new user will be granted SSO access during their initial sign in through the JIT provisioning process. During this process:
- The system automatically creates a user account.
- The user account is added into a designated team where SSO is configured and turned ON.
- The user account is set up with the necessary user attributes.
When JIT provisioning is disabled, new users or users who are not assigned to your team will be restricted from signing in through SSO.
In such cases, you must manually invite users to your Autodesk's team account where SSO for the domain is configured and grant them sign-in access through SSO.
Managing JIT after turning on SSO
To enable or disable JIT after turning on SSO, perform the following steps:
- In Autodesk Account, go to User management > By User or By Group.
- Select your team from the drop-down list and click the Team Settings ⚙️ icon in the upper right-hand corner.
- In the Settings page, go to Single sign-on (SSO) section and click Manage SSO.
- In the Single sign-on (SSO) page, select Manage SSO tab and find the connection which the {domainName} domain is linked to and turned on. In the right-hand corner of the list of domains click Edit SSO access.
- You can change the access by checking/unchecking the box
Allow just-in-time provisioning to give SSO access to new usersand click Save Changes.
For more information refer to the FAQ - Just in time
- Contact Autodesk Support if the user wants to unlink a domain or remove a connection after enabling or turning on SSO.
- Follow the below sequence of steps if the user wants to unlink a domain or remove a connection after disabling or turning off SSO.
Domain related Operations
Turning off SSO/domain
Definition:
- Turning off SSO disables SSO login functionality.
- User must login using their email address and password (to be setup by the individual user) instead of company credentials.
- SSO configuration can be re-enabled anytime without needing to reconfigure the domain.
Turning off SSO has the following impacts:
- For users who had existing Autodesk accounts: The user can sign in either by using their old password that was created with Autodesk prior to turning on SSO or by resetting their password.
- For users who did not have existing Autodesk accounts: The user must create a new Autodesk account.
To turn off SSO, perform the following steps:
Remove the test user (if any).
In Autodesk Account, go to User management > By User or By Group.
Select your team from the drop-down list and click the Team Settings ⚙️ icon in the upper right-hand corner.
In the Settings page, go to Single sign-on (SSO) section and click Manage SSO.
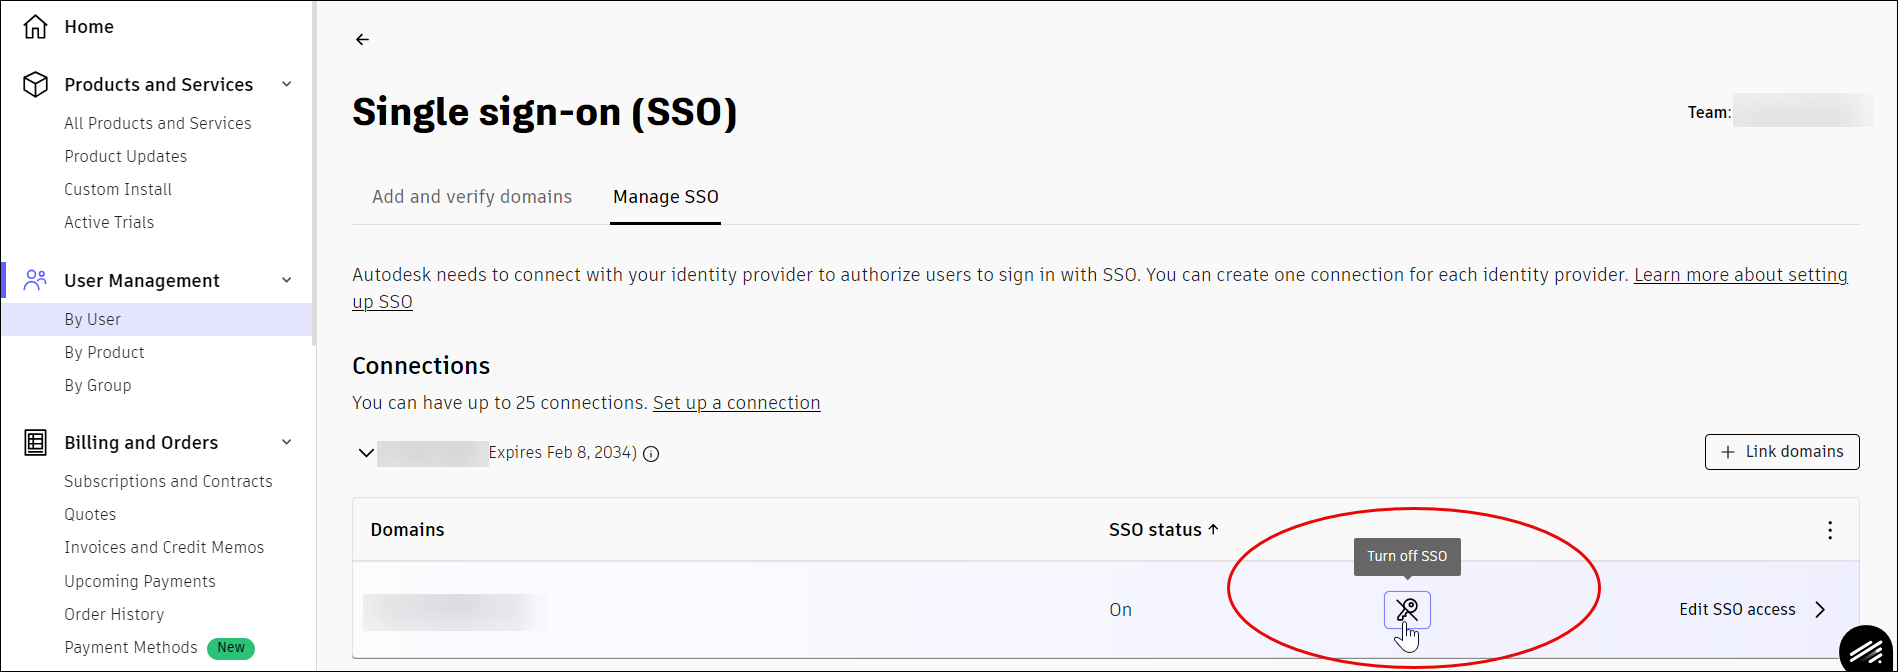
In the Single sign-on (SSO) page, select Manage SSO tab and find the connection, which is linked to the domain that you want to disable. Hover over it and click the Turn off SSO icon
 .
.
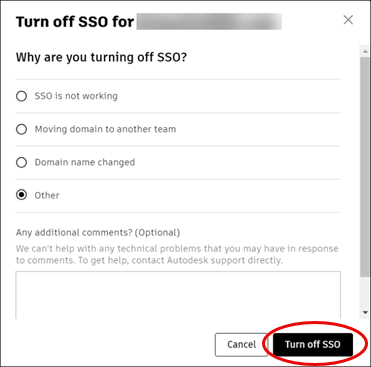
Read the information about turning off SSO and click Continue.
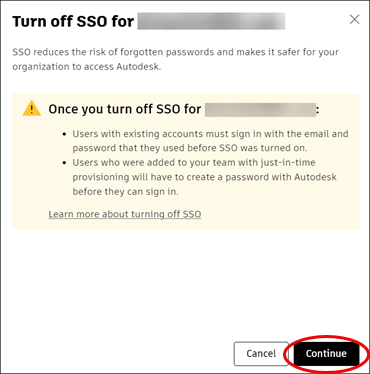
Provide a reason for why you are turning off SSO and click Turn off SSO.
After SSO is turned off, all SSO users under the domain must follow the steps to create their password or reset their password:
Sign in with the email they used for SSO and click Next.
On the password screen, click FORGOT?. An email will be sent prompting the user to reset their password.
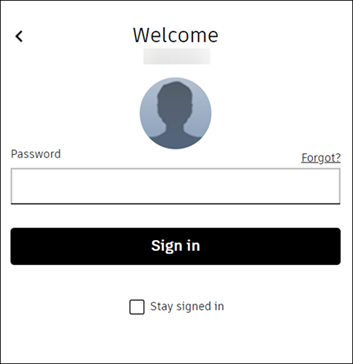
In the email, click Reset Password.
Create and confirm a new password.
Click Reset Password. Now, the user can sign in and access Autodesk products and services.
Unlink the Domain
Definition:
- Unlinking the domain removes the link between the domain and the connection.
- The domain remains verified and present in the team.
- The domain cannot be verified in another team.
- To enable the domain, user must link the domain to a connection within the team.
- To unlink the domain, it is necessary to turn off the domain.
After turning off the domain, go to the Single sign-on (SSO) page, select Manage SSO tab, find the connection, which is linked to the domain that you want to unlink. Hover over it and and click the Turn off SSO icon.
Click Test and turn on SSO to check the status of the domain.
Hover on the connection linked to the domain and click the unlink icon
 .
. 
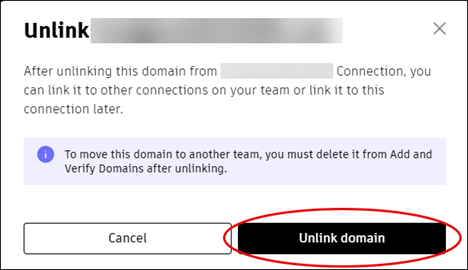
Click Unlink domain.
Delete the Domain
Definition:
- Deleting the domain permanently removes the domain from the team.
- After deletion, the domain is completely free to be added to any team.
- To delete the domain, it is necessary to unlink the domain.
Return back to the Single sign-on (SSO) page, select Add and verify domains tab, find the domain you want to delete. Hover over it and click the trash icon
 .
. 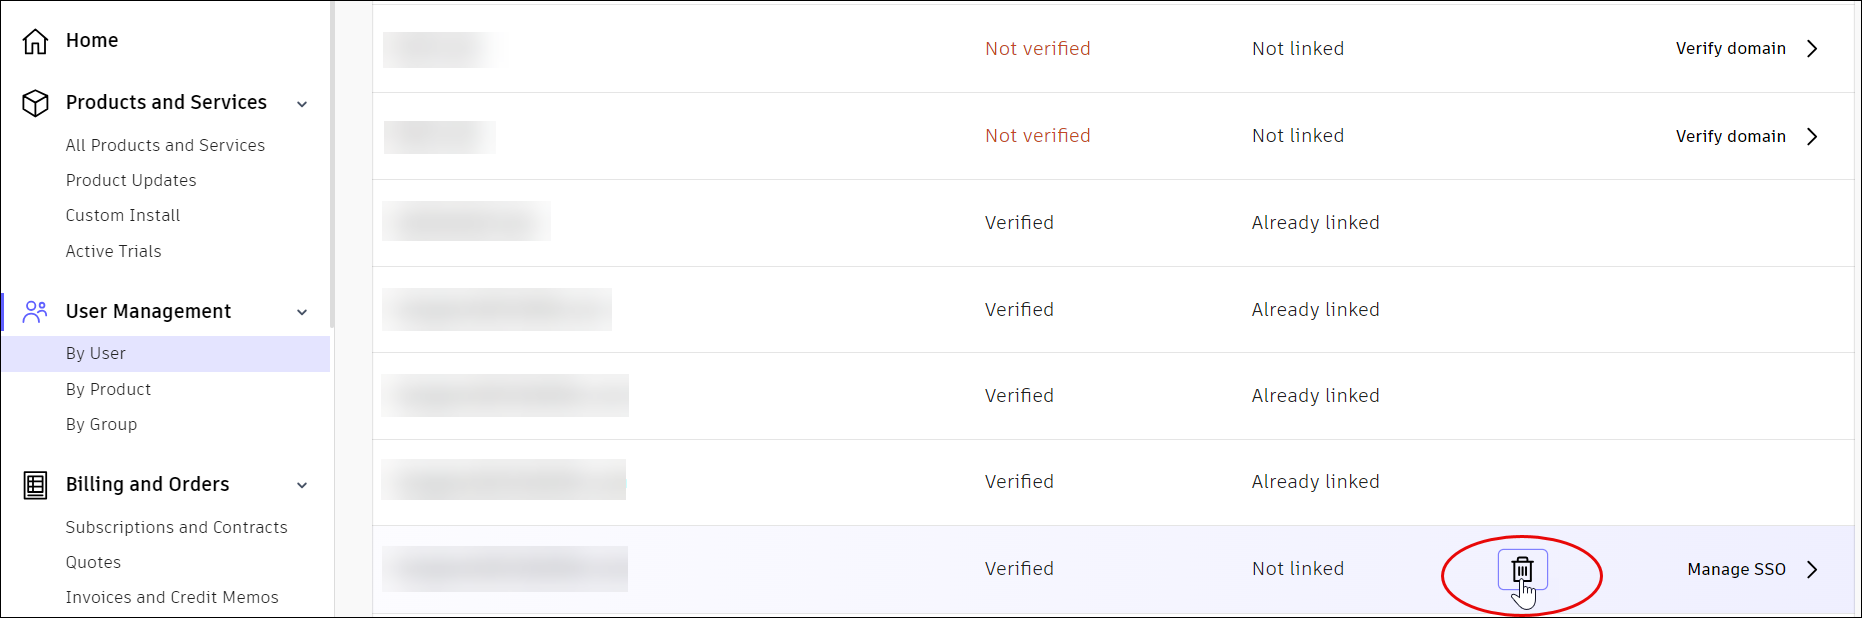
Click Delete domain.
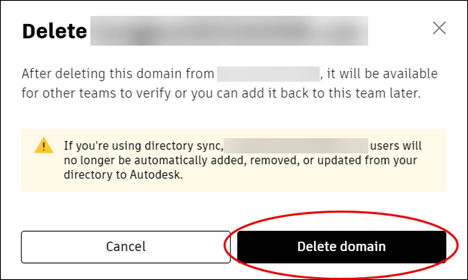
In some instances, the domain deletions may not be immediate. Refresh the page for the latest status of the deletion.
- Once the domain is deleted, a success notification will be displayed.
Moving a Domain to another team
To move the domain to another team, it is necessary to turn off the domain.
Perform all the above steps until Delete the domain.
After deleting the domain, re-create and verify the domain in another team.
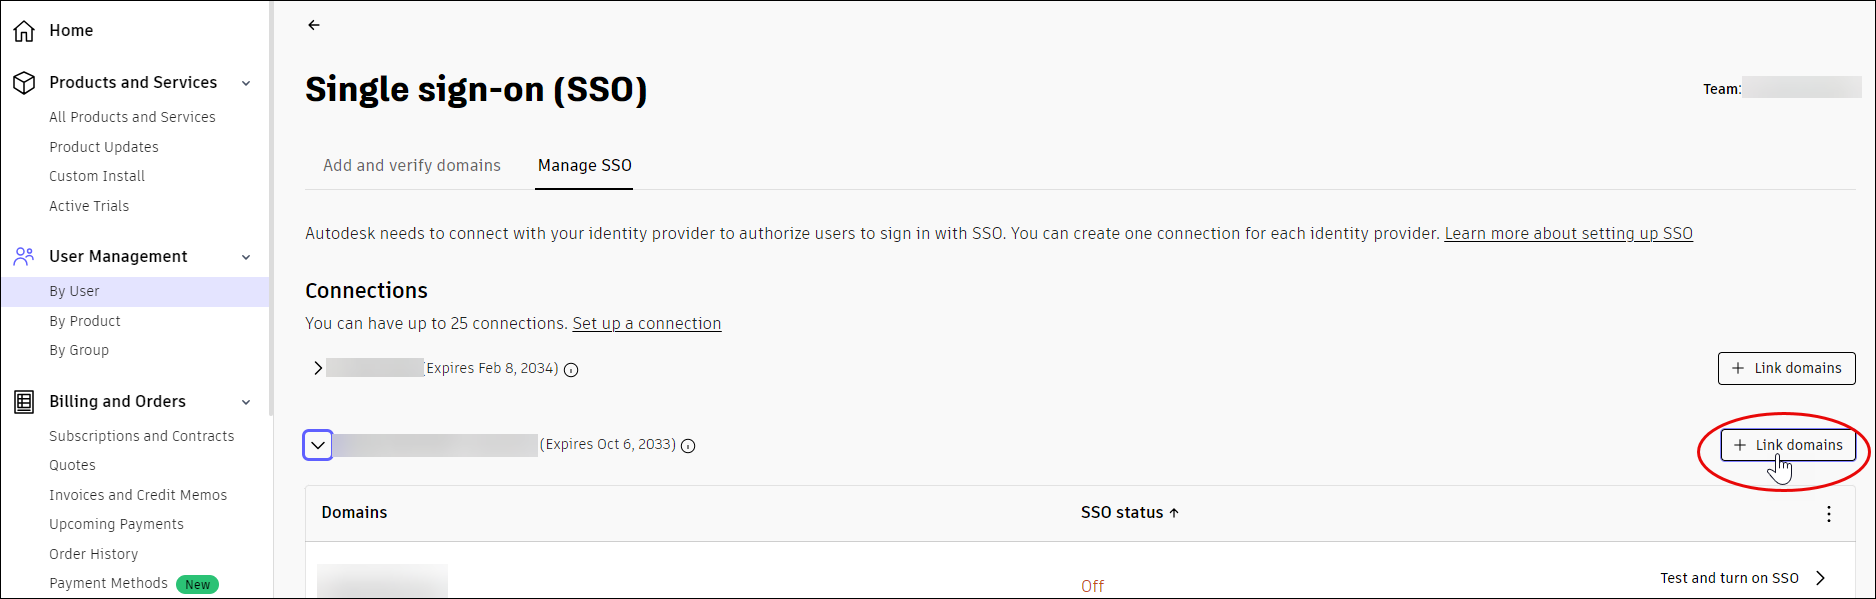
Linking the domain to another connection within the same team
The domain should be turned off, unlinked from one connection, and then linked to another connection within the same team. This does not require any domain verification again.
Perform all the above steps until Unlink the domain.
Go to the Manage SSO tab, find the connection that you want to link the domain to and click + Link domains.
If the user changes or migrates to another IDP, for example, from Azure to Okta, then refer to Set up SSO with Okta
Deleting a connection
To delete a connection, user must ensure that SSO is turned off and unlink all verified domains (see Linking domain to another connection or team) from the connection. Once all verified domains are unlinked, follow these steps:
- In Autodesk Account, go to User management > By User or By Group.
- Select your team from the drop-down list and click the Team Settings ⚙️ icon in the upper right-hand corner.
- In the Settings page, go to Single sign-on (SSO) section and click Manage SSO.
- In the Single sign-on (SSO) page, select Manage SSO tab and find the connection that you want to delete. Click the three dots in the upper right-hand corner of the list of domains.
- Click Delete connection.