
3D views provide important additional visual information for 3D models.
When you review models in 3D, it is essential to become skilled at changing viewpoints for clarity. You can specify 3D views in model space using the following two methods:
- Change 3D views dynamically with 3D Orbit
- Specify standard preset 3D views with the View Manager
Change 3D Views Dynamically
The 3D Orbit command is the most convenient way to change a 3D view dynamically. With 3D Orbit, you can click and drag the cursor to rotate the view, or press and drag the wheel of a wheel mouse to pan dynamically.
Choose Preset 3D Views
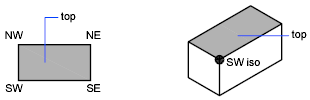
A quick way to set a view is to choose one of the predefined 3D views. You can select predefined standard orthographic and isometric views by name. These views represent commonly used options: Top, Bottom, Front, Left, Right, and Back. In addition, you can set views from isometric options: SW (southwest) Isometric, SE (southeast) Isometric, NE (northeast) Isometric, and NW (northwest) Isometric.
To understand how the isometric views work, imagine you are looking down at the top of a box. If you move toward the lower-left corner of the box, you are viewing the box from the SW Isometric View. If you move toward the upper-right corner of the box, you are viewing it from NE Isometric View.
Use Visual Styles
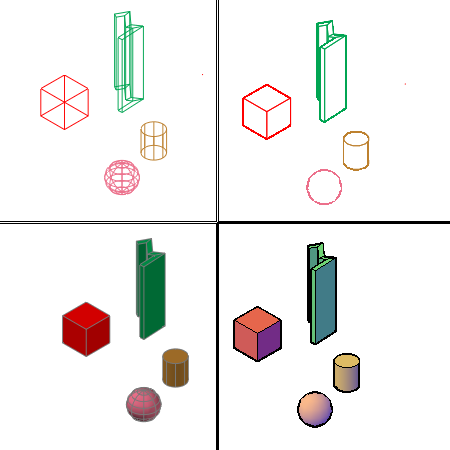
A visual style is a collection of settings that control the display of edges and shading in the viewport. The following predefined visual styles are supplied with the product.
- 2D Wireframe. Displays the objects using lines and curves to represent the boundaries. Raster and OLE objects, linetypes, and lineweights are visible.
- Conceptual. Shades the objects and smooths the edges between polygon faces. Shading uses the Gooch face style, a transition between cool and warm colors rather than dark to light. The effect is less realistic, but it can make the details of the model easier to see.
- Hidden. Displays the objects using 3D wireframe representation and hides lines representing back faces.
- Realistic. Shades the objects and smooths the edges between polygon faces. Materials that you have attached to the objects are displayed.
- Shaded. Produces a smooth shaded model.
- Shaded with Edges. Produces a smooth shaded model with visible edges.
- Shades of Gray. Produces a gray color effect by using the monochrome face color mode.
- Sketchy. Produces a hand-sketched effect by using the overhang and jitter.
- Wireframe. Displays the objects using lines and curves to represent the boundaries.
- X-ray. Changes the opacity of faces to make the whole scene partially transparent.
Procedures
To rotate a 3D view dynamically
- Click
 .
.
- Do one of the following:
- If you have more than one viewport in model space, click and drag inside the viewport that contains the 3D view.
- If you are working in a layout, click and drag inside a layout viewport that contains the 3D view.
- (Optional) If you have a wheel mouse, rotate the wheel to zoom in and out, or click and drag the wheel button and move the cursor to pan.
- Press Esc, Enter, or the Spacebar to exit the command.
To display a preset 3D view
- Do one of the following:
- If you have more than one viewport in model space, click inside the viewport that contains the preset 3D view.
- If you are working in a layout, double-click inside a layout viewport that contains the preset 3D view.
- Click
.
- In the View Manager, click Preset Views, click to display and select the desired view.
- Click Set Current.
- Click OK.
To apply a visual style in a viewport
- Do one of the following:
- If you have more than one viewport in model space, click inside the viewport where you want to apply the visual style.
- If you are working in a layout, double-click inside a layout viewport where you want to apply the visual style.
- Click
.
- Click one of the visual styles from the menu.
The selected visual style is applied to the model in the viewport.